Oh, friend, do you ever get that craving for something incredibly decadent, something that feels like a fancy pastry shop creation, but you just don’t have hours to spend in the kitchen? Maybe it’s a Sunday afternoon, and you’re dreaming of a sweet escape that’s both comforting and oh-so-elegant. That’s exactly where this Dulce de Leche Tiramisu Bowl comes into play! Forget everything you thought you knew about tiramisu being complicated. This recipe takes all the classic, beloved flavors and transforms them into an unbelievably easy, quick-to-assemble, and utterly memorable dessert. It’s like a warm hug for your taste buds, with a sophisticated twist that’ll have everyone asking for seconds. Speaking of those effortlessly elegant desserts, if you’re a fan of no-bake wonders, you absolutely have to check out my easy no-bake Oreo bars next!
Why You’ll Love Dulce de Leche Tiramisu Bowl
- Fast
- Easy
- Giftable
- Crowd-pleasing
Ingredients
Gathering your ingredients for this Tiramisu Bowl is half the fun! Each component plays a vital role in creating that perfect balance of creamy, sweet, and coffee-infused goodness.
- 6 large egg yolks: These are the magic behind that silky, rich mascarpone cream. Don’t worry, we’re heating them safely!
- ¾ cup granulated sugar: Just enough sweetness to balance the richness and bring out the flavors.
- 1 ½ cup mascarpone cheese, at room temperature: The heart of our tiramisu! Make sure it’s at room temperature for that perfect, lump-free smoothness.
- 1 ½ cup heavy cream, cold: This is what gives us that glorious, cloud-like dulce de leche whipped cream. Keep it super cold until you’re ready to whip!
- ¼ cup dulce de leche, plus 2 tablespoons: Ah, the star of the show! This adds a deep, caramelized sweetness that takes classic tiramisu to a whole new level.
- 1 pinch salt: Just a tiny bit to help balance and enhance all those sweet flavors. It’s a secret weapon in sweet recipes!
- 2 boxes soft ladyfingers (4.4-ounce each): These delicate little sponges are perfect for soaking up all that wonderful coffee flavor.
- 2 cups strong coffee or espresso, cooled: The classic tiramisu kick! Make sure it’s completely cooled before dipping your ladyfingers, or they’ll fall apart.
- ½ cup cocoa powder: For dusting dreams over the top before serving. It adds a beautiful visual and a hint of bittersweet chocolate.
- 1 chocolate bar, for shaving: A gourmet touch that makes this dessert feel extra special and impressive.
How to Make Dulce de Leche Tiramisu Bowl
Get ready for some serious kitchen fun! This recipe is all about layering simple components to create something truly spectacular.
- Prepare the Egg Yolk Mixture: Grab a heatproof bowl – a metal or glass one works great. In it, whisk together your egg yolks and granulated sugar until they’re nicely combined and a little pale. Now, here’s the trick for that smooth, safe cream: place this bowl directly over a saucepan that has about an inch or two of simmering water in it. Make sure the bottom of your bowl doesn’t touch the water, just the steam! Whisk constantly for about 5-7 minutes. You’ll see the mixture transform, becoming pale, thicker, and almost ribbons when you lift the whisk. This process is called a bain-marie, and it gently cooks the eggs without scrambling them. Once it’s done, remove the bowl from the heat and let that beautiful mixture cool down completely. Patience is key here!
- Make the Mascarpone Cream: While your egg mixture is cooling, in a separate bowl, take your room-temperature mascarpone cheese and give it a good beat until it’s super smooth and creamy. No lumps allowed! Once your egg yolk mixture is cool, gently fold it into the beaten mascarpone. Use a spatula and go slow, ensuring it’s all wonderfully combined and smooth. This is the luscious base of our tiramisu!
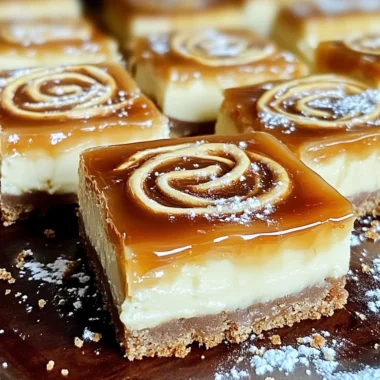
- Whip the Dulce de Leche Cream: For the best results here, make sure your heavy cream is straight from the fridge and your mixing bowl (and whisk attachments, if using an electric mixer) are chilled. I sometimes pop my bowl and whisk in the freezer for 10-15 minutes beforehand! Whip the cold heavy cream until you start to see soft peaks form. Then, add in your ¼ cup of dulce de leche and that tiny pinch of salt. Continue whipping until stiff peaks form – meaning when you lift the whisk, the peaks hold their shape beautifully. Be careful not to over-whip, or you’ll end up with butter! If you’re looking for other ways to get that rich caramel flavor, you might also love my easy no-bake caramel pretzel bars!
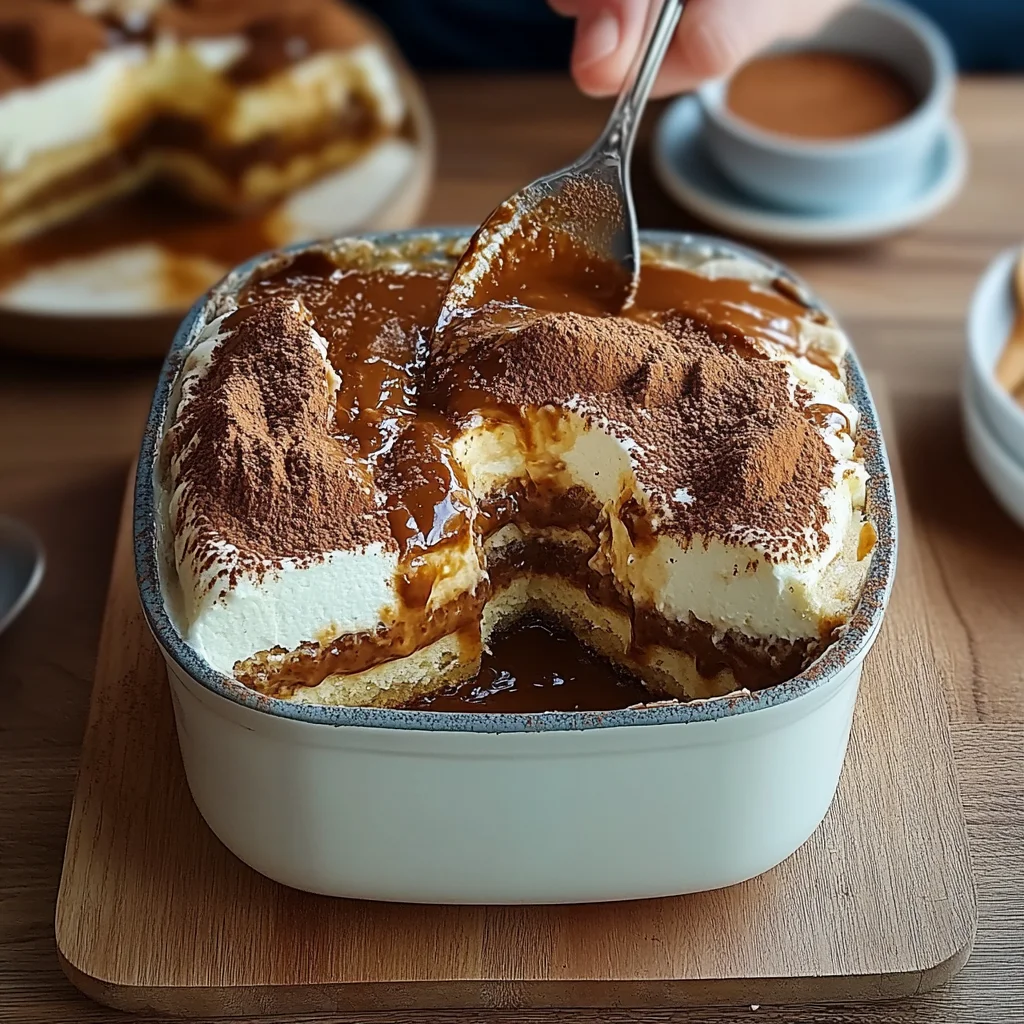
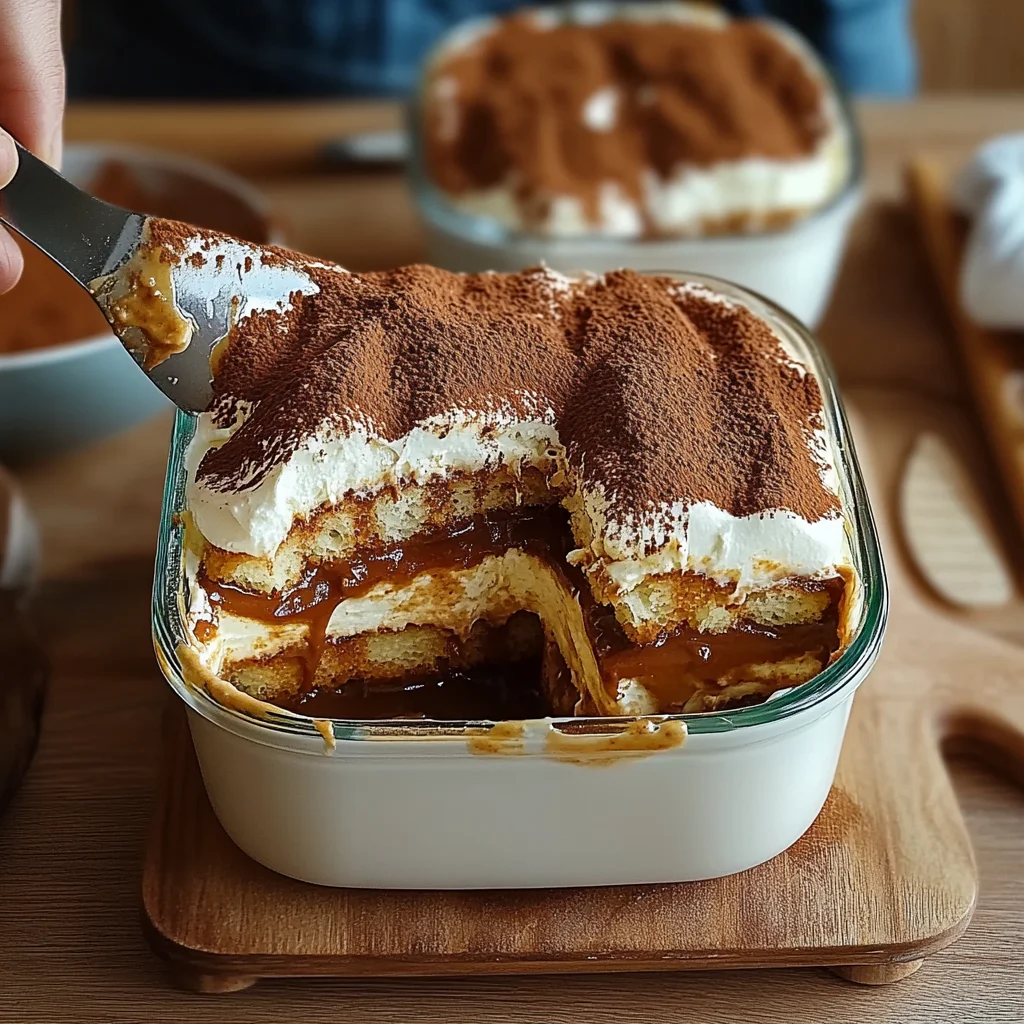
- Assemble the Tiramisu: Now for the fun part – building our bowls! Pour your cooled strong coffee (or espresso) into a shallow dish. Take one ladyfinger at a time and quickly dip it into the coffee. I mean quickly – a dip for just a second or two on each side is usually enough. You don’t want them to get soggy, nobody likes a floppy ladyfinger! Arrange a layer of these coffee-dipped ladyfingers at the bottom of your serving bowls.
- Layer the Desserts: Once your ladyfingers are in place, gently spoon a generous layer of your smooth mascarpone cream over them. Follow that with a lovely layer of your sweet dulce de leche whipped cream.
- Repeat Layers: Keep building! Add another layer of quickly-dipped ladyfingers, then more mascarpone cream, and finally, another layer of that dreamy dulce de leche whipped cream. You want to finish with that beautiful, caramel-kissed cream on top.
- Chill: This step is non-negotiable for true tiramisu magic. Pop your assembled tiramisu bowls into the refrigerator for at least 4 hours, but honestly, overnight is even better! This chilling time allows all those incredible flavors to meld together and the dessert to firm up beautifully.
- Garnish and Serve: When you’re ready to serve, grab your cocoa powder and a fine-mesh sieve. Generously dust the top of each bowl with cocoa powder. Then, use a vegetable peeler or a sharp knife to shave delicate curls from your chocolate bar over the top for that extra touch of elegance. Serve immediately and watch the smiles appear!
Substitutions & Additions
The beauty of a recipe like this is how easily you can customize it! Here are a few ideas to get your creative juices flowing:
- Coffee Swap: Not a coffee fan, or making it for kids? You can use decaf coffee, hot chocolate, or even a little milk mixed with vanilla extract for dipping the ladyfingers. For an adult twist, a splash of coffee liqueur (like Kahlua), rum, or amaretto in the coffee is divine!
- Dulce de Leche Alternatives: If you don’t have dulce de leche on hand, a good quality caramel sauce or even melted Nutella could work for the whipped cream, though the flavor profile will change.
- Ladyfinger Replacements: No ladyfingers? Try using slices of pound cake, angel food cake, or even shortbread cookies. Just be mindful of how much liquid they absorb! For another sweet twist, this recipe reminds me of how versatile my strawberry cheesecake crunch bites are if you’re experimenting with different dessert bases.
- Add-ins: Consider adding a sprinkle of mini chocolate chips between layers, a few fresh berries (raspberries or sliced strawberries would be lovely), or a dash of cinnamon to the cocoa powder for dusting.
Tips for Success
Even though this recipe is super easy, a few little tricks can make all the difference in achieving tiramisu perfection:
- Don’t Over-Soak Ladyfingers: This is probably the most crucial tip! Ladyfingers are like sponges. A quick dip (1-2 seconds per side) is all you need. If they get too saturated, your tiramisu will be soggy.
- Cold Cream, Cold Bowl: For the best whipped cream, make sure both your heavy cream and your mixing bowl (and whisk) are very cold. This helps the cream whip up faster and hold its peaks better.
- Ample Chill Time: Resist the urge to dig in too soon! The chilling time is essential for the flavors to meld and the tiramisu to set properly. This also allows the ladyfingers to soften perfectly from the absorbed coffee and cream.
- Quality Ingredients: While simple, the quality of your mascarpone, coffee, and dulce de leche really shines through. Use good stuff!
- Make Ahead: This dessert is a fantastic make-ahead option, especially for parties or busy days. It only gets better as it sits!
How to Store Dulce de Leche Tiramisu Bowl
Once you’ve assembled your dreamy tiramisu bowls, you’ll want to store them properly to keep them fresh and delicious.
- Refrigeration: Always keep your Dulce de Leche Tiramisu Bowl refrigerated. The dairy components, especially the mascarpone and whipped cream, need to stay cold.
- Airtight Container: Cover your individual bowls tightly with plastic wrap or transfer the tiramisu to an airtight container before placing it in the fridge. This prevents it from absorbing any odors from other foods and keeps it from drying out.
- Shelf Life: When stored correctly, your tiramisu bowls will last for 3-4 days in the refrigerator. The flavors often deepen and improve on the second day!
- Freezing: While you can freeze tiramisu, I generally don’t recommend it for this particular bowl version, as the texture of the whipped cream and ladyfingers can change slightly upon thawing. If you must freeze, ensure it’s in a freezer-safe, airtight container for up to 1 month, then thaw slowly in the refrigerator overnight.
FAQs
Here are some common questions I get asked about making this delightful dessert:
Q: Can I make this tiramisu bowl recipe completely alcohol-free?
A: Absolutely! The recipe as written is already alcohol-free, using strong coffee or espresso for the classic flavor. You can continue to use just coffee, or even substitute with decaf coffee or a flavored syrup mixed into water if you prefer.
Q: My mascarpone cream looks lumpy. What did I do wrong?
A: Lumpy mascarpone usually means it wasn’t at room temperature, or it was overbeaten before folding in the egg mixture. Make sure your mascarpone is soft before you start, and beat it just until smooth – don’t overdo it!
Q: How can I make strong coffee or espresso without a fancy machine?
A: You can use instant espresso powder dissolved in hot water, or simply brew a very strong batch of regular coffee. Even a French press can give you a nice, strong brew perfect for this recipe.
Q: Can I prepare the creams ahead of time and assemble later?
A: Yes, you can! Both the mascarpone cream and the dulce de leche whipped cream can be made a day in advance and stored separately in airtight containers in the refrigerator. Just give the dulce de leche cream a gentle whisk if it needs a little fluffing before assembly.
For more delicious recipes and kitchen inspiration, be sure to follow us on Pinterest!

Dreamy Dulce de Leche Tiramisu Bowl
Ingredients
Equipment
Method
- Step 1: Prepare the Egg Yolk Mixture: In a heatproof bowl, whisk egg yolks and granulated sugar until combined and pale. Place the bowl over a saucepan with simmering water (not touching the water) and whisk constantly for 5-7 minutes until thick and ribbon-like. Remove from heat and cool completely.
- Step 2: Make the Mascarpone Cream: In a separate bowl, beat room-temperature mascarpone cheese until smooth. Once the egg yolk mixture is cool, gently fold it into the beaten mascarpone until wonderfully combined and smooth.
- Step 3: Whip the Dulce de Leche Cream: Ensure heavy cream, mixing bowl, and whisk attachments are cold. Whip the cold heavy cream until soft peaks form. Add ¼ cup of dulce de leche and a pinch of salt. Continue whipping until stiff peaks form. Be careful not to over-whip.
- Step 4: Assemble the Tiramisu: Pour cooled strong coffee (or espresso) into a shallow dish. Quickly dip one ladyfinger at a time (1-2 seconds per side) into the coffee, ensuring they don't get soggy. Arrange a layer of coffee-dipped ladyfingers at the bottom of your serving bowls.
- Step 5: Layer the Desserts: Spoon a generous layer of mascarpone cream over the ladyfingers, followed by a layer of dulce de leche whipped cream.
- Step 6: Repeat Layers: Add another layer of quickly-dipped ladyfingers, then more mascarpone cream, and finally, another layer of dulce de leche whipped cream. Finish with the caramel-kissed cream on top.
- Step 7: Chill: Refrigerate the assembled tiramisu bowls for at least 4 hours, or ideally overnight, allowing flavors to meld and the dessert to firm up.
- Step 8: Garnish and Serve: When ready to serve, generously dust the top of each bowl with cocoa powder using a fine-mesh sieve. Shave delicate curls from a chocolate bar over the top. Serve immediately.