Oh, friend, do you ever have those days when your sweet tooth is calling, but your energy reserves are, well, not exactly overflowing? Or maybe you’ve got last-minute guests arriving, and you want to whip up something truly special without spending hours in the kitchen? If so, then get ready to meet your new best dessert friend: the No-Bake Chocolate Cherry Cream Pie! This isn’t just a dessert; it’s a nostalgic hug, a sigh of sweet relief, and a testament to how incredible simplicity can be.
I remember my grandma making similar no-bake wonders for summer gatherings, and they always disappeared in a flash. This chocolate cherry version captures that same magic – it’s shockingly easy, incredibly quick to put together, and boasts layers of creamy, fruity, chocolatey goodness that will have everyone asking for seconds. Seriously, no oven required, minimal fuss, and maximum flavor. It’s the kind of memorable dessert that feels like a labor of love, even though it’s anything but!
Why You’ll Love Chocolate Cherry Cream Pie
- Fast: Ready to chill in under 20 minutes!
- Easy: No baking, no complicated techniques, just simple layering.
- Giftable: Perfect for potlucks, parties, or a sweet surprise for a neighbor.
- Crowd-pleasing: A winning combination of chocolate and cherry that everyone adores.
Ingredients
Gather your ingredients, my sweet friend. This list is short and mighty, promising maximum flavor with minimal effort!
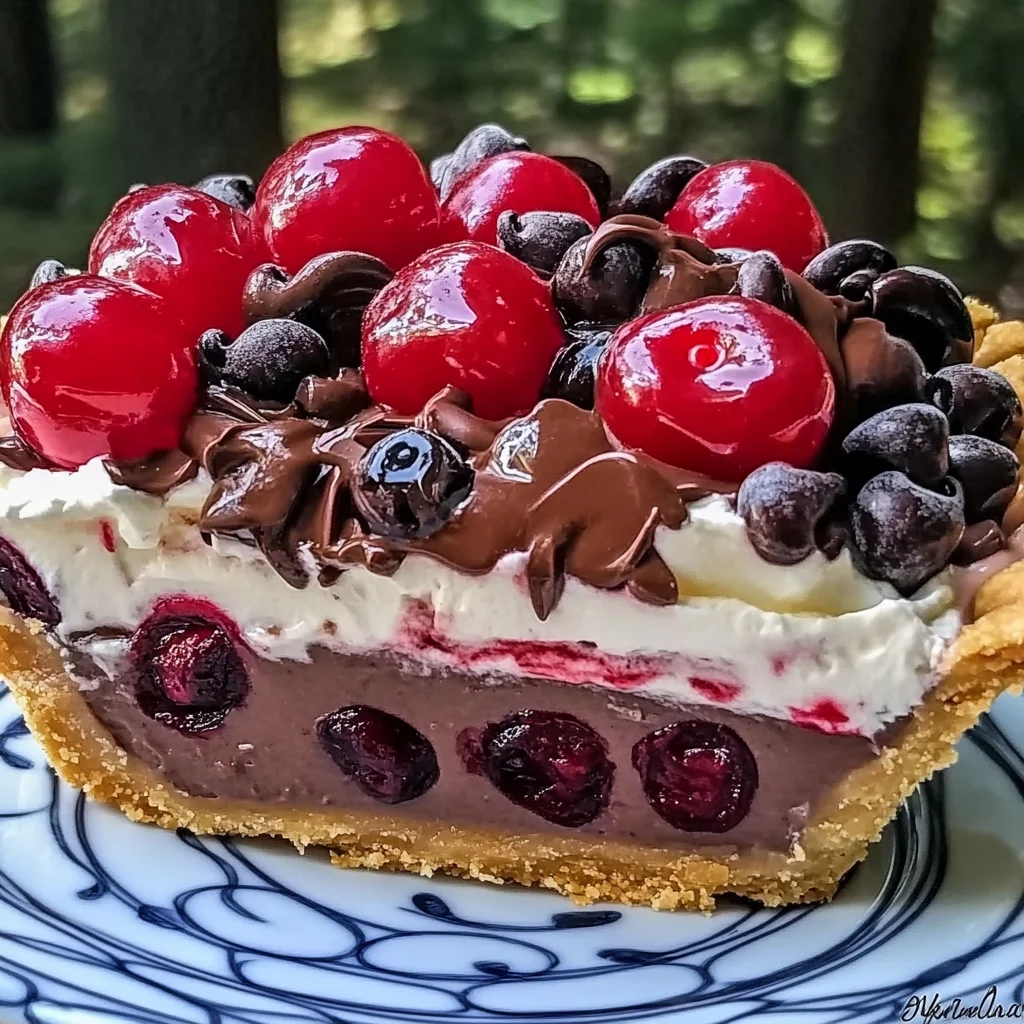
- 1 pre-baked 9-inch pie crust: Your trusty shortcut to pie perfection. You can find these in the baking aisle, or if you’re feeling ambitious, use your favorite homemade graham cracker or Oreo crust!
- 1 can (21 oz) cherry pie filling (or homemade): The star of the show! Its vibrant color and sweet-tart flavor are just what we need.
- 1 box (3.9 oz) chocolate pudding mix: The creamy, dreamy magic that binds it all together. Make sure it’s instant pudding!
- 2 cups cold milk (for pudding mix): Essential for that perfect, thick pudding consistency. I always use whole milk for extra richness, but 2% works beautifully too.
- 1 ½ cups whipped cream (homemade or store-bought): A fluffy cloud of deliciousness to top it all off. If you’re using store-bought, make sure it’s well-chilled.
- ½ cup chocolate chips (semi-sweet or dark): A little extra chocolatey goodness for texture and flavor.
- Fresh cherries for garnish (optional): For that final pop of color and freshness. They make the pie look absolutely stunning!
How to Make Chocolate Cherry Cream Pie
Alright, let’s get this deliciousness layered! Follow these simple steps, and you’ll be chilling in no time.
- Prepare Your Crust: First things first, make sure your pre-baked pie crust is completely cool. This is super important so it doesn’t warm up your other layers. If you just bought it, it’s likely already at room temp, but if you baked one yourself, let it chill out!
- Lay the Cherry Foundation: Grab that luscious can of cherry pie filling and spread it evenly across the bottom of your cooled pie crust. Don’t be shy, get all that fruity goodness in there. This vibrant red layer is going to be such a beautiful surprise when you slice into it!
- Whip Up the Chocolate Layer: Next up, the chocolatey heart of our pie! In a medium bowl, whisk up your chocolate pudding mix with the 2 cups of cold milk. Whisk it vigorously for about 2 minutes, until it starts to thicken. You’ll see it transform right before your eyes! Once it’s slightly thickened but still pourable, gently spread this creamy chocolate pudding over the cherry layer. Take your time to create a nice, even layer.
- Add the Whipped Cream Topping: Time for the crowning glory: your whipped cream! Carefully and gently spread the whipped cream over the chocolate layer. You want to be light-handed here so you don’t mix the layers. Aim for a smooth, even topping that covers the entire pie. This fluffy cloud is key to that “cream pie” texture!
- Garnish and Glam Up: Almost there! Now it’s time to add a little sparkle. Sprinkle your ½ cup of chocolate chips evenly over the whipped cream. If you have them, place a few fresh cherries artfully on top for that extra touch of elegance and freshness. It makes the pie look professionally made, even though it was so easy!
- Chill Out: Patience, my friend, is a virtue, especially when it comes to no-bake pies! Carefully transfer your beautiful pie to the refrigerator. You’ll need to chill it for at least 2 hours to allow all those glorious layers to set up perfectly. If you can, I always recommend letting it chill for even longer, like 4 hours or even overnight, for the best possible texture.
- Slice and Serve: The best part! Once the pie is perfectly set, grab a sharp knife (running it under hot water for a few seconds before each slice helps create clean cuts!) and slice into your masterpiece. Serve it chilled, and prepare for smiles and compliments all around!
Substitutions & Additions
This pie is fantastic as is, but it’s also super flexible! Here are some ideas to make it uniquely yours:
- Crust Variations: Instead of a traditional pre-baked crust, try a graham cracker crust, an Oreo cookie crust, or even a shortbread cookie crust for different flavor profiles.
- Fruit Fun: Not a cherry fan? No problem! You can swap the cherry pie filling for blueberry, peach, or even strawberry. For another fantastic no-bake cherry treat, you might also love our Grandma’s Easy No-Bake Cherry Delight!
- Pudding Play: Experiment with different instant pudding flavors! White chocolate pudding would be lovely, or even a cheesecake flavored pudding for an extra creamy twist.
- Extra Toppings: Drizzle with chocolate syrup or a raspberry coulis. Add some chopped nuts (like pecans or walnuts) for crunch, or a dusting of cocoa powder for an elegant finish. A pinch of almond extract in the cherry layer before spreading can really enhance the cherry flavor!
- A Little Kick: For the grown-ups, a tiny splash of cherry liqueur or even a coffee liqueur mixed into the pudding could add a sophisticated depth.
Tips for Success
Making this pie is a breeze, but a few simple tips will ensure it turns out perfectly every time:
- Crust Temperature is Key: Make sure your pie crust is truly cold. A warm crust can make the bottom layer runny.
- Don’t Rush the Pudding: Whisk the pudding thoroughly until it starts to thicken. If it’s too thin when you spread it, your layers might mingle a bit too much. Don’t worry if it’s not super thick; it will continue to set in the fridge.
- Chill Time is Crucial: I know it’s hard to wait, but resisting the urge to cut into it too soon is vital! The 2-hour minimum chill time allows all the layers to firm up and become beautifully distinct. Trust me, it’s worth the wait for those clean, impressive slices.
- Homemade Whipped Cream: If you’re going for homemade whipped cream, make sure your cream, bowl, and whisk are very cold. This helps achieve stiff peaks. You can even add a teaspoon of powdered sugar and a few drops of vanilla extract for extra flavor.
- Clean Slices: For picture-perfect slices, wipe your knife with a warm, damp cloth between each cut. This prevents dragging and keeps those layers looking sharp.
How to Store Chocolate Cherry Cream Pie
This pie is best enjoyed fresh, but it stores wonderfully!
- Refrigeration: Keep any leftover pie tightly covered with plastic wrap or in an airtight container in the refrigerator.
- Shelf Life: It will stay delicious for up to 3-4 days in the fridge. The crust might soften slightly over time, but the flavors will remain fantastic.
- Freezing: I don’t recommend freezing this pie, primarily because the whipped cream and pudding layers can change texture when thawed, becoming a bit watery or grainy. It’s definitely a fresh-from-the-fridge kind of treat!
FAQs
Q: Can I use sugar-free pudding or pie filling?
A: Absolutely! You can easily swap in sugar-free chocolate pudding mix and sugar-free cherry pie filling if you’re looking to reduce the sugar content. The taste and texture will still be great!
Q: What if I can’t find a pre-baked pie crust?
A: No worries! You can use a ready-made graham cracker or Oreo cookie crust from the baking aisle. They work just as well and add another layer of flavor. Alternatively, you can bake your own pie crust or even make a simple no-bake crumb crust using crushed cookies and melted butter.
Q: Can I make this pie a day ahead of time for a party?
A: Yes, definitely! This pie is a fantastic make-ahead dessert. Preparing it a day in advance allows ample time for all the layers to set and meld, often making it even more delicious. Just keep it well-covered in the refrigerator.
Q: My pudding isn’t thickening. What went wrong?
A: The most common culprit is usually not using cold enough milk, or not whisking long enough. Make sure your milk is straight from the fridge and whisk for the full 2 minutes (or even a little longer if needed) to activate the setting agents in the pudding mix. Patience is key here!
This Chocolate Cherry Cream Pie is a testament to how simple ingredients can create something truly spectacular. It’s perfect for busy weeknights, special occasions, or just because you deserve a little slice of heaven. If you love easy, decadent desserts, be sure to check out our creamy Chocolate Lasagna or explore all our delicious recipes for more inspiration!
Don’t forget to follow us on Pinterest for more easy and delicious recipes!

No-Bake Chocolate Cherry Cream Pie
Ingredients
Equipment
Method
- Step 1: Prepare your pre-baked pie crust by ensuring it is completely cool.
- Step 2: Spread the can of cherry pie filling evenly across the bottom of the cooled pie crust.
- Step 3: In a medium bowl, whisk the chocolate pudding mix with 2 cups of cold milk vigorously for about 2 minutes until it starts to thicken. Gently spread this creamy chocolate pudding over the cherry layer, creating an even layer.
- Step 4: Carefully and gently spread the 1 ½ cups of whipped cream over the chocolate layer, aiming for a smooth, even topping.
- Step 5: Sprinkle the ½ cup of chocolate chips evenly over the whipped cream. If using, place a few fresh cherries on top for garnish.
- Step 6: Carefully transfer the pie to the refrigerator and chill for at least 2 hours to allow all layers to set perfectly. For the best texture, chilling for 4 hours or even overnight is recommended.
- Step 7: Once the pie is perfectly set, slice into it with a sharp knife (running it under hot water briefly between cuts helps create clean slices). Serve chilled.