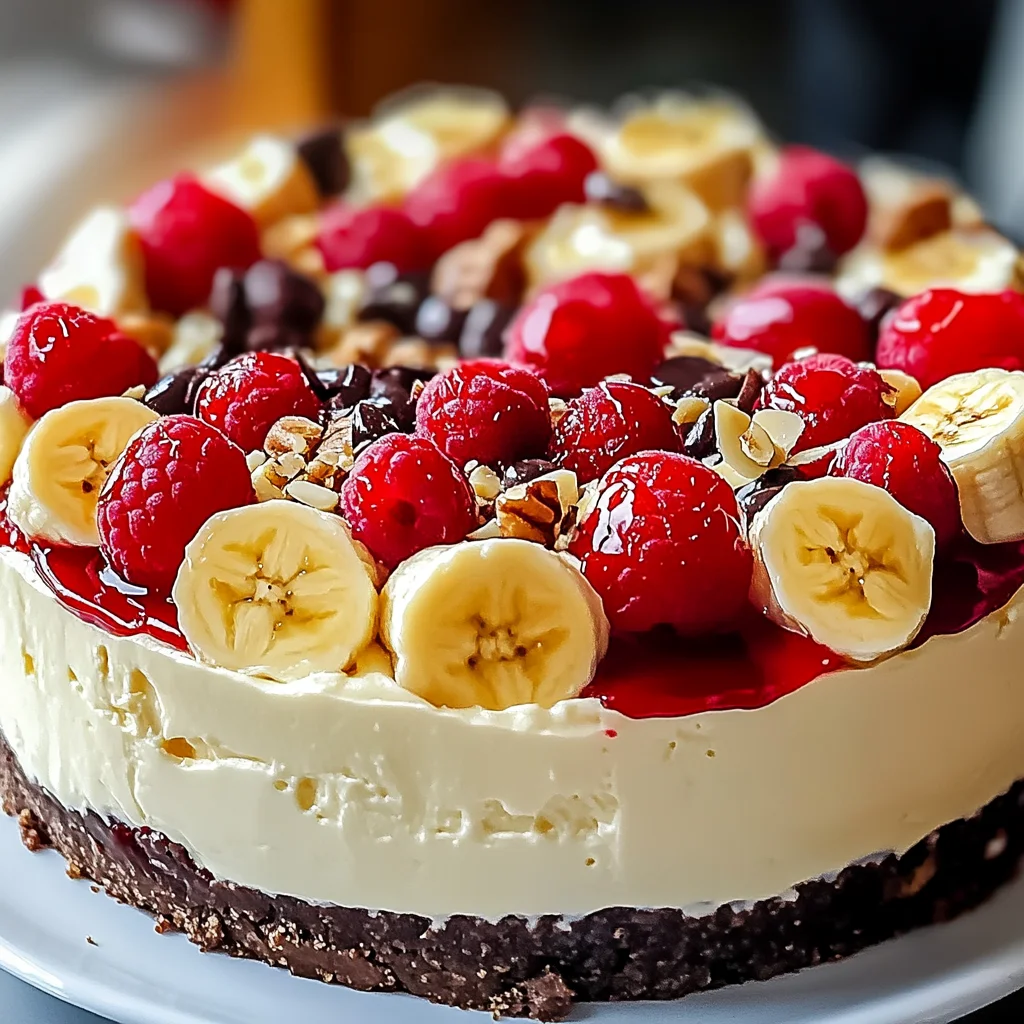
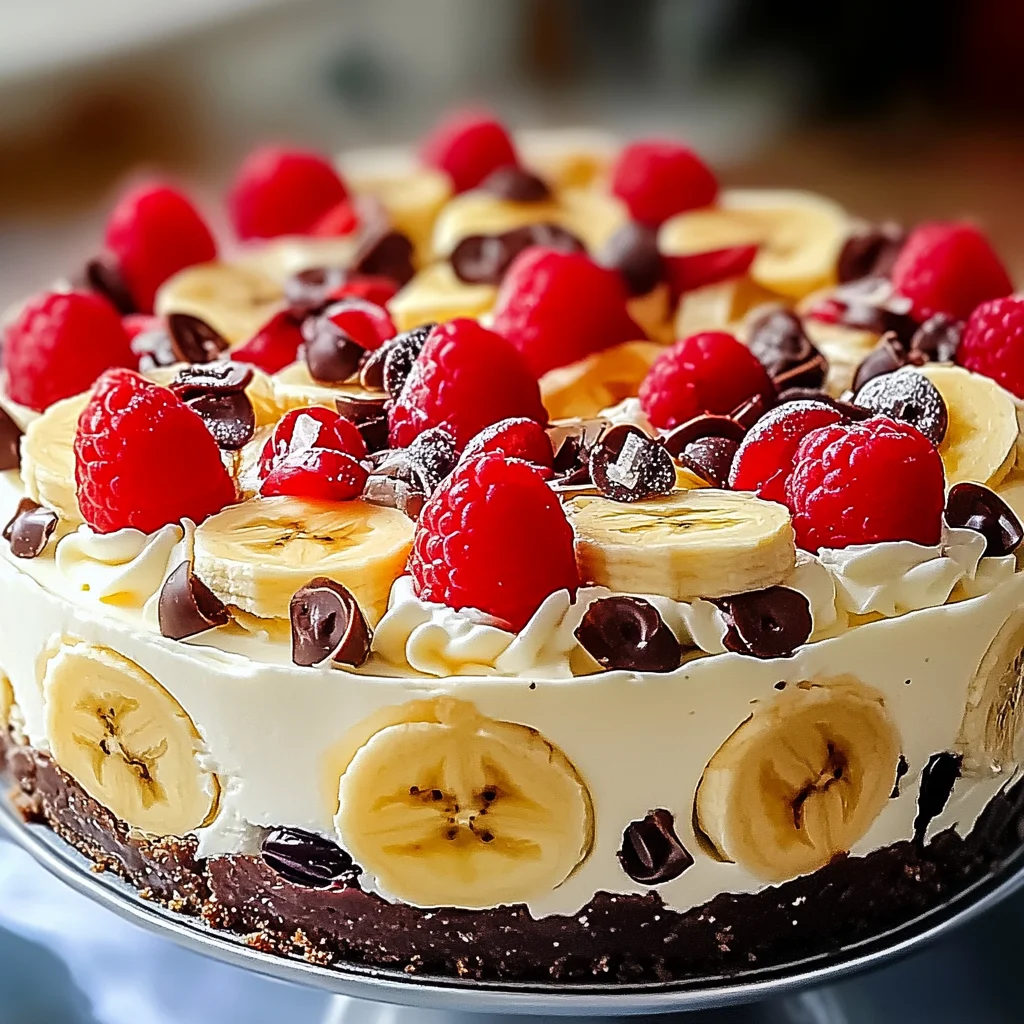
Remember those classic diner banana splits? Piled high with creamy ice cream, sweet bananas, gooey chocolate syrup, bright cherries, and maybe a little pineapple? What if you could capture all that deliciousness in a dreamy, creamy cheesecake, without ever turning on your oven? Well, get ready, because this Chilled Banana Split Cheesecake recipe is about to become your new favorite obsession!
This dessert is pure nostalgia in sliceable form. It’s ridiculously easy to whip up, uses simple ingredients, and tastes like a vacation for your taste buds. It’s the perfect thing to bring to a potluck, serve at a summer barbecue, or just make for yourself when you need a little extra sunshine in your day. Trust me, once you try this, you’ll be hooked!
Why You’ll Love This Recipe
- Fast
- Easy
- Giftable
- Crowd-pleasing
Ingredients
Gather up these simple goodies. You might have most of them already!
- 1 1/2 cups graham cracker crumbs: You can buy these pre-crushed or just crush about 10-12 full graham cracker sheets yourself. Easy peasy!
- 1/4 cup granulated sugar: Just a touch of sweetness for that buttery crust.
- 1/2 cup unsalted butter, melted: This is the magical glue that holds our delicious crust together.
- 2 cups cream cheese, softened: Make sure it’s full-fat block cream cheese, and that it’s good and soft! Leave it on the counter for an hour or two before starting, or give it a quick zap in the microwave (just be careful not to melt it!). This is key for a smooth filling.
- 1 cup powdered sugar: Also called confectioners’ sugar. It dissolves beautifully for a silky smooth filling.
- 1 teaspoon vanilla extract: Pure vanilla gives you the best flavor here.
- 1 1/2 cups heavy cream, cold: This is what makes our filling light, airy, and sets up perfectly! Make sure it’s really cold for best whipping results.
- 2 ripe bananas, thinly sliced: Use ripe but not overly mushy bananas.
- 1/4 cup maraschino cherries, drained: Those classic bright red beauties! Drain them well so you don’t add extra liquid.
- 1/4 cup chocolate syrup: Your favorite brand will work great for that essential drizzle.
- 1/4 cup crushed pineapple, drained: Another must-have banana split topping! Again, make sure it’s very well drained.
How to Make It
Alright, let’s get cooking… well, chilling! Follow these simple steps and you’ll have a showstopper dessert in no time.
-
Step 1: Prep the Crust. In a medium bowl, combine your graham cracker crumbs, granulated sugar, and the melted butter. Give it a good mix with a fork or spoon until everything looks evenly moistened, kind of like wet sand. Now, press this mixture firmly into the bottom of a 9-inch springform pan. You can use the bottom of a glass or a flat-bottomed measuring cup to really pack it down tight and create a solid base. Pop this into the fridge while you get started on the filling.
-
Step 2: Beat the Cream Cheese Mixture. Grab a large bowl and your electric mixer. Add the softened cream cheese, powdered sugar, and vanilla extract. Beat on medium speed until the mixture is completely smooth, beautifully creamy, and there are no lumps. Scrape down the sides and bottom of the bowl a few times to make sure everything is incorporated.
-
Step 3: Whip the Cream. In a separate, clean bowl (and make sure your beaters are clean and dry too!), pour in the cold heavy cream. Beat on high speed until stiff peaks form. You’ll know it’s ready when you lift the beaters and the peaks stand straight up without flopping over. Keep a close eye on it; you don’t want to overbeat and accidentally make butter!
-
Step 4: Combine Gently. Now comes the gentle part! Take about half of your whipped cream and add it to the cream cheese mixture. Using a rubber spatula, gently fold it in. Don’t stir or beat hard, you want to keep that airiness! Add the remaining whipped cream and gently fold until it’s just combined and no streaks of whipped cream remain. You’re aiming for a light and fluffy filling.
-
Step 5: Assemble the Base. Pull your chilled crust out of the fridge. Carefully spoon the cream cheese filling evenly over the top of the graham cracker crust. Use a spatula or the back of a spoon to smooth it out into a nice, even layer.
-
Step 6: Add Those Banana Split Toppings! Now for the fun part! Arrange your thinly sliced banana pieces all over the top of the filling. Then, scatter the drained maraschino cherries and the very well-drained crushed pineapple evenly across the bananas. Finally, drizzle that decadent chocolate syrup generously over everything. Don’t be shy!
-
Step 7: Chill, Chill, Chill! This is the most important step to get that perfect sliceable cheesecake texture. Cover the pan loosely with plastic wrap and pop the whole thing back into the refrigerator. It needs at least 4 hours to set up properly, but honestly? Overnight is even better if you can wait. The longer it chills, the firmer and easier it will be to slice.
-
Step 8: Slice and Serve. When you’re ready to enjoy, carefully remove the sides of the springform pan. For the cleanest cuts, use a sharp knife dipped in hot water and wiped clean between slices. Serve it up cold and watch everyone’s faces light up!
Substitutions & Additions
Want to put your own spin on this masterpiece? Here are a few ideas to make it your own:
- Different Crust: Instead of graham crackers, try using crushed vanilla wafers, chocolate cookies (like Oreos, just scrape out the filling!), or even Nutter Butter cookies for a fun peanut butter twist!
- Add Nuts: A true banana split often has nuts! Sprinkle some chopped peanuts, walnuts, or pecans over the chocolate syrup right before serving for a little crunch.
- Extra Sauces: Drizzle with caramel sauce or even a little strawberry syrup alongside the chocolate for even more classic flavor.
- Fresh Fruit: While the recipe uses classic banana split toppings, you could add fresh sliced strawberries or kiwi on top just before serving for extra color and flavor.
- Mini Cheesecakes: Press the crust into muffin liners placed in a muffin tin, add the filling, and top individually for cute mini no-bake cheesecakes! Adjust chilling time accordingly.
Tips for Success
Even though this recipe is super forgiving, here are a few pointers to make sure yours turns out perfectly every time:
- Softened Cream Cheese is Key: Seriously, let your cream cheese sit on the counter for at least an hour (or gently warm it) until it’s really soft. This is the #1 secret to a smooth, lump-free filling.
- Don’t Overbeat: Be careful not to overbeat the cream cheese mixture or the heavy cream. Overbeating the cream cheese can make the filling too soft or grainy, and overbeating heavy cream makes butter!
- Fold Gently: This is how you incorporate the whipped cream without losing all that wonderful airiness. Imagine you’re gently lifting the mixture from the bottom and turning it over onto itself with your spatula.
- Drain Those Toppings: Excess liquid from the cherries and pineapple can make your cheesecake watery. Drain them very well. I sometimes even give the pineapple a gentle squeeze in a paper towel.
- Chill Patience: Resist the urge to cut into it too early! That 4-hour minimum (or overnight!) is crucial for the cheesecake to set firm enough to slice cleanly.
- Springform Pan Help: Using a springform pan makes serving a breeze. If you don’t have one, you can use a regular pie plate, but slicing and serving will be a bit messier (though still just as delicious!).
How to Store It
Got leftovers? Lucky you! This cheesecake stores beautifully so you can enjoy slices of banana split heaven for days.
- In the Fridge: Keep the cheesecake covered tightly with plastic wrap or in an airtight container in the refrigerator.
- How Long: It will stay delicious for 3-4 days. The bananas might soften a bit over time, but it will still be perfectly safe and tasty.
- Freezing? While you could freeze the base cheesecake filling and crust (without the banana/cherry/pineapple/syrup toppings), I don’t recommend freezing it with the toppings. The texture of the fruit changes significantly when frozen and thawed, especially the bananas and pineapple. Best to enjoy this one fresh from the fridge!
FAQs
Got questions? I’ve got answers!
- Q: My cheesecake filling seems soft, did I do something wrong?
A: The most common reasons for a soft filling are not chilling it for long enough, or potentially not whipping the heavy cream to stiff peaks. Make sure to give it the full refrigeration time, preferably overnight! - Q: Can I make this cheesecake in a different size pan?
A: Yes, you can use an 8-inch pan for a taller cheesecake (you might need slightly more chilling time), or a 10-inch pan for a slightly thinner one. A standard pie plate also works, just know you won’t get that clean springform edge. - Q: How far ahead can I make this?
A: You can make the crust a day or two in advance. The full assembled cheesecake is best made the day before or the morning of the day you want to serve it to give it plenty of time to set up perfectly. I wouldn’t make the full assembled cheesecake more than 2 days ahead because of the fresh fruit toppings. - Q: Can I use reduced-fat cream cheese?
A: I really recommend using full-fat block cream cheese for this recipe. Reduced-fat versions often contain more water and stabilizers, which can prevent the cheesecake from setting up properly and won’t give you that rich, creamy texture we’re aiming for.
Dreamy & Easy No-Bake Chilled Banana Split Cheesecake
Ingredients
Equipment
Method
- Step 1: Prep the Crust. In a medium bowl, combine your graham cracker crumbs, granulated sugar, and the melted butter. Mix until evenly moistened. Press this mixture firmly into the bottom of a 9-inch springform pan. Pop this into the fridge while you get started on the filling.
- Step 2: Beat the Cream Cheese Mixture. In a large bowl, add the softened cream cheese, powdered sugar, and vanilla extract. Beat with an electric mixer on medium speed until completely smooth and creamy, scraping down the sides as needed.
- Step 3: Whip the Cream. In a separate, clean bowl, pour in the cold heavy cream. Beat on high speed until stiff peaks form.
- Step 4: Combine Gently. Take about half of your whipped cream and add it to the cream cheese mixture. Using a rubber spatula, gently fold it in. Add the remaining whipped cream and gently fold until just combined and no streaks remain.
- Step 5: Assemble the Base. Pull your chilled crust out of the fridge. Carefully spoon the cream cheese filling evenly over the top of the graham cracker crust. Smooth it out into a nice, even layer.
- Step 6: Add Those Banana Split Toppings! Arrange your thinly sliced banana pieces all over the top of the filling. Scatter the drained maraschino cherries and the very well-drained crushed pineapple evenly. Drizzle the chocolate syrup generously over everything.
- Step 7: Chill, Chill, Chill! Cover the pan loosely with plastic wrap and pop the whole thing back into the refrigerator. It needs at least 4 hours to set up properly; overnight is even better.
- Step 8: Slice and Serve. When ready to enjoy, carefully remove the sides of the springform pan. For the cleanest cuts, use a sharp knife dipped in hot water and wiped clean between slices. Serve it up cold.