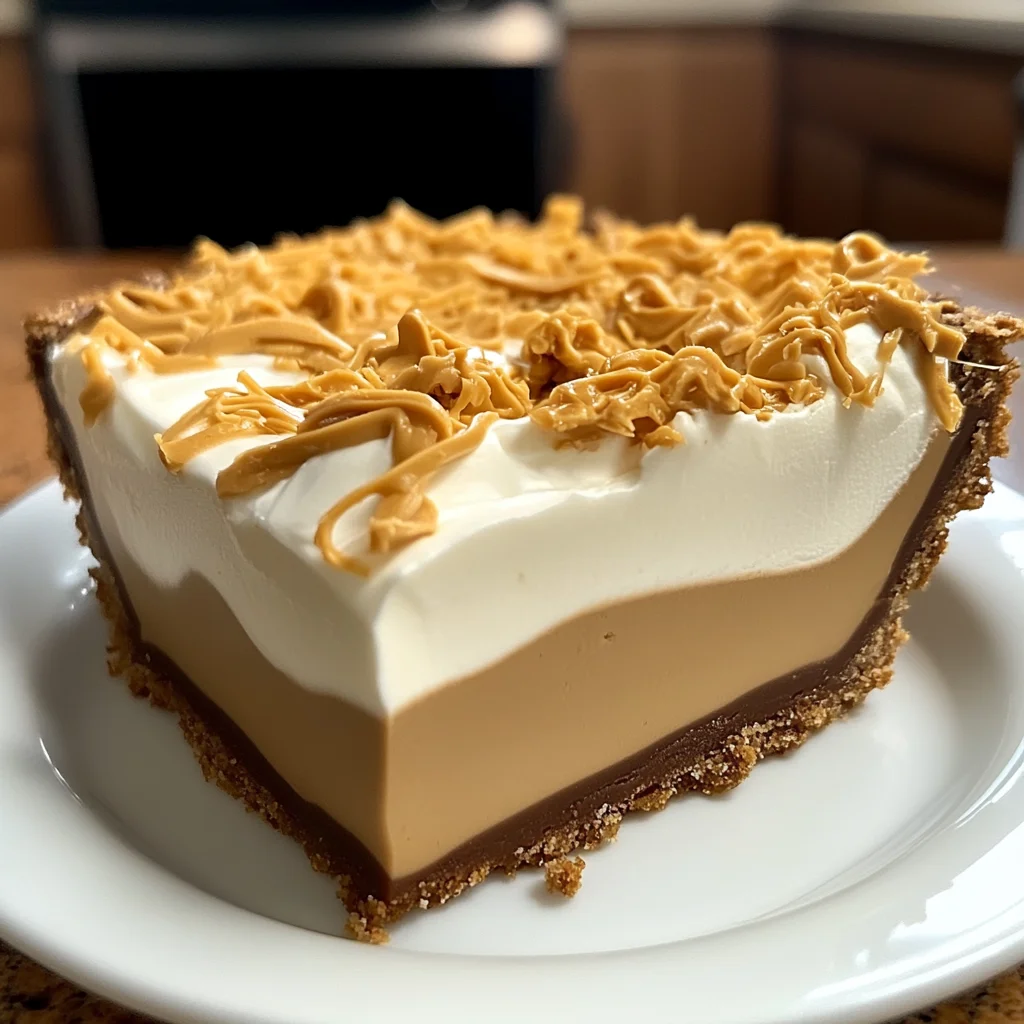
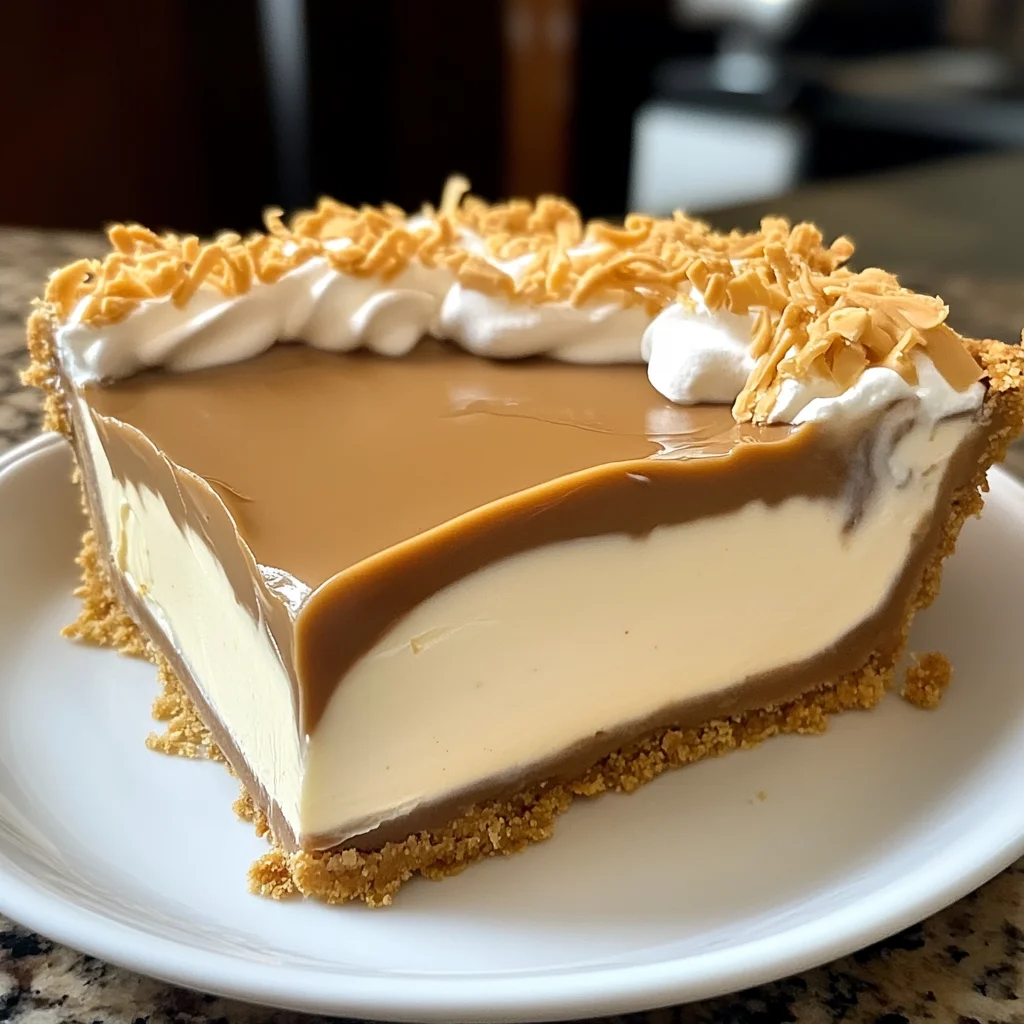
Oh, friend, let me tell you about a pie that brings me right back to my grandma’s kitchen, even though it’s the simplest thing you’ll ever whip up. You know those recipes that just feel like a warm hug? This Amish Peanut Butter Cream Pie is exactly that. It’s rich, creamy, and packed with that irresistible peanut buttery goodness that makes everyone close their eyes and sigh in pure contentment. There’s something so special about a dessert that tastes like it took hours of loving labor, but in reality, you can have this beauty chilling in your fridge in under 20 minutes. Seriously!
This pie is a true lifesaver for last-minute gatherings, potlucks, or just when that sweet tooth hits hard on a Tuesday night. Forget turning on the oven, because this delightful creation is completely no-bake. It’s a classic for a reason – simple ingredients, maximum flavor, and a smile on every face. You’re going to fall in love with how easy, quick, and utterly memorable this pie is!
Why You’ll Love Amish Peanut Butter Cream Pie
- Fast: Seriously, from prep to fridge in under 20 minutes!
- Easy: No baking, no fuss, just simple mixing.
- Giftable: Packaged beautifully, it makes a wonderful treat for friends or neighbors.
- Crowd-pleasing: Who doesn’t love the dreamy combination of peanut butter and cream?
Ingredients

Gather your simple treasures from the pantry and fridge. Here’s what you’ll need for this creamy dream:
- 1 pre-made graham cracker pie crust: Your ultimate shortcut to dessert heaven! Feel free to grab a chocolate cookie crust too for a fun twist.
- 1 cup creamy peanut butter: The star of our show! Use your favorite creamy variety, but make sure it’s not the natural, oil-separated kind, as it can affect the texture.
- 1 cup powdered sugar: Also known as confectioners’ sugar. This helps create that delightful crumbly texture with the peanut butter.
- 8 oz cream cheese, softened: Let it sit on the counter for a bit! Softened cream cheese is key to a smooth, lump-free filling.
- 1 cup granulated sugar: For just the right amount of sweetness in our luscious cream cheese base.
- 2 cups heavy cream: This is what gives our pie that airy, whipped, irresistible texture.
- 1 teaspoon vanilla extract: A little splash of vanilla elevates all the flavors. Don’t skip it!
- 1 cup milk: Any kind works here, but whole milk will give you the richest pudding.
- 1 package (3.4 oz) instant vanilla pudding mix: The secret ingredient that helps everything set up perfectly.
How to Make Amish Peanut Butter Cream Pie
Get ready to create some magic without even breaking a sweat. You’ll be amazed at how quickly this comes together!
- Whip Up Those Crumbles: First things first, grab a medium-sized bowl. Toss in your creamy peanut butter and powdered sugar. Now, get in there with a spoon or your hands (it’s fun, I promise!) and mix them together until you have a lovely crumbly texture, almost like wet sand. This is going to be pure gold in your pie! Once it’s all crumbly, set half of this delicious mixture aside. That’s for our glorious topping later.
- Create the Creamy Dream Base: In a large mixing bowl – you want plenty of room for this – add your softened cream cheese and granulated sugar. Beat them together with an electric mixer until they’re beautifully smooth and completely combined. No lumps allowed! Next, pour in the heavy cream and that lovely vanilla extract. Keep beating, and watch as it transforms into a light, fluffy cloud of creamy goodness. This is going to be so luxurious!
- Layer the Peanut Butter Goodness: Time to start building our pie! Take your pre-made graham cracker pie crust. Evenly spread half of those irresistible peanut butter crumbles you made in step one across the bottom. This layer is going to give you a delightful texture and burst of peanut butter in every bite.
- Prepare the Pudding Magic: In a separate bowl, it’s pudding time! Whisk together your milk and the instant vanilla pudding mix. Keep whisking for about 2 minutes, or until it starts to thicken up nicely. Don’t worry if it looks a little thin at first; it will thicken as you whisk.
- Combine and Fill: Now, gently fold the thickened pudding mixture into your light and fluffy cream cheese mixture. You want to combine them well, but don’t overmix. Just until everything is integrated and looks wonderfully smooth. Pour this heavenly combined filling directly over the peanut butter crumbles in your pie crust. Smooth it out with a spatula so it’s even and inviting.
- Sprinkle and Chill: Remember that other half of peanut butter crumbles you set aside? Now’s their moment to shine! Sprinkle them evenly over the top of the pie. They’ll add a fantastic finish and more of that beloved peanut butter flavor. Now for the hardest part: refrigeration! Pop that pie into your fridge for a minimum of 4 hours. This chill time is super important to let it set completely, so it’s firm enough to slice beautifully. I always recommend letting it chill overnight if you can; patience truly pays off with this one!
Substitutions & Additions
This pie is fantastic as is, but it’s also a wonderful canvas for your own creative twists! Don’t be afraid to experiment a little.
- Crust Adventures: While a graham cracker crust is classic, you could totally use a pre-made chocolate cookie crust for an extra chocolatey kick. Or, if you’re feeling ambitious, try a homemade no-bake Oreo crust!
- Crunchy Peanut Butter: If you’re a fan of texture, swap out half or all of the creamy peanut butter for crunchy peanut butter in the crumble mixture. You’ll get delightful little peanut pieces throughout!
- Chocolate Drizzle: A melted chocolate drizzle (dark, milk, or even white chocolate!) over the top before serving adds a beautiful touch and extra decadence.
- Candy Toppings: Crushed Reese’s Peanut Butter Cups or chopped peanuts sprinkled on top would be absolutely divine for an extra indulgence.
- Pudding Flavor Swap: Feeling adventurous? Try instant chocolate pudding instead of vanilla for a chocolate-peanut butter dream pie!
- Whipped Cream Finish: A dollop of fresh whipped cream on each slice just before serving adds an extra layer of light, creamy goodness.
Tips for Success
Even though this pie is super easy, a few little tricks can make it absolutely perfect every time.
- Soften That Cream Cheese: I can’t stress this enough! If your cream cheese isn’t soft, you’ll end up with lumps in your filling, and nobody wants that. Take it out of the fridge at least 30 minutes to an hour before you start, or gently soften it in the microwave for 10-15 seconds.
- Don’t Overbeat the Heavy Cream: Once your heavy cream starts to get fluffy, stop beating! If you go too far, you risk turning it into butter (which is delicious, but not what we’re aiming for here).
- Chill Time is Crucial: This isn’t just a suggestion; it’s a command from your taste buds! The 4-hour minimum chill time allows the pudding and cream cheese mixture to firm up beautifully, ensuring clean slices. Planning to make it for a dinner party? Make it the night before – it’ll be perfectly set and ready to impress! For another quick, no-bake peanut butter treat, you might enjoy these peanut butter butterscotch haystacks!
- Quality Peanut Butter: Since peanut butter is such a star here, use a brand you really love the taste of.
How to Store Amish Peanut Butter Cream Pie
Once you’ve tasted this pie, you might wonder if there will be any left to store! But just in case:
Store any leftover pie in the refrigerator, covered tightly with plastic wrap or aluminum foil. It will stay fresh and delicious for 3-4 days. While technically you could freeze it, the texture of the cream cheese and pudding can change slightly upon thawing, becoming a bit grainier. For best results, enjoy it fresh from the fridge!
FAQs
Can I make this pie ahead of time for a party?
Absolutely! This pie is actually fantastic made a day in advance. The extra chilling time allows all the flavors to meld together beautifully, and it will be perfectly set for slicing. Just keep it covered in the refrigerator.
My pie isn’t setting up properly. What went wrong?
The most common culprit is not whisking the instant pudding mixture long enough, or not allowing enough chill time. Make sure you whisk the pudding and milk vigorously for the full 2 minutes until it visibly thickens. And don’t skimp on the refrigeration; 4 hours is the minimum, but longer is better!
Can I use a sugar-free pudding mix?
Yes, you can certainly substitute sugar-free instant vanilla pudding mix if you’re looking to reduce the sugar content. The texture should still be fine, though the flavor might be slightly different.
What if I don’t have heavy cream? Can I use Cool Whip?
While heavy cream provides the best texture for this pie, if you’re in a pinch, you can substitute the heavy cream and granulated sugar mixture with an equal amount (about 4 cups) of thawed whipped topping like Cool Whip. Just fold the pudding mixture into the whipped topping and cream cheese. The flavor and consistency will be slightly different but still delicious!
For more comforting, homemade flavors, check out our recipe for Amish Onion Fritters!
Find more delicious recipes and cooking inspiration by following us on Pinterest!
Grandma's Secret: Easy No-Bake Amish Peanut Butter Cream Pie
Ingredients
Equipment
Method
- Step 1: Whip Up Those Crumbles: First things first, grab a medium-sized bowl. Toss in your creamy peanut butter and powdered sugar. Now, get in there with a spoon or your hands (it's fun, I promise!) and mix them together until you have a lovely crumbly texture, almost like wet sand. This is going to be pure gold in your pie! Once it’s all crumbly, set half of this delicious mixture aside. That's for our glorious topping later.
- Step 2: Create the Creamy Dream Base: In a large mixing bowl – you want plenty of room for this – add your softened cream cheese and granulated sugar. Beat them together with an electric mixer until they're beautifully smooth and completely combined. No lumps allowed! Next, pour in the heavy cream and that lovely vanilla extract. Keep beating, and watch as it transforms into a light, fluffy cloud of creamy goodness. This is going to be so luxurious!
- Step 3: Layer the Peanut Butter Goodness: Time to start building our pie! Take your pre-made graham cracker pie crust. Evenly spread half of those irresistible peanut butter crumbles you made in step one across the bottom. This layer is going to give you a delightful texture and burst of peanut butter in every bite.
- Step 4: Prepare the Pudding Magic: In a separate bowl, it’s pudding time! Whisk together your milk and the instant vanilla pudding mix. Keep whisking for about 2 minutes, or until it starts to thicken up nicely. Don’t worry if it looks a little thin at first; it will thicken as you whisk.
- Step 5: Combine and Fill: Now, gently fold the thickened pudding mixture into your light and fluffy cream cheese mixture. You want to combine them well, but don't overmix. Just until everything is integrated and looks wonderfully smooth. Pour this heavenly combined filling directly over the peanut butter crumbles in your pie crust. Smooth it out with a spatula so it’s even and inviting.
- Step 6: Sprinkle and Chill: Remember that other half of peanut butter crumbles you set aside? Now's their moment to shine! Sprinkle them evenly over the top of the pie. They'll add a fantastic finish and more of that beloved peanut butter flavor. Now for the hardest part: refrigeration! Pop that pie into your fridge for a minimum of 4 hours. This chill time is super important to let it set completely, so it's firm enough to slice beautifully. I always recommend letting it chill overnight if you can; patience truly pays off with this one!
Notes
Substitutions & Additions
- Crust Adventures: While a graham cracker crust is classic, you could totally use a pre-made chocolate cookie crust for an extra chocolatey kick. Or, if you're feeling ambitious, try a homemade no-bake Oreo crust!
- Crunchy Peanut Butter: If you're a fan of texture, swap out half or all of the creamy peanut butter for crunchy peanut butter in the crumble mixture. You'll get delightful little peanut pieces throughout!
- Chocolate Drizzle: A melted chocolate drizzle (dark, milk, or even white chocolate!) over the top before serving adds a beautiful touch and extra decadence.
- Candy Toppings: Crushed Reese's Peanut Butter Cups or chopped peanuts sprinkled on top would be absolutely divine for an extra indulgence.
- Pudding Flavor Swap: Feeling adventurous? Try instant chocolate pudding instead of vanilla for a chocolate-peanut butter dream pie!
- Whipped Cream Finish: A dollop of fresh whipped cream on each slice just before serving adds an extra layer of light, creamy goodness.
Tips for Success
- Soften That Cream Cheese: I can't stress this enough! If your cream cheese isn't soft, you'll end up with lumps in your filling, and nobody wants that. Take it out of the fridge at least 30 minutes to an hour before you start, or gently soften it in the microwave for 10-15 seconds.
- Don't Overbeat the Heavy Cream: Once your heavy cream starts to get fluffy, stop beating! If you go too far, you risk turning it into butter (which is delicious, but not what we're aiming for here).
- Chill Time is Crucial: This isn't just a suggestion; it's a command from your taste buds! The 4-hour minimum chill time allows the pudding and cream cheese mixture to firm up beautifully, ensuring clean slices. Planning to make it for a dinner party? Make it the night before – it'll be perfectly set and ready to impress! For another quick, no-bake peanut butter treat, you might enjoy these peanut butter butterscotch haystacks!
- Quality Peanut Butter: Since peanut butter is such a star here, use a brand you really love the taste of.