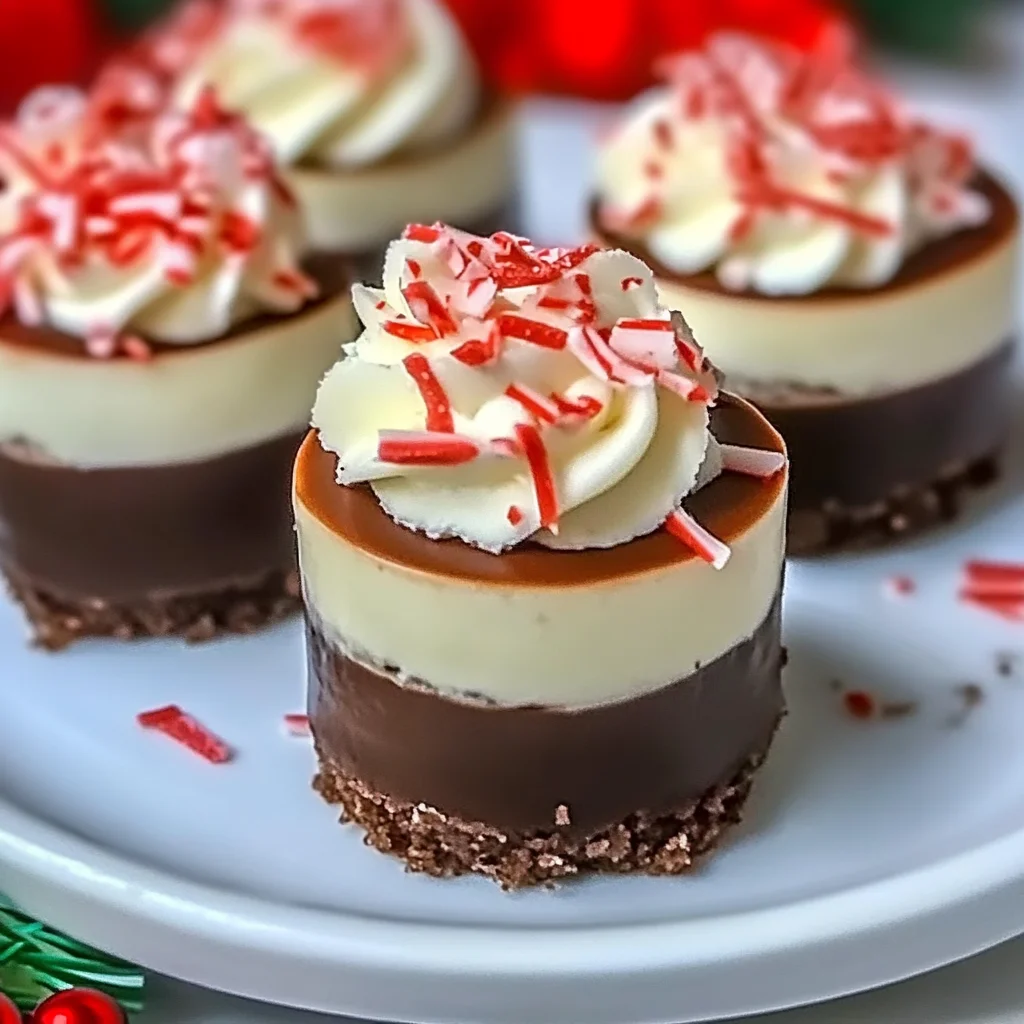
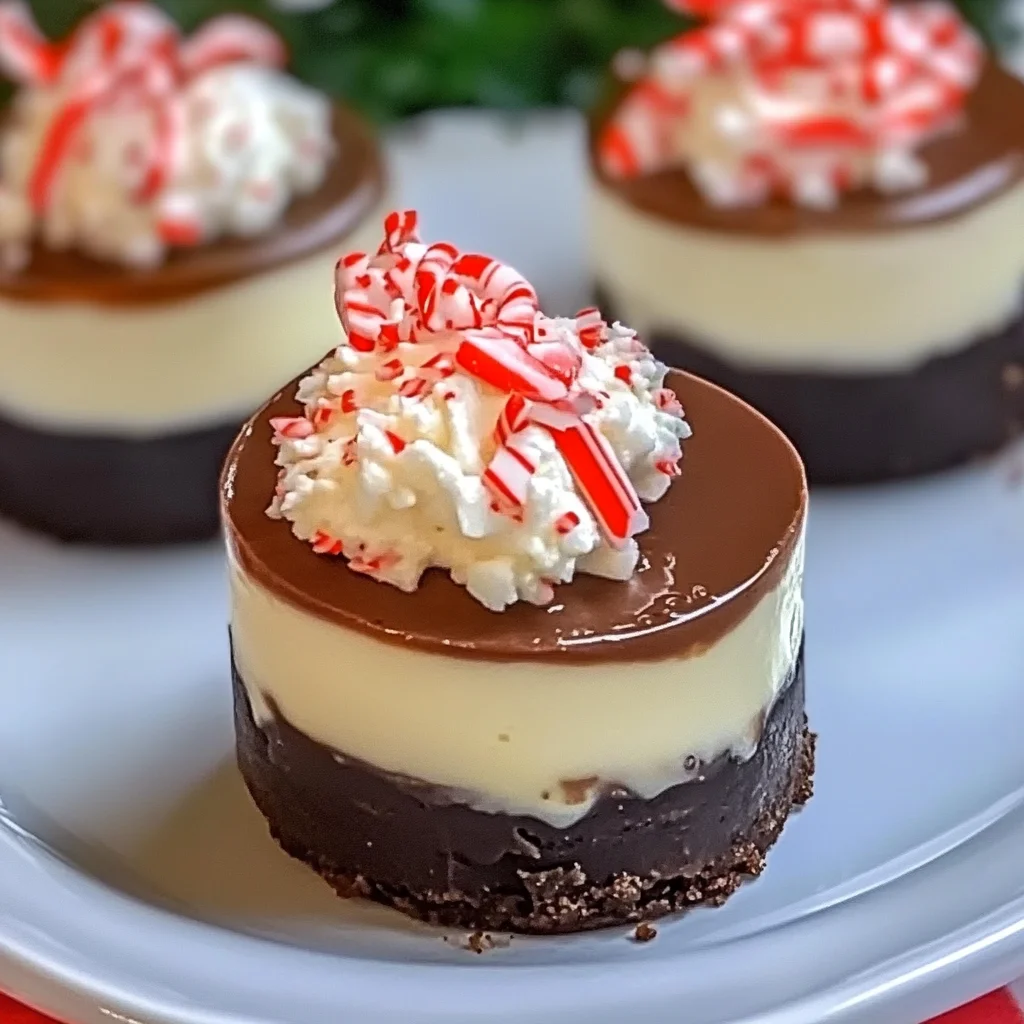
Oh, friend, do you ever get that cozy, nostalgic feeling when the air turns crisp, the festive lights twinkle, and the scent of hot cocoa fills your home? For me, it’s a feeling of pure comfort and joy. And what better way to capture that magical holiday spirit than with a dessert that tastes like a hug in a bite? That’s where these incredible Hot Cocoa Peppermint Cheesecake Bites come in! Imagine your favorite warm, chocolatey drink, infused with a kiss of refreshing peppermint, all wrapped up in a creamy, dreamy cheesecake… but in a mini, perfectly portioned, irresistible form. Trust me, these aren’t just a dessert; they’re a little piece of winter wonderland you can hold in your hand. And the best part? They’re surprisingly easy to whip up, leaving you more time for holiday cheer (and less time stressing in the kitchen!).
Why You’ll Love Hot Cocoa Peppermint Cheesecake Bites
- Fast: Forget hours of baking! These come together quicker than you’d think.
- Easy: No fancy techniques here, just simple steps for stunning results.
- Giftable: Packaged in a pretty box, these make the most thoughtful homemade present. Much like our No-Bake Peppermint Bark Snowballs, they’re perfect for sharing the love during the festive season.
- Crowd-pleasing: Who can resist the classic combo of chocolate and peppermint? Everyone will be asking for the recipe!
Ingredients
Alright, let’s gather our goodies! These are all common ingredients you can easily find at your local grocery store.
For the Crust:
- 1 cup chocolate graham cracker crumbs: The perfect chocolatey foundation! You can buy them pre-crushed or crush your own graham crackers in a food processor.
- 3 tbsp melted butter: Our binder! It brings the crust together and adds a lovely richness.
- 1 tbsp sugar: Just a touch for extra sweetness and to help caramelize the crust ever so slightly.
For the Cheesecake Filling:
- 16 oz cream cheese, softened: The absolute star of our cheesecake! Make sure it’s at room temperature for a silky-smooth filling.
- 1/2 cup sugar: Sweetens our creamy base to perfection.
- 1/2 tsp peppermint extract: This is where the magic happens! That classic, refreshing peppermint kick.
- 1 tsp vanilla extract: A warming, classic flavor that complements the chocolate and peppermint beautifully.
- 2 eggs: These bind our cheesecake and give it that wonderful structure.
- 1/4 cup sour cream: Adds a lovely tang and keeps the cheesecake incredibly moist and tender. Again, room temperature is your friend here!
For the Ganache:
- 1/2 cup heavy cream: The base for our rich, pourable chocolate ganache.
- 4 oz semi-sweet chocolate chips: Melty, delicious chocolate that transforms into a glossy topping.
For Topping:
- Whipped cream: A fluffy cloud of deliciousness to crown each bite.
- Crushed candy canes: For that essential festive crunch and a burst of vibrant color.
- Mini peppermint sticks: The cutest little edible garnish!
How to Make Hot Cocoa Peppermint Cheesecake Bites
Get ready, because making these is a breeze! Just follow these steps, and you’ll be a cheesecake bite pro in no time.
1. Prepare the Crust:

First things first, let’s get that oven warmed up. You’ll want it at 325°F (163°C). While it’s heating, grab a medium bowl and toss together your chocolate graham cracker crumbs, sugar, and melted butter. Give it a good mix until it looks like wet sand. Now, if you’re using mini cheesecake molds, great! If not, a regular muffin tin lined with paper liners works perfectly. Spoon about a tablespoon of the crumb mixture into each mold or liner and gently press it down with the back of a spoon or your fingertips. We want a nice, even base. Pop these into your preheated oven for just 5–7 minutes. This helps set the crust and makes it nice and sturdy. Once they’re out, let them cool completely while you get started on the filling.
2. Make the Cheesecake:
In a large mixing bowl, using an electric mixer, beat your softened cream cheese until it’s wonderfully smooth and creamy. Seriously, no lumps allowed! Now, add in the sugar, peppermint extract, and vanilla extract, and beat again until everything is well combined and fluffy. Next, crack in one egg at a time, mixing just until each egg is incorporated before adding the next. Don’t overmix here; we don’t want to incorporate too much air, which can lead to cracks. Finally, gently fold in the sour cream. This step is key for that rich, velvety texture. Spoon this dreamy cheesecake mixture evenly over your cooled crusts. Bake for 18–22 minutes, or until the edges are set but the centers still have a slight jiggle. Once baked, turn off the oven, crack the door open slightly, and let the cheesecakes cool inside for about 15-20 minutes. This slow cool-down helps prevent cracking. Then, remove them from the oven, let them cool completely on a wire rack, and here’s the most important part: chill them in the refrigerator for at least 2 hours. Cold cheesecake is happy cheesecake!
3. Add Ganache:
While your cheesecake bites are chilling, let’s make that luscious ganache. In a small saucepan, heat your heavy cream over medium heat until it’s just simmering – you’ll see tiny bubbles around the edges. Don’t let it boil! Remove it from the heat and immediately pour it over your semi-sweet chocolate chips in a heat-proof bowl. Let it sit undisturbed for about 2 minutes. This gives the chocolate time to melt beautifully. Then, gently stir with a whisk or spatula starting from the center and working your way out until you have a smooth, glossy, irresistible chocolate ganache. Once your cheesecakes are perfectly chilled, spoon a little ganache over the top of each one. It’ll start to set as it cools, creating that beautiful, shiny finish.
4. Decorate:
Now for the fun part – making them look as good as they taste! Once the ganache has set, pipe a swirl of whipped cream onto each cheesecake bite. I love using a star tip for a festive look! Then, generously sprinkle with crushed candy canes and, for that final flourish, nestle a mini peppermint stick right into the whipped cream. Voila! You’ve got yourself a batch of show-stopping Hot Cocoa Peppermint Cheesecake Bites!
Substitutions & Additions
Part of the joy of baking is making a recipe your own! Here are a few ideas to get your creative juices flowing:
- Crust Variations: Not a fan of chocolate graham crackers? You could totally use regular graham cracker crumbs or even crushed Oreo cookies for an extra dose of chocolatey goodness.
- Chocolate Boost: Want even more chocolate in your cheesecake? Fold in a handful of mini chocolate chips into the cheesecake batter before baking.
- Espresso Kick: For a “mocha peppermint” vibe, add 1/2 teaspoon of instant espresso powder to your cream cheese mixture. It deepens the chocolate flavor beautifully!
- Different Toppings: Instead of (or in addition to!) crushed candy canes, try chocolate shavings, mini marshmallows (to really lean into the hot cocoa theme!), or a drizzle of white chocolate.
- Mint Chocolate Dream: If you’re really passionate about the mint and chocolate combination, you might just adore our Mint Chocolate Cheesecake Cake Recipe for your next big celebration!
Tips for Success
To ensure your Hot Cocoa Peppermint Cheesecake Bites turn out perfect every single time, keep these little secrets in mind:
- Room Temperature is King: Seriously, I can’t stress this enough! Make sure your cream cheese and sour cream are properly softened to room temperature. This is the key to a lump-free, silky-smooth cheesecake batter. Pull them out of the fridge at least an hour before you plan to bake.
- Don’t Overmix: When adding the eggs to your cheesecake batter, mix just until they are incorporated. Overmixing introduces too much air, which can cause your cheesecakes to puff up too much in the oven and then fall, sometimes resulting in cracks.
- Cool Down Slowly: After baking, letting the cheesecakes cool gradually in the turned-off oven (with the door ajar) helps prevent drastic temperature changes, which can also cause cracking. Patience is a virtue when it comes to cheesecake!
- Chill, Chill, Chill: That chilling time in the fridge is absolutely essential. It allows the cheesecake to fully set, firm up, and develop its best texture and flavor. Don’t rush it! For another delightful chilled dessert that’s perfect for a crowd, you might want to try these amazing No-Bake Oreo Cheesecakes.
- Quality Chocolate for Ganache: While semi-sweet chocolate chips work great, using a good quality chocolate bar (chopped) for your ganache can elevate the flavor and give it an even silkier texture.
How to Store Hot Cocoa Peppermint Cheesecake Bites
These little beauties are best enjoyed fresh, but they also store wonderfully! Keep your Hot Cocoa Peppermint Cheesecake Bites in an airtight container in the refrigerator for up to 3-4 days. If you’ve already added the whipped cream and candy cane toppings, they’re still fine in the fridge, but the whipped cream might soften a bit over time, and the candy canes can get a little sticky. If you’re making them ahead, I recommend adding the fresh whipped cream and crushed candy canes just before serving for the best presentation!
FAQs
Got questions? I’ve got answers!
Can I use a different type of crust?
Absolutely! While chocolate graham crackers are divine here, you could easily swap them for regular graham cracker crumbs, crushed Oreo cookies, or even gingersnap cookies for a different festive twist.
Can I make these ahead of time for a party?
Yes, please do! You can make the cheesecake bites (crust, filling, and ganache) up to 2 days in advance. Just store them in an airtight container in the fridge. Add the whipped cream, crushed candy canes, and peppermint sticks right before serving for the freshest look.
What if my cream cheese isn’t soft enough?
If you’re in a pinch, you can unwrap the cream cheese and microwave it in its foil packaging for about 15-30 seconds on low power. Just be careful not to melt it! Or, cut it into smaller cubes and let it sit on the counter for 15-20 minutes.
Can I make these without the peppermint?
Of course! If peppermint isn’t your jam, simply omit the peppermint extract. You’ll still have a delicious chocolate cheesecake bite that’s perfect for any occasion!
I hope you love making and sharing these Hot Cocoa Peppermint Cheesecake Bites as much as I do. Happy baking!
For more delicious recipes and kitchen inspiration, follow us on Pinterest!
Hot Cocoa Peppermint Cheesecake Bites
Ingredients
Equipment
Method
- Step 1: Preheat oven to 325°F (163°C). In a medium bowl, combine chocolate graham cracker crumbs, sugar, and melted butter. Mix until it resembles wet sand. Spoon about 1 tablespoon of crumb mixture into each mini cheesecake mold or paper-lined muffin tin and gently press down. Bake for 5–7 minutes. Let cool completely.
- Step 2: In a large mixing bowl, beat softened cream cheese with an electric mixer until smooth. Add sugar, peppermint extract, and vanilla extract; beat until well combined. Beat in one egg at a time, mixing just until incorporated. Gently fold in the sour cream. Spoon the cheesecake mixture evenly over the cooled crusts.
- Step 3: Bake for 18–22 minutes, or until edges are set and centers have a slight jiggle. Turn off the oven, crack the door slightly, and let cheesecakes cool inside for 15-20 minutes. Remove from oven, cool completely on a wire rack, then chill in the refrigerator for at least 2 hours.
- Step 4: While cheesecakes chill, prepare the ganache. In a small saucepan, heat heavy cream over medium heat until just simmering (tiny bubbles around edges). Remove from heat and immediately pour over semi-sweet chocolate chips in a heat-proof bowl. Let sit undisturbed for 2 minutes. Stir gently with a whisk or spatula from the center outwards until smooth and glossy. Once cheesecakes are chilled, spoon ganache over the top of each one.
- Step 5: Once ganache has set, pipe a swirl of whipped cream onto each cheesecake bite. Garnish generously with crushed candy canes and nestle a mini peppermint stick into the whipped cream. Serve immediately.