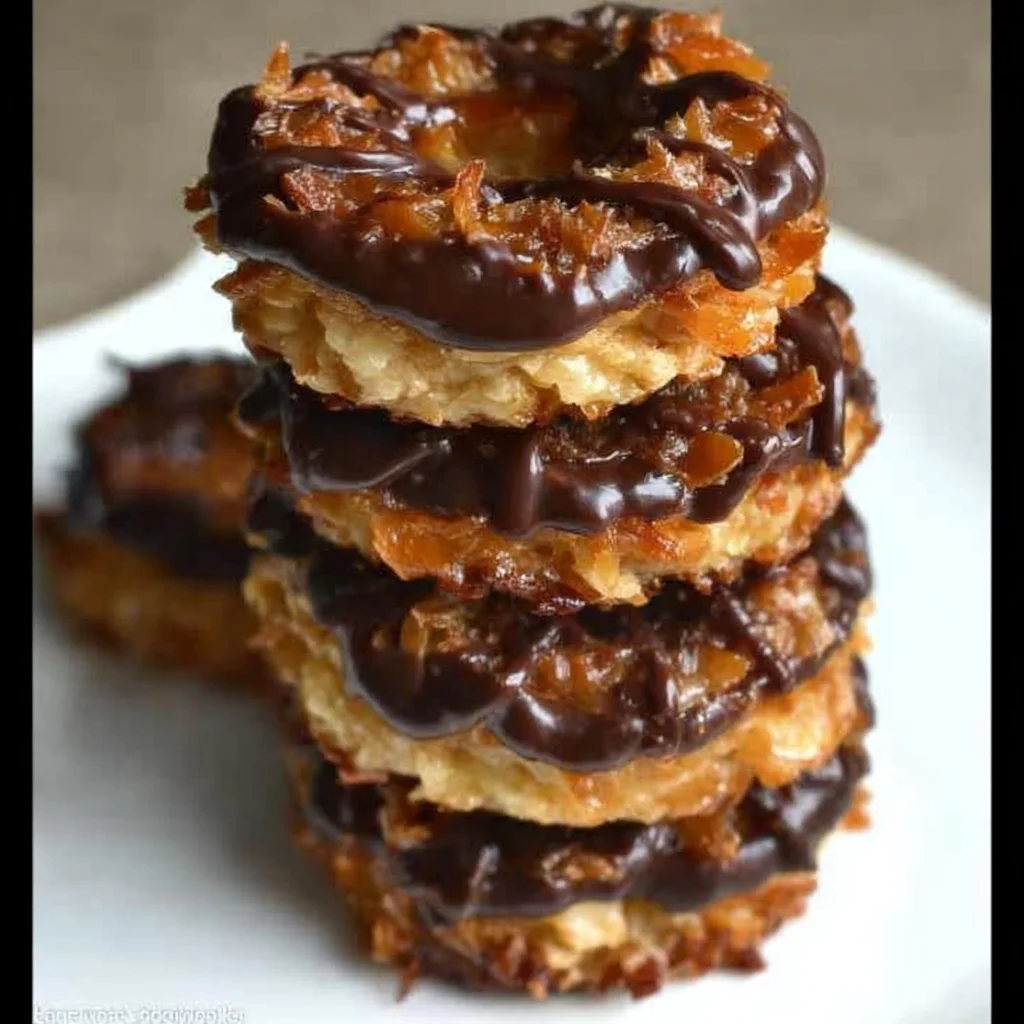
Hey there, cookie lover! Remember that little thrill you’d get when cookie season rolled around? Flipping through the brochure, circling your absolute favorites… and landing on those irresistible ring cookies coated in caramel, coconut, and chocolate? Yep, we’re talking about Samoas (or Caramel deLites, depending on where you live!). What if I told you that you don’t have to wait for that one time a year to enjoy them? That’s right! Making your own Homemade Samoas is totally doable, and honestly, maybe even better than the ones from the box (shhh, don’t tell anyone!).
This recipe brings all that nostalgic flavor right into your kitchen. It might look like a few steps, but each one is simple and totally worth it for that perfect blend of tender shortbread, gooey caramel, toasted coconut, and rich chocolate. Get ready to become everyone’s favorite baker!
Why You’ll Love This Recipe
- Fast(ish): Okay, they have a few layers, but the steps themselves are straightforward and move pretty quickly once you get into the rhythm. Much faster than waiting for a shipment!
- Easy: No fancy equipment needed, just standard kitchen tools and techniques. Perfect for beginners!
- Giftable: These make the most amazing homemade gifts for friends, neighbors, or anyone who needs a little smile.
- Crowd-Pleasing: Seriously, who doesn’t love the Samoa flavor combo? These disappear fast!
- Taste of Nostalgia: Every bite takes you right back to childhood.
- Better than Store-Bought: You control the quality of the ingredients, and that fresh taste is unbeatable!
Ingredients
Here’s what you’ll need to whip up a batch of these beauties. Most of these are probably already hanging out in your pantry!
For the Buttery Shortbread Cookies:
- 2 cups all-purpose flour: The base of our delicious, tender cookie ring.
- 1/4 teaspoon baking powder: Just a tiny bit to give them a little lift.
- 1/4 teaspoon salt: Balances out the sweetness.
- 1/2 cup (1 stick) unsalted butter, softened: Make sure it’s truly softened for easy creaming. Leave it out on the counter for an hour or two before you start.
- 1/2 cup granulated sugar: Sweetens the cookie just right.
- 2 tablespoons milk: Adds a little moisture to the dough.
- 1/2 teaspoon vanilla extract: Essential for that classic cookie flavor.
For the Caramel & Coconut Topping:
- 3 cups shredded sweetened coconut: This is the iconic texture! Sweetened works best here for that classic taste.
- 10-12 oz soft caramel candies (like Werther’s or Kraft caramels) or caramel bits: Using soft candies is the easiest way to get that perfect gooey caramel texture. Bits work great too!
- 2-3 tablespoons milk or heavy cream: Helps the caramels melt into a smooth, pourable sauce. Cream makes it a bit richer!
- 1/4 teaspoon salt: A little touch of salt makes the caramel flavor pop!
For the Chocolate Coating:
- 8 oz dark or semi-sweet chocolate: Use good quality chocolate chips or a chopped bar for the best melting and flavor.
- 1 teaspoon vegetable oil or coconut oil (optional): This isn’t strictly necessary, but adding a tiny bit of oil helps the chocolate melt smoother and gives it a nice sheen once set.
How to Make It
Alright, let’s get baking! We’ll tackle this layer by layer, and you’ll see just how simple it is.
Make the Cookies:
First things first, let’s get our cookie base ready. These are a simple shortbread-style cookie that bakes up perfectly for holding all that delicious topping.
- Preheat your oven to 350°F (175°C). Line baking sheets with parchment paper. This makes cleanup a breeze!
- In a medium bowl, whisk together the flour, baking powder, and salt. Set this aside.
- In a large bowl, grab your softened butter and granulated sugar. Use an electric mixer (or a sturdy whisk and some elbow grease!) to cream them together until they’re light and fluffy. This incorporates air and makes for a tender cookie.
- Add the milk and vanilla extract to the butter mixture and mix until they’re well combined.
- Now, gradually add the dry ingredients to the wet ingredients. Mix on low speed, or by hand, until everything is just combined and forms a cohesive dough. Don’t overmix!
- Divide the dough in half, flatten each half into a disk, wrap them tightly in plastic wrap, and pop them in the refrigerator for at least 1 hour. This chilling step is crucial! It makes the dough firm and much easier to roll out and cut without sticking or losing its shape.
- Once chilled, take one disk out (leave the other in the fridge until you’re ready for it). On a lightly floured surface, roll out the dough to about 1/8-inch thickness.
- Now for the fun part: cutting! Use a 2-inch round cookie cutter to cut out circles. Then, use a smaller cutter (like a thimble, a small bottle cap, or even the wide end of a piping tip) to cut out the centers, creating that iconic ring shape.
- Carefully transfer the cookie rings to your prepared baking sheets. You can re-roll the scraps once to cut out more cookies.
- Bake for 10-12 minutes, or until the edges are just starting to look pale golden brown. You don’t want them too dark!
- Let the cookies cool on the baking sheet for a minute or two before transferring them gently to a wire rack to cool completely. They need to be totally cool before we add the toppings.
Toast the Coconut:
Toasting the coconut is key to that amazing Samoa flavor. It brings out a nuttier, more intense taste!
- While the cookies are cooling (or even while the dough is chilling), spread the shredded sweetened coconut in a single layer on a clean baking sheet.
- Bake it in the same 350°F (175°C) oven for 5-10 minutes. Here’s where you need to be eagle-eyed! Stir the coconut every couple of minutes. It goes from perfectly toasted to burnt very quickly. You’re looking for a lovely golden brown color.
- Once toasted, immediately remove the coconut from the hot pan and transfer it to a bowl or plate to cool. This stops it from continuing to cook on the hot sheet.
Make the Caramel Topping:
This gooey, sweet caramel is the heart of the cookie!
- In a medium saucepan or the top of a double boiler, combine the soft caramel candies (or bits), milk or heavy cream, and salt.
- Heat this mixture over low heat, stirring constantly, until the caramels are completely melted and you have a smooth, glossy sauce. Be patient and keep the heat low to avoid scorching the caramel.
- Remove the pan from the heat and stir in the cooled toasted coconut. Mix it all up so every piece of coconut is coated in that glorious caramel.
Assemble the Samoas:
Now we put it all together! This is where your cookies start to look like the real deal.
- Take your completely cooled cookie rings.
- Working with one cookie at a time, use a small offset spatula or the back of a spoon to spread a thin layer of the melted caramel (without coconut) over the top surface of the cookie ring. The recipe doesn’t specify just caramel first, but this is how the originals are made with a thin caramel layer under the coconut! If you skip this, the coconut-caramel mixture might fall off easier. Self-correction: The recipe says “Spread a thin layer of melted caramel over the top… then Spoon the coconut-caramel mixture…”. Okay, let’s follow the recipe exactly. So, just use the coconut-caramel mixture.
- Spoon the coconut-caramel mixture evenly over the top of the caramel-covered cookies. Gently press the mixture onto the caramel layer to help it adhere well. You want a good mound of that delicious stuff!
- Let the cookies sit for a few minutes on the wire rack to allow the caramel-coconut topping to start setting up a bit. This makes the next step easier.
Coat with Chocolate:
The final layer of deliciousness: chocolate! We’ll dip the bottoms and drizzle the tops.
- Melt the chocolate. You can do this in a double boiler over simmering water, stirring until smooth. Or, melt it in a microwave-safe bowl in 30-second intervals, stirring well after each interval, until smooth and melted.
- If using, stir in the vegetable or coconut oil. This helps thin the chocolate slightly for dipping and gives it a nice shine.
- Dip the bottom of each cookie ring into the melted chocolate, covering the entire bottom surface. Let any excess chocolate drip back into the bowl.
- Place the dipped cookies bottom-down on a clean sheet of parchment paper.
- Now, for the signature drizzle! You can use a fork, a piping bag with a small tip, or even just a spoon to drizzle the remaining melted chocolate back and forth over the tops of the coconut-caramel layer. Make it look rustic and homemade, or neat and tidy – totally up to you!
Chill and Enjoy:
Just a little waiting left!
- Pop the baking sheet with the assembled cookies into the refrigerator for 15-20 minutes, or until the chocolate is completely set and firm.
- Once chilled, stack ’em up (carefully!), put them in a cute tin, or just start munching!

Substitutions & Additions
Want to play around with the recipe a little? Here are a few ideas:
- Chocolate: While dark or semi-sweet is classic, feel free to use milk chocolate if that’s your preference. White chocolate drizzle could also be fun!
- Caramel: If you can’t find soft caramels, you could try making your own chewy caramel, but store-bought soft candies are definitely the easiest route for this recipe.
- Coconut: You could experiment with unsweetened coconut, but the sweetened kind really gives you that authentic flavor and texture.
- Additions: A sprinkle of flaky sea salt over the chocolate drizzle would be divine! You could also add a tiny pinch of cinnamon to the cookie dough.
- Gluten-Free?: I haven’t tested this specifically, but you might be able to swap the all-purpose flour for a 1:1 gluten-free baking blend. Results may vary slightly in texture.
Tips for Success
Making these is pretty straightforward, but here are a few pointers I’ve learned along the way:
- Chill the Dough: Don’t skip that refrigeration step! It’s essential for the dough to hold its shape when rolling and cutting.
- Roll Evenly: Try to roll the dough to a consistent 1/8-inch thickness so your cookies bake evenly.
- Watch the Coconut! Seriously, toasted coconut burns in the blink of an eye. Stay by the oven and stir frequently.
- Low Heat for Caramel: Melt the caramels over low heat and stir constantly to prevent them from scorching or becoming grainy.
- Don’t Overbake the Cookies: You want pale golden cookies, not dark brown ones. They continue to set up a bit as they cool.
- Parchment Paper is Your Friend: Use it on your baking sheets for the cookies and for setting the finished cookies on after dipping. It prevents sticking and makes cleanup easy.
How to Store It
Once the chocolate is set, you can store your homemade Samoas in an airtight container. They keep well at room temperature for about 5-7 days, if they last that long! If it’s warm in your house or you prefer them firmer, you can also store them in the refrigerator. They also freeze beautifully! Store them in a single layer or with parchment paper between layers in a freezer-safe container for up to 2-3 months. Thaw at room temperature or in the fridge.
FAQs
- Q: My caramel seized up. What happened?
A: This usually happens if the heat was too high or if you didn’t stir constantly. Try adding another tablespoon of milk or cream and stirring over very low heat to see if you can bring it back. Patience is key with melting caramel! - Q: Can I use crunchy caramels?
A: The recipe calls for soft chewy caramels specifically because they melt into a smooth sauce easily. Hard or crunchy caramels won’t work the same way. - Q: Why did my cookies spread too much?
A: This could be due to your butter being too soft (melted) or not chilling the dough long enough. Make sure your butter is just softened, not melted, and give that dough at least an hour in the fridge. - Q: Can I use unsweetened coconut?
A: Yes, you can. However, the flavor profile will be less sweet and slightly different from the classic cookie. You might also need to adjust the amount of milk/cream needed to melt the caramels as sweetened coconut has more moisture.
There you have it! Your very own batch of incredible Homemade Samoas. Get ready to share (or hoard, no judgment here!) these delicious treats. Happy baking, my friend!

Homemade Samoas Cookies Recipe
Ingredients
Equipment
Method
- Step 1: Preheat your oven to 350°F (175°C). Line baking sheets with parchment paper.
- Step 2: In a medium bowl, whisk together the flour, baking powder, and salt. Set aside.
- Step 3: In a large bowl, cream together the softened butter and granulated sugar using an electric mixer until light and fluffy.
- Step 4: Add the milk and vanilla extract to the butter mixture and mix until well combined.
- Step 5: Gradually add the dry ingredients to the wet ingredients. Mix on low speed, or by hand, until just combined and forms a cohesive dough. Don't overmix!
- Step 6: Divide the dough in half, flatten each into a disk, wrap tightly in plastic wrap, and refrigerate for at least 1 hour.
- Step 7: Once chilled, take one disk out (leave the other in the fridge). On a lightly floured surface, roll out the dough to about 1/8-inch thickness.
- Step 8: Use a 2-inch round cookie cutter to cut out circles. Then, use a smaller cutter (like a thimble, bottle cap, or piping tip) to cut out the centers, creating the ring shape.
- Step 9: Carefully transfer the cookie rings to your prepared baking sheets. You can re-roll scraps once.
- Step 10: Bake for 10-12 minutes, or until edges are pale golden brown. Let cool on the baking sheet for a minute or two, then transfer to a wire rack to cool completely.
- Step 11: While cookies cool, spread shredded sweetened coconut in a single layer on a clean baking sheet.
- Step 12: Bake coconut in the same 350°F (175°C) oven for 5-10 minutes, stirring every couple of minutes, until golden brown. Immediately transfer to a bowl or plate to cool.
- Step 13: In a medium saucepan or double boiler, combine soft caramel candies (or bits), milk or heavy cream, and salt.
- Step 14: Heat mixture over low heat, stirring constantly, until caramels are completely melted and you have a smooth, glossy sauce. Keep heat low to avoid scorching.
- Step 15: Remove pan from heat and stir in the cooled toasted coconut. Mix until every piece is coated.
- Step 16: Take completely cooled cookie rings. Spoon the coconut-caramel mixture evenly over the top of the cookies.
- Step 17: Gently press the mixture onto the cookie to help it adhere. Let cookies sit for a few minutes on the wire rack to allow the topping to start setting up.
- Step 18: Melt the chocolate in a double boiler or microwave in 30-second intervals, stirring until smooth.
- Step 19: If using, stir in the vegetable or coconut oil.
- Step 20: Dip the bottom of each cookie ring into the melted chocolate, covering the entire bottom surface. Let excess chocolate drip back into the bowl.
- Step 21: Place the dipped cookies bottom-down on a clean sheet of parchment paper.
- Step 22: Drizzle the remaining melted chocolate back and forth over the tops of the coconut-caramel layer using a fork, piping bag, or spoon.
- Step 23: Pop the baking sheet with the assembled cookies into the refrigerator for 15-20 minutes, or until the chocolate is completely set and firm.
- Step 24: Once chilled, store or enjoy!