Remember those after-school snacks, or maybe even those late-night cravings when all you wanted was something cheesy, warm, and utterly satisfying? For me, it often involved some form of pizza, but who has time for a full pizza every time that craving hits? Well, friend, let me introduce you to your new best culinary buddy: Pizza Chips! These little wonders are ridiculously easy, incredibly quick, and trust me, they’re so memorable, you’ll be making them on repeat. They hit all the savory, cheesy, crispy notes you love about pizza, but in a fun, dippable chip form. Get ready to elevate your snack game without any fuss!
Why You’ll Love Pizza Chips
- Fast: From kitchen to couch in under 15 minutes. Seriously!
- Easy: Just a few ingredients and simple steps. No fancy techniques here.
- Giftable: (Okay, maybe not traditionally, but if you showed up with a batch, you’d be everyone’s favorite human!)
- Crowd-pleasing: Kids, adults, picky eaters – everyone adores them. Perfect for game day, movie night, or just because!
Ingredients

You’ll be amazed at how little you need to whip up this deliciousness. It’s truly a pantry staple kind of recipe!
- 1 large flour tortilla: This is your base! Flour tortillas work best for that sturdy yet crispy chip texture. You can experiment with whole wheat or even corn tortillas, but flour is my top pick for classic “chip” vibes.
- 1 cup shredded mozzarella cheese: The star of the show! Mozzarella gives you that classic stretchy, bubbly pizza melt. A good Italian blend with provolone and parmesan also works beautifully for a richer flavor.
- Optional: Dried Italian herbs, garlic powder, or crushed red pepper flakes: These are your flavor magic wands! A sprinkle of Italian herbs makes it taste just like your favorite slice. Garlic powder adds a subtle savory kick, and if you like a little heat, those red pepper flakes are your friend!
How to Make Pizza Chips
Let’s get cooking! This is where the magic happens, and trust me, it’s easier than ordering takeout!
- Get Your Oven Ready: First things first, preheat your oven to a cozy 400°F (200°C). While it’s warming up, grab a baking sheet and line it with parchment paper. This little trick makes cleanup a breeze and ensures your chips don’t stick!
- Build Your Pizza Tortilla: Lay your large flour tortilla flat on the prepared baking sheet. Now for the fun part: evenly sprinkle that delicious shredded mozzarella cheese over the entire surface of the tortilla. Don’t be shy! If you’re using them, now’s the time to add your dried Italian herbs, a dash of garlic powder, or those fiery crushed red pepper flakes. Think of it like seasoning your favorite pizza before it goes into the oven.
- Bake to Perfection: Pop that baking sheet into your preheated oven. Bake for about 8-10 minutes. Keep a close eye on it, because ovens can be quirky! You’re looking for the tortilla edges to turn a beautiful golden brown and the cheese to be gloriously bubbly and melted. That’s how you know it’s done!
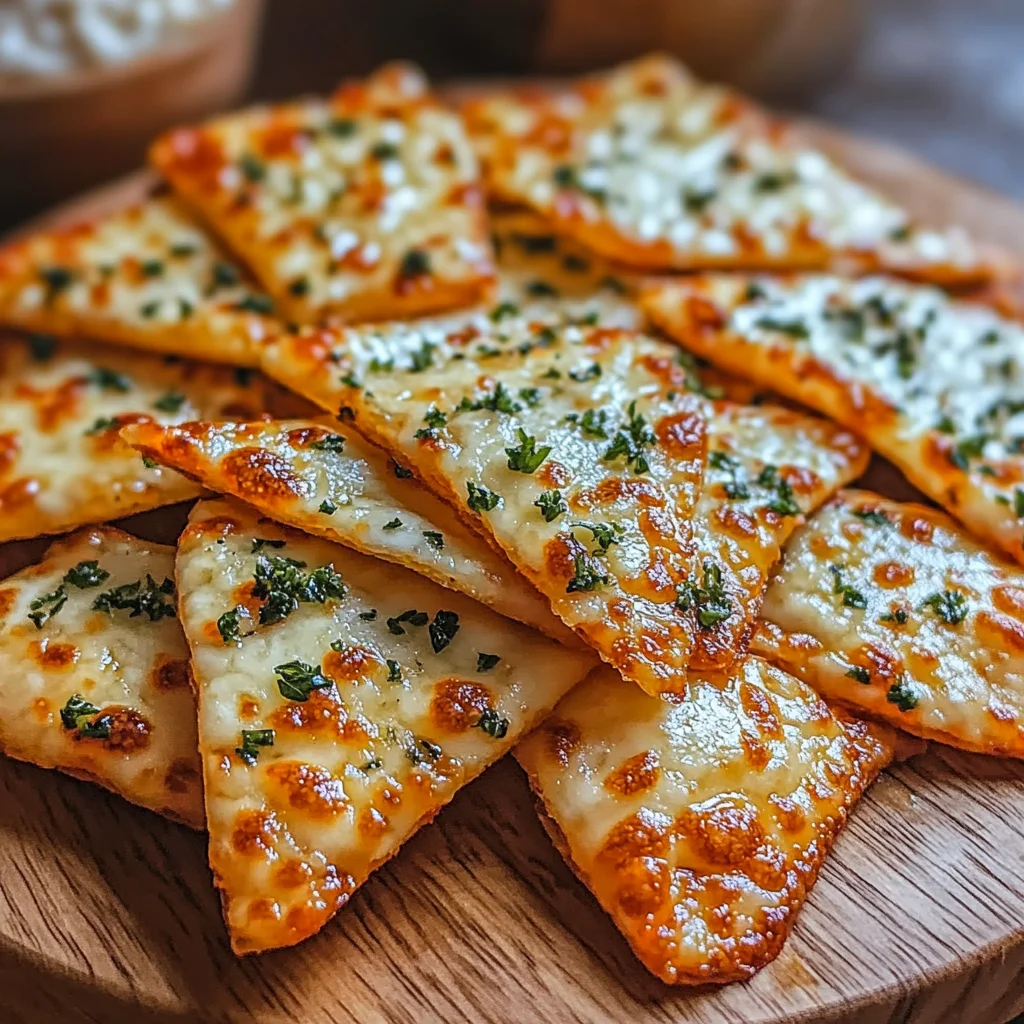
- Slice and Serve: Carefully remove the baking sheet from the oven. Let it cool right there on the sheet for just one minute. This brief cooling period helps the cheese set a tiny bit, making it easier to slice. Now, grab a pizza cutter or a sharp knife and slice your cheesy tortilla into chip-sized pieces. I usually go for triangles, like a classic tortilla chip, but squares work too! Allow the chips to cool just slightly more before you dig in. They’ll crisp up even more as they cool.

Substitutions & Additions
The beauty of Pizza Chips is how customizable they are! Think of this as your starting canvas, and let your culinary imagination run wild.
- Cheese Please! While mozzarella is classic, feel free to experiment with cheddar for a sharper flavor, Monterey Jack for extra meltiness, or even a sprinkle of parmesan for a salty kick. For another cheesy delight that’s perfect for dipping, you might also love making some Crispy Air Fryer Mozzarella Sticks!
- Spice it Up: A dash of smoked paprika, onion powder, or even a pinch of cayenne pepper can add a whole new dimension.
- Mini Meats: Craving pepperoni? Snip mini pepperonis into quarters and sprinkle them on top before baking. Cooked, crumbled bacon bits or finely diced cooked ham are also delicious additions.
- Veggie Power: Finely chopped bell peppers, onions, or even a few thinly sliced mushrooms can be added, but be sure they’re very small so they cook quickly and don’t make the chips soggy.
- Dipping Fun: Serve with marinara sauce for that authentic pizza experience, or try ranch dressing, hot sauce, or even a dollop of sour cream. These chips are also a fantastic scoop for a hearty chili or a creamy dip!
Tips for Success
Making these Pizza Chips is super straightforward, but a few little tips can ensure they turn out absolutely perfect every time!
- Don’t Overload: Resist the urge to pile on too much cheese or too many toppings. A thin, even layer is key for crispy chips. Too much moisture from toppings can make them soggy.
- Watch Your Oven: Ovens vary, so keep a close eye on your chips, especially during the last few minutes. They can go from perfectly golden to burnt pretty quickly! If you’re looking for other easy, cheesy baked goods, you might want to try these Cheesy Garlic Toast Pizzas.
- Cooling is Crucial: That one minute of cooling on the baking sheet really does make a difference. It helps the cheese firm up slightly, preventing it from sticking to your pizza cutter and making cleaner slices.
- Single Layer Rule: Always bake your tortillas in a single layer. If you’re making a big batch, use multiple baking sheets or work in batches. Overlapping tortillas won’t crisp up evenly.
- Air Fryer Option: If you have an air fryer, you can totally make these! Place the prepared tortilla in the air fryer basket (you might need to cut it in half or quarters to fit) and air fry at 375°F (190°C) for 3-5 minutes, or until crispy and golden. It’s another quick way to get that delicious pizza flavor, much like how easy it is to make Homemade Pizza Hut Breadsticks for a quick side.
How to Store Pizza Chips
While these are definitely best enjoyed fresh from the oven, you can absolutely store any leftovers.
- At Room Temperature: Once completely cooled, store Pizza Chips in an airtight container at room temperature for up to 2-3 days. They might lose a bit of their crispness, but the flavor will still be there.
- Reheating: To bring back that satisfying crunch, pop them back in a preheated oven at 350°F (175°C) for a few minutes, or in an air fryer for 1-2 minutes, until crispy again.
FAQs
Got questions? I’ve got answers!
Can I use corn tortillas instead of flour?
You can, but they will have a different texture. Corn tortillas tend to be a bit tougher and less flexible, and they might not bubble up quite the same way. Flour tortillas give you that ideal chip-like crispness.
Can I add sauce before baking?
I don’t recommend adding a full layer of pizza sauce before baking, as it can make the chips soggy and prevent them from crisping up. It’s best to use sauce for dipping after they’re baked!
Are these good for meal prep?
While delicious, these are truly a “make and eat immediately” kind of snack for optimal crispiness. You can pre-shred your cheese and measure out spices to cut down on prep time right before baking.
Can I make these in a toaster oven?
Absolutely! A toaster oven is perfect for a small batch. Just keep an even closer eye on them, as toaster ovens can heat up very quickly.
For more delicious and easy recipes, make sure to follow us on Pinterest!
Easy Homemade Pizza Chips: Your New Favorite Crispy, Cheesy Snack!
Ingredients
Equipment
Method
- Step 1: Get Your Oven Ready: Preheat your oven to 400°F (200°C). Line a baking sheet with parchment paper.
- Step 2: Build Your Pizza Tortilla: Lay the flour tortilla flat on the prepared baking sheet. Evenly sprinkle the shredded mozzarella cheese over the entire surface. If desired, add dried Italian herbs, garlic powder, or crushed red pepper flakes.
- Step 3: Bake to Perfection: Bake for 8-10 minutes, or until the tortilla edges are golden brown and the cheese is gloriously bubbly and melted. Keep a close eye as ovens can vary.
- Step 4: Slice and Serve: Carefully remove the baking sheet from the oven. Let it cool on the sheet for one minute to allow the cheese to set. Slice the cheesy tortilla into chip-sized triangles or squares using a pizza cutter or sharp knife. Allow to cool slightly more to crisp up further before serving immediately.