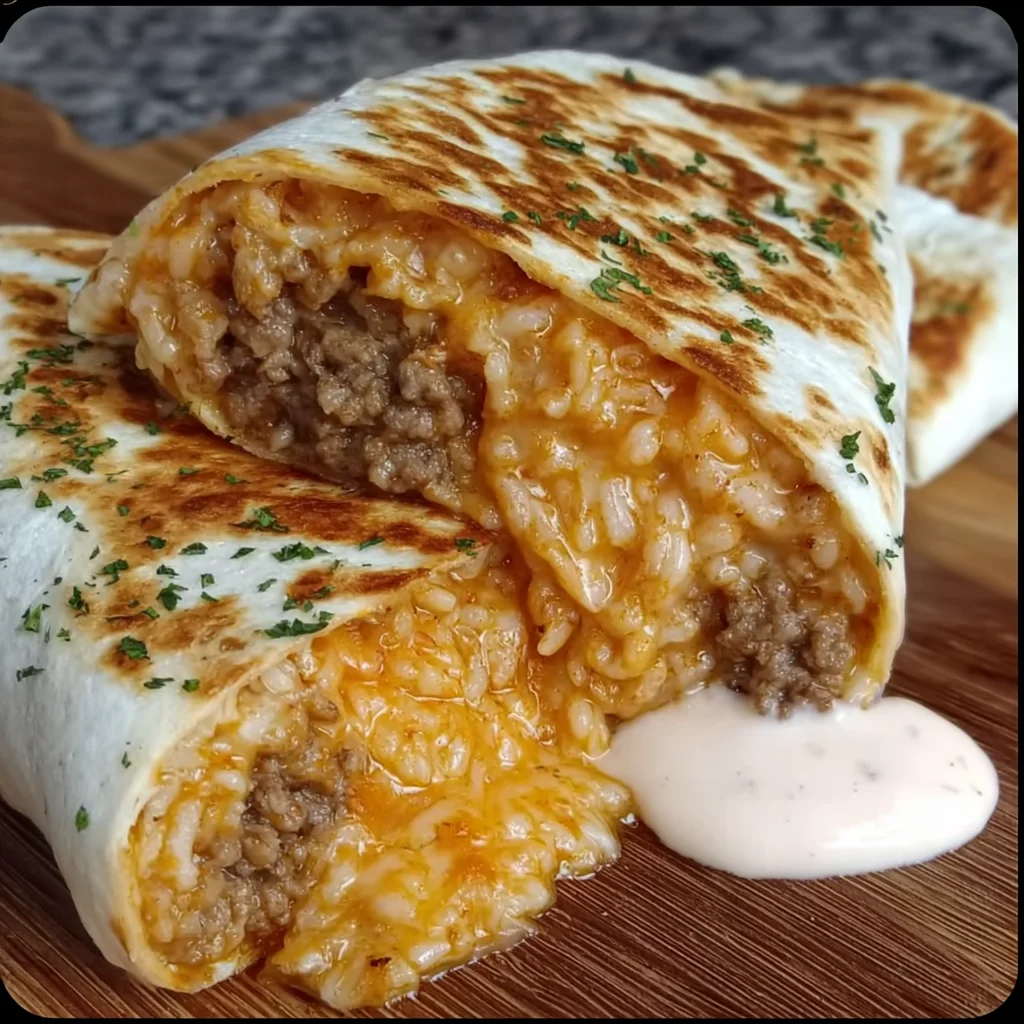
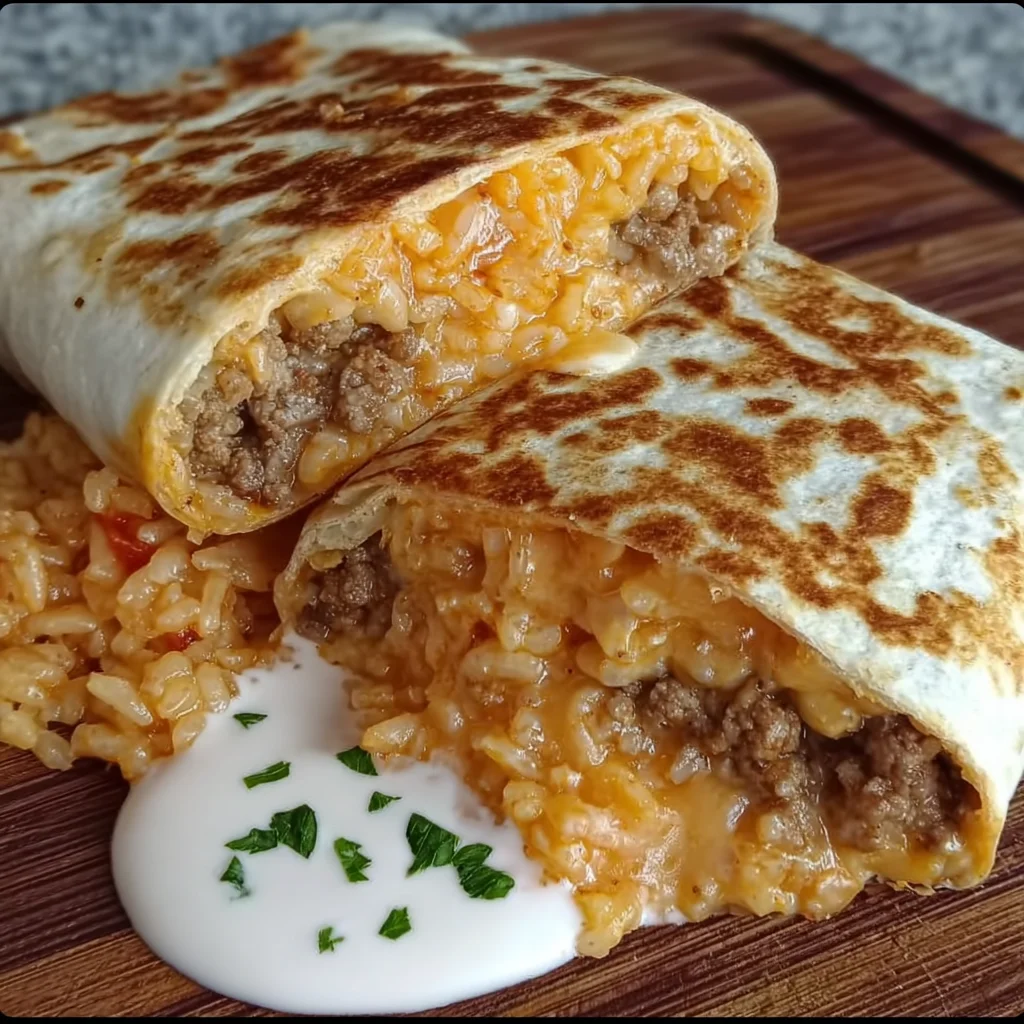
Hey there, friends! Let’s talk comfort food mashups, shall we? There are some culinary combinations that just feel right. Like peanut butter and jelly, or tacos and Tuesdays. And then, there’s the glorious union of a perfectly grilled cheese and a hearty, flavorful burrito. Pure magic!
If you’ve ever stared into the fridge wondering what deliciousness you can whip up that’s comforting, satisfying, and maybe a little bit fun, this Best Grilled Cheese Burrito is your answer. It’s surprisingly easy to make, comes together faster than you’d think, and trust me, it’s one of those meals your family (or just you, no judgment!) will be dreaming about long after the last bite. It’s crispy on the outside, packed with delicious fillings, and that spicy mayo? Oh boy, it’s a game-changer. Let’s get cooking!
Why You’ll Love This Recipe
- Fast: Gets dinner on the table without a fuss.
- Easy: Simple steps, simple ingredients.
- Giftable: (Okay, maybe not giftable in the traditional sense, but definitely shareable with loved ones who deserve a cheesy, spicy hug in a tortilla!)
- Crowd-pleasing: Who doesn’t love crispy, cheesy, spicy goodness?
Ingredients
Gather ’round, let’s talk about the goodies you’ll need. Nothing fancy here, just good, honest food!
- Ground Beef: 1 lb. The base of our hearty filling. You can use leaner if you prefer, but 80/20 or 90/10 works great.
- Taco Seasoning: 1 tablespoon. Use your favorite packet or whip up your own!
- Water: 1/4 cup. Helps the seasoning meld into the beef beautifully.
Now for that incredible spicy mayo…
- Mayonnaise: 1/2 cup. The creamy backbone. Use good quality mayo here!
- Sriracha: 2 tablespoons (or to taste). This is where the kick comes in. Adjust it up or down depending on how much heat you like!
- Lime Juice: 1 tablespoon. Brightens everything up! Freshly squeezed is always best.
- Garlic Powder: 1/2 teaspoon. Adds that essential savory depth.
And the other crucial components:
- Large Flour Tortillas: 4 (burrito size). Make sure they are nice and pliable – you’ll need them big enough to hold all that goodness!
- Cooked White Rice: 2 cups, cooled. Using cooled rice is key for getting that slightly fried texture later without it turning gummy. Leftover rice is perfect!
- Finely Diced White Onion: 1/2 cup. Adds a little bite and freshness.
- Chopped Fresh Cilantro: 1/4 cup. Adds that classic Mexican-inspired flavor. Don’t skip it if you’re a cilantro lover!
- Shredded Cheddar Cheese: 1 cup. Hello, classic melting cheese!
- Shredded Monterey Jack Cheese: 1 cup. Melts beautifully and adds a lovely mild flavor. Using a blend is the secret to optimal cheesiness.
- Olive Oil: 2 tablespoons. For cooking our rice and getting that gorgeous crispy exterior on the burritos.
- Optional Additions: Pickled jalapeños (for extra heat and tang!), sour cream, guacamole (for serving!).
How to Make It
Alright, let’s roll up our sleeves and make this magic happen. You’ve got this!
1. Get that Ground Beef Ready: Grab your largest skillet and pop it over medium-high heat. Add your ground beef. Use a spoon to break it up into crumbles as it cooks. Keep going until it’s all browned up – should take about 5-7 minutes. Once it’s cooked, drain off any excess grease. We don’t want our burritos swimming in fat! Now, sprinkle that taco seasoning over the beef and pour in the water. Give it a good stir to make sure every bit of beef is coated. Let it simmer away for 5-7 minutes, or until most of the liquid is soaked up and the beef smells amazing and is well-seasoned. Slide the beef out of the skillet and set it aside for a moment.
2. Whip up the Spicy Mayo: While your beef is simmering or cooling slightly, grab a small bowl. Add the mayonnaise, sriracha (start with 2 tablespoons, you can always add more later!), lime juice, and garlic powder. Whisk everything together until it’s super smooth and creamy. Give it a little taste – need more heat? Add more sriracha! Set this aside too.
3. Make the Cilantro Fried Rice: Wipe out that large skillet (or grab a wok if you have one!). Heat 1 tablespoon of the olive oil over medium-high heat. Toss in your finely diced onion and cook for just 2-3 minutes until they soften up a bit and become fragrant. Now, add your cooled cooked rice. This is important – hot rice can get mushy. Stir-fry the rice for about 3-5 minutes, breaking up any clumps with your spoon, until it’s heated through and maybe starting to get a little toasted. Stir in that chopped fresh cilantro right at the end. Smell that? Delicious!
4. Assemble Your Flavor Bombs: This is where it all comes together! Lay one of your large flour tortillas flat on a clean surface. Here’s a little trick I like: sprinkle about 1/4 cup of your mixed shredded cheddar and Monterey Jack cheese directly onto the tortilla first. This acts as a sort of glue and helps the filling stay put and gets extra melted on the inside!
5. Add the Beef: On one side of the cheese layer (think about where you’ll start rolling), add about 1/4 of your seasoned ground beef.
6. Pile on the Rice: Right next to the beef, add about 1/2 cup of your cilantro fried rice.
7. Drizzle the Magic: Now, generously drizzle some of that incredible spicy mayo over the beef and rice. If you’re using pickled jalapeños, scatter a few over the filling now too. Yum!
8. Fold and Roll! This is key to a successful grilled burrito. First, fold in the sides of the tortilla tightly over the filling. Then, starting from the bottom edge (the side with the beef/rice/mayo), tightly roll up the burrito towards the top. You want it to be snug and compact so nothing falls out when you grill it. Repeat this process with your remaining tortillas and fillings.
9. Time to Grill! Grab that large non-stick skillet or a griddle. Heat the remaining 1 tablespoon of olive oil over medium heat. You don’t want it too high, or the tortilla will burn before the inside gets heated and the cheese melts.
10. Get Them Crispy: Carefully place your assembled burritos, seam-side down, onto the hot skillet. This helps seal the seam as it cooks. Cook for 3-4 minutes on that first side, until it’s a beautiful golden brown and crispy. Then, use a spatula to carefully flip them over and cook for another 3-4 minutes on the other side, or until both sides are golden and crispy, and you can tell that cheese inside is wonderfully melted.
11. Serve ‘Em Hot! Remove the gorgeous, crispy burritos from the skillet. You can slice them in half diagonally if you like (makes them easier to handle and shows off the layers!). Serve them immediately, maybe with a dollop of sour cream or a scoop of guacamole if you’re feeling extra!
Substitutions & Additions
This recipe is super flexible! Feel free to get creative:
- Different Protein: Swap the ground beef for ground chicken, turkey, shredded chicken, or even black beans for a vegetarian version. Make sure to season the protein or beans well!
- Cheese, Please! Instead of the cheddar/Monterey Jack blend, try Pepper Jack for more heat, a Mexican blend, or even Provolone or Mozzarella for a different vibe.
- Mix up the Sauce: Don’t like mayo? Try a simple hot sauce drizzle, a creamy avocado crema, or even just some sour cream or salsa.
- Veggie Boost: Sneak in some sautéed bell peppers and onions, corn, or black beans into the filling.
- Add Heat: Besides jalapeños, try a pinch of cayenne in the beef seasoning or a dash of your favorite hot sauce in the filling.
- Sour Cream Rice: Instead of just cilantro, stir a spoonful of sour cream and a pinch of cumin into the rice.
Tips for Success
Want to make your Grilled Cheese Burritos absolutely perfect? Keep these tips in mind:
- Don’t Overfill: It’s tempting to pack them full, but too much filling makes rolling difficult and can lead to blowouts on the grill.
- Roll Tight: Practice makes perfect! Folding in the sides first and then rolling tightly from the bottom helps create a sturdy burrito.
- Cooled Rice is Key: Seriously, using cold or room temperature cooked rice prevents your rice from becoming a sticky, mushy mess when you stir-fry it.
- Medium Heat is Your Friend: Be patient when grilling. Medium heat allows the tortilla to crisp up and the cheese to melt without burning the outside.
- Seam-Side Down First: Starting the burrito on the grill with the seam facing down helps seal it shut as the tortilla heats up.
- Prep Ahead: You can cook the ground beef and make the spicy mayo a day in advance. Store them in separate containers in the fridge. Then, on cooking day, just make the rice, assemble, and grill!
How to Store It
Got leftovers? Lucky you! Allow the burritos to cool completely. Wrap them tightly in plastic wrap or foil, or place them in an airtight container. They’ll keep in the refrigerator for 2-3 days.
To reheat, you can pop them back in a skillet over medium heat to re-crisp the tortilla, or microwave them (though you’ll lose the crispy texture). If microwaving, start with 1-2 minutes, flipping halfway.
FAQs
Here are a couple of questions folks often ask about these delicious burritos:
Q: Can I make these vegetarian?
A: Absolutely! Swap the ground beef for canned black beans (rinsed and drained) seasoned with the taco seasoning and a splash of water, or use a plant-based ground meat alternative.
Q: Can I bake these instead of grill them in a pan?
A: Yes, you can! While pan-grilling gives the best crispy texture, you can bake them. Place assembled burritos on a baking sheet. Brush lightly with oil. Bake at 400°F (200°C) for 15-20 minutes, flipping halfway, until golden and heated through. They won’t be quite as crispy, but still delicious!
Q: What’s the best cheese blend to use?
A: I love the cheddar and Monterey Jack blend for flavor and meltability. But honestly, any good melting cheese or Mexican blend will work great!
Q: Why is cooling the rice important?
A: Using cooled or leftover rice prevents it from getting gummy when you stir-fry it. Hot rice can steam and clump up, while cool rice separates better and can crisp up slightly in the pan.

Crispy, Cheesy, Spicy Grilled Cheese Burrito
Ingredients
Equipment
Method
- Step 1: Get that Ground Beef Ready: Grab your largest skillet and pop it over medium-high heat. Add your ground beef. Use a spoon to break it up into crumbles as it cooks. Keep going until it's all browned up – should take about 5-7 minutes. Once it's cooked, drain off any excess grease. Now, sprinkle that taco seasoning over the beef and pour in the water. Give it a good stir to make sure every bit of beef is coated. Let it simmer away for 5-7 minutes, or until most of the liquid is soaked up and the beef smells amazing and is well-seasoned. Slide the beef out of the skillet and set it aside for a moment.
- Step 2: Whip up the Spicy Mayo: While your beef is simmering or cooling slightly, grab a small bowl. Add the mayonnaise, sriracha (start with 2 tablespoons, you can always add more later!), lime juice, and garlic powder. Whisk everything together until it's super smooth and creamy. Give it a little taste – need more heat? Add more sriracha! Set this aside too.
- Step 3: Make the Cilantro Fried Rice: Wipe out that large skillet (or grab a wok if you have one!). Heat 1 tablespoon of the olive oil over medium-high heat. Toss in your finely diced onion and cook for just 2-3 minutes until they soften up a bit and become fragrant. Now, add your cooled cooked rice. Stir-fry the rice for about 3-5 minutes, breaking up any clumps with your spoon, until it's heated through and maybe starting to get a little toasted. Stir in that chopped fresh cilantro right at the end.
- Step 4: Assemble Your Flavor Bombs: Lay one of your large flour tortillas flat on a clean surface. Sprinkle about 1/4 cup of your mixed shredded cheddar and Monterey Jack cheese directly onto the tortilla first. This acts as a sort of glue.
- Step 5: Add the Beef: On one side of the cheese layer (think about where you'll start rolling), add about 1/4 of your seasoned ground beef.
- Step 6: Pile on the Rice: Right next to the beef, add about 1/2 cup of your cilantro fried rice.
- Step 7: Drizzle the Magic: Now, generously drizzle some of that incredible spicy mayo over the beef and rice. If you're using pickled jalapeños, scatter a few over the filling now too.
- Step 8: Fold and Roll! Fold in the sides of the tortilla tightly over the filling. Then, starting from the bottom edge, tightly roll up the burrito towards the top. Repeat this process with your remaining tortillas and fillings.
- Step 9: Time to Grill! Grab that large non-stick skillet or a griddle. Heat the remaining 1 tablespoon of olive oil over medium heat. You don't want it too high.
- Step 10: Get Them Crispy: Carefully place your assembled burritos, seam-side down, onto the hot skillet. Cook for 3-4 minutes on that first side, until it's a beautiful golden brown and crispy. Then, use a spatula to carefully flip them over and cook for another 3-4 minutes on the other side, or until both sides are golden and crispy, and you can tell that cheese inside is wonderfully melted.
- Step 11: Serve 'Em Hot! Remove the gorgeous, crispy burritos from the skillet. You can slice them in half diagonally if you like. Serve them immediately, maybe with a dollop of sour cream or a scoop of guacamole if you're feeling extra!