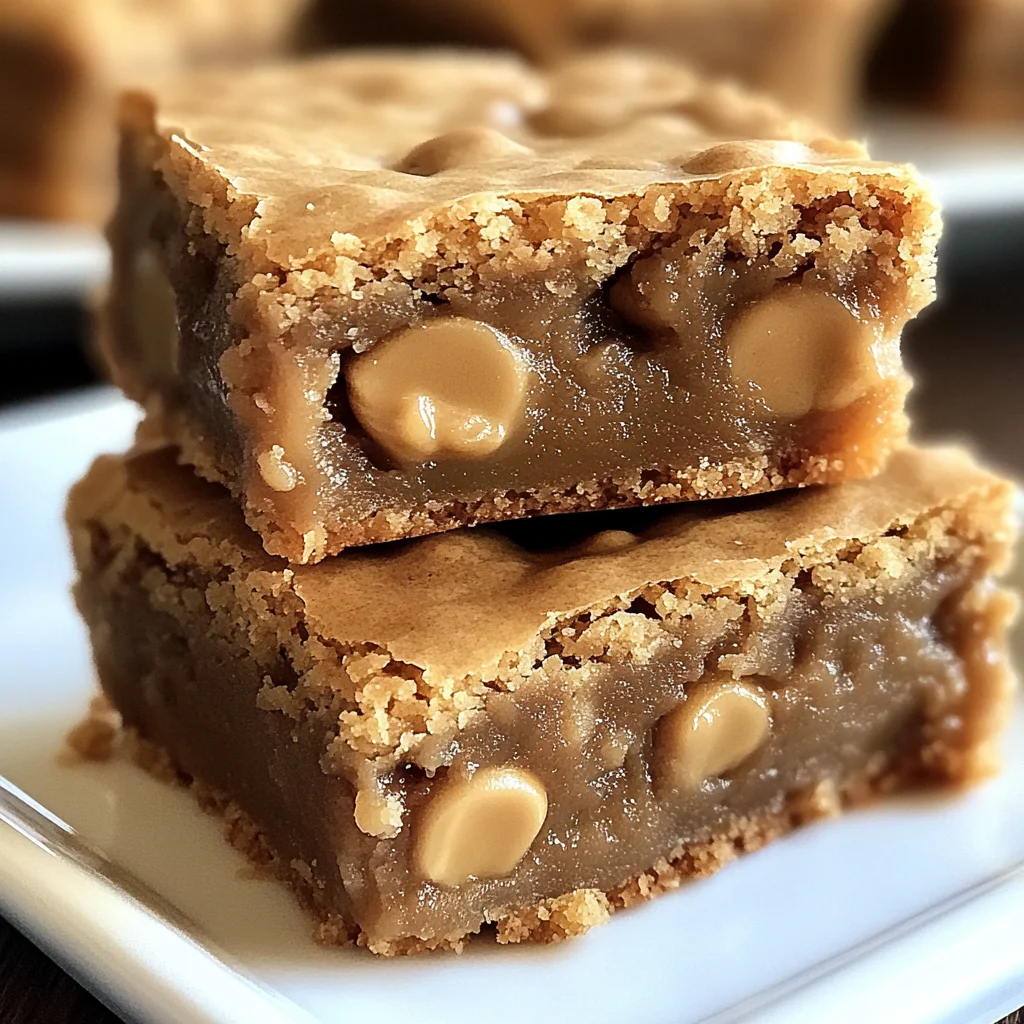
There’s something truly magical about a recipe that instantly transports you back to your grandma’s cozy kitchen—the smell of butter melting, the warm laughter echoing, and the sweet anticipation of a freshly baked treat. Grandma’s Chewy Butterscotch Blondies are exactly that kind of recipe. They’re a comforting hug in dessert form, chewy and rich with the buttery sweetness of butterscotch chips that melt just perfectly into every bite. If you’re looking for a quick, easy, and utterly memorable dessert that will have everyone asking for seconds, you’re in the right place!
These blondies are not only delicious but come together quickly, making them a fantastic last-minute treat or a thoughtful homemade gift. Whether you’re new to baking or a seasoned pro, I’m here to walk you through every step with tips I’ve picked up over the years. Plus, I’ll share some fun ideas to make these blondies your very own.
Why You’ll Love Grandma’s Chewy Butterscotch Blondies
- Fast: Ready in under an hour from start to finish, including baking and cooling time.
- Easy: Simple ingredients and straightforward steps make it perfect for bakers of all skill levels.
- Giftable: Wrapped up in a pretty box, these blondies make a heartfelt homemade gift everyone will adore.
- Crowd-pleasing: Sweet, chewy, and packed with butterscotch chips, they’re a guaranteed hit at any gathering.
Ingredients
This recipe calls for simple pantry staples that you likely already have on hand. Let’s take a closer look:
- 1 cup unsalted butter, melted: Using unsalted butter lets you control the salt level perfectly. Melting the butter helps create those chewy edges we all love.
- 2 cups packed brown sugar: Brown sugar adds moisture and that deep caramel flavor that complements butterscotch beautifully.
- 2 large eggs: Eggs bind everything together and contribute to the blondies’ rich texture.
- 2 teaspoons vanilla extract: Pure vanilla extract enhances the sweetness and adds a lovely aroma.
- 2 cups all-purpose flour: Provides structure to the blondies. If you want a gluten-free twist, I’ll share alternatives below.
- 1/2 teaspoon baking powder: Gives just a touch of lift so the blondies aren’t too dense.
- 1/2 teaspoon salt: Balances the sweetness and enhances the butterscotch flavor.
- 1 1/2 cups butterscotch chips: The star of the show! These melt into little pockets of gooey sweetness throughout.
How to Make Grandma’s Chewy Butterscotch Blondies
Now, let’s get to the fun part—baking! Follow these steps, and I promise you’ll end up with the perfect batch every time.
- Preheat your oven to 350°F (175°C). This is the sweet spot for baking blondies—warm enough to bake through evenly without drying out.
- Grease a 9×13-inch baking pan. You can use butter, non-stick spray, or even parchment paper for easy removal. I like to line my pan with parchment and leave a little overhang. This way, you can lift the blondies out easily for cutting.
- In a large bowl, combine the melted butter and packed brown sugar. Stir until smooth and well combined. You’ll notice the mixture becomes glossy and thick, which is exactly what you want.
- Add the eggs and vanilla extract. Beat them in well, so the batter is smooth and shiny. This step is where the magic starts to happen—once combined, your batter should be thick but pourable.
- Stir in the flour, baking powder, and salt. Mix just until everything is combined. Be careful not to overmix here; overworking the batter can make your blondies tough instead of chewy.
- Fold in the butterscotch chips. Use a spatula to gently incorporate them so they’re evenly distributed but still intact. The chips will melt during baking and create those dreamy pockets of sweetness.
- Spread the batter evenly into the prepared pan. Use the back of your spatula or a spoon to smooth the top. Even layering helps with uniform baking.
- Bake for 25–30 minutes. You’re looking for the edges to be set and lightly golden, while the center should still be a bit soft but not jiggly. Remember, blondies continue to set as they cool.
- Cool completely before cutting into squares. This is crucial! Cutting too early can cause them to crumble or stick. I like to let mine cool for at least an hour, which also makes them easier to handle and enjoy.
If you love classic desserts with a buttery twist, you might also enjoy the nostalgic charm of these Earl Grey Cookies—they’re another family favorite that’s quick to whip up for tea time or dessert.
Substitutions & Additions
One of the best things about this recipe is how easy it is to customize. Here are some ideas to make these blondies uniquely yours or to accommodate what you have on hand:
- Swap butterscotch chips for chocolate chips or white chocolate chips: Each gives a different but equally delicious flavor profile. I sometimes mix half butterscotch and half chocolate chips for a delightful combo.
- Make them gluten-free: Replace the all-purpose flour with a gluten-free baking blend. Just make sure it contains xanthan gum to hold the blondies together well.
- Add nuts: Chopped pecans, walnuts, or macadamia nuts add a wonderful crunch and nuttiness that pairs perfectly with butterscotch. Toast them lightly before adding for extra flavor.
- Swirl in caramel or cream cheese: For a more decadent treat, dollop spoonfuls of caramel sauce or softened cream cheese on top before baking and swirl with a knife for a marbled effect.
- Spice it up: A pinch of cinnamon or nutmeg enhances the warm flavors, especially if you’re baking these blondies close to fall or winter.
For a fruity twist, you might even want to try pairing these blondies with a cozy cup of pumpkin spice latte or serve them alongside a slice of Pumpkin Banana Loaf for a cozy autumn dessert spread.
Tips for Success
From my many afternoons baking in grandma’s kitchen, here are some tips to ensure your blondies come out perfect every time:
- Don’t overmix the batter: Once you add the flour, stir just until the dry ingredients disappear. Overmixing develops gluten, making the blondies tough instead of chewy.
- Use packed brown sugar: This is key for moisture and flavor. Light or dark brown sugar works, but dark will give a richer caramel taste.
- Watch your baking time: Because ovens vary, start checking around 22 minutes. The blondies should be set on the edges and slightly soft in the center.
- Cool completely before cutting: This step is essential for neat squares. If you’re impatient like me, chilling them in the fridge after cooling speeds up the process.
- Prep ahead: You can mix the batter and refrigerate it for up to 24 hours before baking. Just bring it back to room temperature and stir gently before spreading in the pan.
If you’re ever in the mood for another easy and crowd-pleasing snack, check out my recipe for Muddy Buddies. They’re a crunchy, sweet treat with peanut butter and chocolate that’s just as addictive!
How to Store Grandma’s Chewy Butterscotch Blondies
Storing your blondies properly will keep them chewy and delicious for days. Here’s how I recommend:
- Room temperature: Store the blondies in an airtight container at room temperature for up to 3 days. Make sure they’re completely cooled before sealing to avoid sogginess.
- Refrigeration: If you want them to last longer, keep them in the fridge for up to a week. They might firm up a bit, so I like to warm them slightly in the microwave before serving.
- Freezing: Blondies freeze wonderfully. Wrap individual squares tightly in plastic wrap and place them in a freezer-safe bag or container. Freeze for up to 3 months. Thaw at room temperature or warm gently before enjoying.
One of my favorite storage hacks is to keep a batch in the freezer for unexpected guests or a sweet craving. They thaw quickly and taste almost like fresh-baked!
FAQs
- Can I use white sugar instead of brown sugar?
- Brown sugar adds moisture and a caramel flavor that white sugar can’t replicate. You might get a drier and less flavorful blondie if you substitute it completely. If needed, try half brown and half white sugar.
- Why are my blondies crumbly?
- Overbaking or overmixing can cause crumbly blondies. Make sure to follow the baking time closely and mix just until combined. Also, using packed brown sugar helps retain moisture.
- Can I make these vegan?
- Yes! Replace the butter with a vegan butter or coconut oil and use flax eggs (1 tablespoon ground flaxseed + 3 tablespoons water per egg). The texture may vary slightly but still delicious!
- What’s the best way to cut blondies neatly?
- Cool them completely, then chill for about 30 minutes. Use a sharp knife wiped clean between cuts to get nice, clean edges.
I hope you enjoy making these chewy butterscotch blondies as much as I do. They’re the perfect sweet treat to share with loved ones, or just to savor quietly with a cup of coffee. For more comforting and delicious recipes, you might want to explore other favorites on Easily Cooked, where you’ll find everything from savory meals to sweet indulgences.
Ready to make these? I promise the smell alone will fill your home with warmth and nostalgia. Happy baking!
Don’t forget to follow my Pinterest for more tasty recipes and kitchen inspiration!
Grandma's Chewy Butterscotch Blondies
Ingredients
Equipment
Method
- Step 1: Preheat your oven to 350°F (175°C).
- Step 2: Grease a 9x13-inch baking pan or line it with parchment paper, leaving an overhang for easy removal.
- Step 3: In a large bowl, combine the melted butter and packed brown sugar, stirring until smooth and glossy.
- Step 4: Add the eggs and vanilla extract; beat well until the batter is smooth and shiny.
- Step 5: Stir in the flour, baking powder, and salt just until combined—do not overmix.
- Step 6: Fold in the butterscotch chips gently to distribute evenly.
- Step 7: Spread the batter evenly in the prepared pan and smooth the top.
- Step 8: Bake for 25–30 minutes, until edges are set and lightly golden, and the center is slightly soft but not jiggly.
- Step 9: Cool completely before cutting into squares to prevent crumbling.