Oh my goodness, friends. If there’s one combination that sends me straight back to childhood, it’s peanut butter and chocolate. Specifically, the glorious, iconic marriage found in a Reese’s Cup. There’s just something magical about that sweet and salty symphony, right? Well, imagine taking that magic and turning it into a giant, creamy, dreamy pie that requires absolutely no baking. Seriously! This Giant Reese’s Peanut Butter Cup Pie is exactly that – a showstopper dessert that’s surprisingly easy to whip up. It’s the kind of pie that makes everyone’s eyes light up the moment it hits the table. Whether you’re looking for a holiday treat, a birthday surprise, or just an excuse to indulge your inner child, this pie is IT. And trust me, it disappears fast!
Why You’ll Love This Recipe
- Fast: No need to turn on the oven! Most of the time is just waiting for it to chill.
- Easy: Simple steps, straightforward ingredients, and totally beginner-friendly. You got this!
- Giftable: Who wouldn’t be thrilled to receive a slice (or two!) of this deliciousness?
- Crowd-pleasing: Peanut butter and chocolate? It’s a universal love language.
Ingredients
Gather ’round! Here’s what you’ll need to create this masterpiece. Most of these are likely staples in your pantry!
Chocolate Crust:
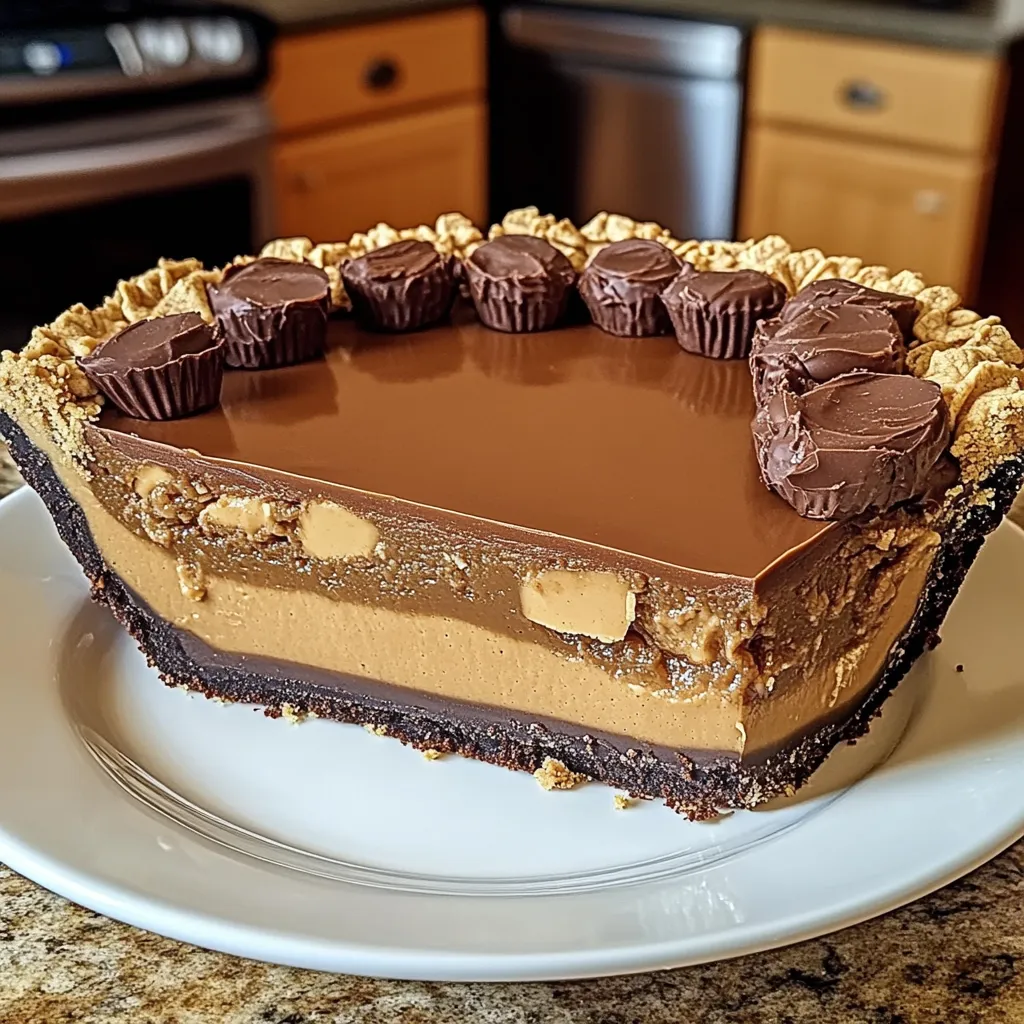
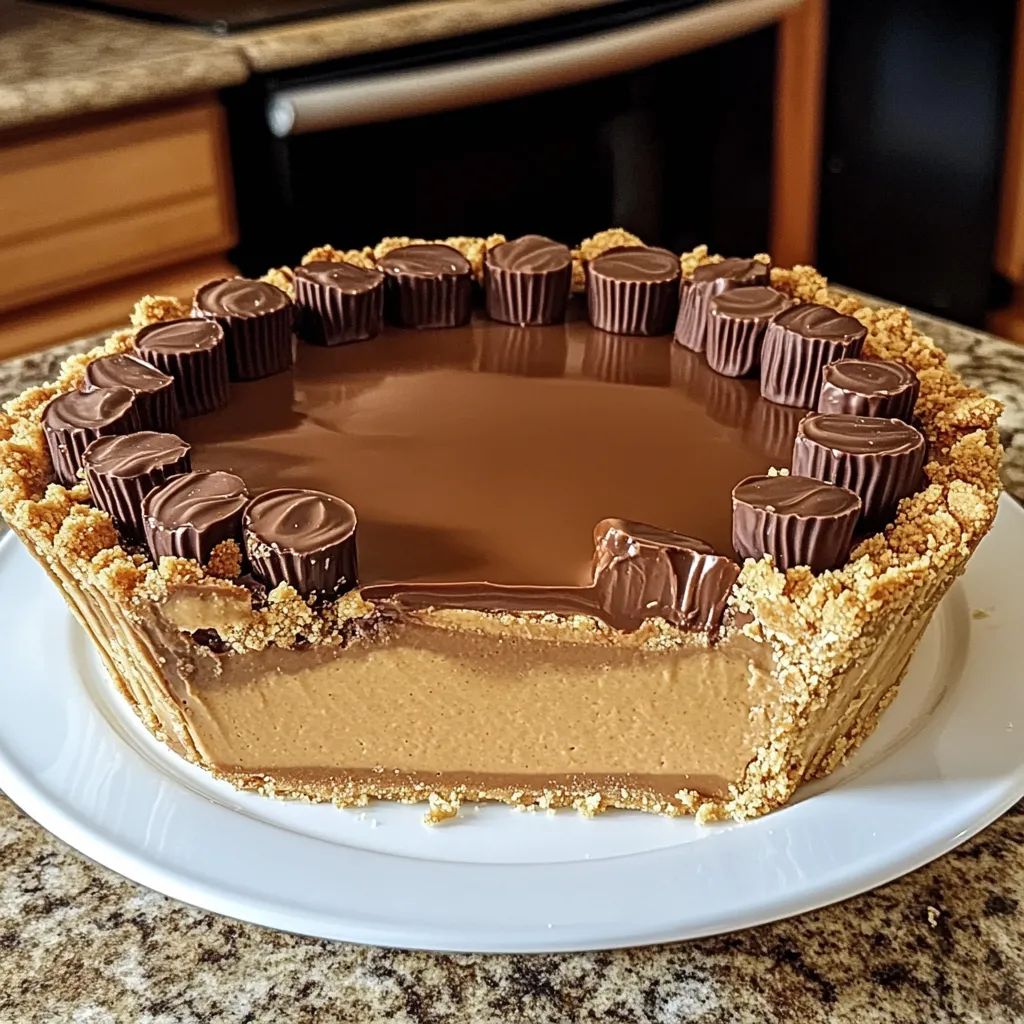
- 2½ cups (300g) chocolate cookie crumbs: Think Oreo cookie crumbs (without the filling!) or even chocolate graham crackers. Whatever you choose, just make sure they’re finely ground.
- ½ cup (115g) unsalted butter, melted: This is the glue that holds your perfect crust together. Unsalted is best so you control the saltiness.
- 1 tbsp granulated sugar (optional): Just a little extra sweetness if you like your crust a touch sweeter, but the cookies usually provide plenty!
Peanut Butter Mousse:
- 1½ cups (360g) creamy peanut butter (standard, not natural): For this recipe, a standard creamy peanut butter like Jif or Skippy works best. Natural peanut butter can separate and make the mousse less stable.
- 8 oz (225g) full-fat cream cheese, room temperature: Let it sit out for about an hour so it’s nice and soft. This helps create a smooth, creamy mousse.
- 1¼ cups (150g) powdered sugar, sifted: Sifting helps prevent lumps, ensuring that silky smooth texture we’re going for.
- 1 tsp pure vanilla extract: A little splash of warmth to enhance all those delicious flavors.
- 1½ cups (360ml) heavy cream, chilled: Super cold heavy cream whips up the best! This gives the mousse its light, airy texture.
- ¼ tsp salt: Just a pinch to balance the sweetness and really make the peanut butter flavor pop.
Chocolate Ganache:
- 1 cup (175g) semi-sweet chocolate chips: Good quality chips melt smoothly for a lovely, glossy topping.
- ½ cup (120ml) heavy cream: Heated cream melts the chocolate into a pourable ganache.
- 1 tbsp (14g) unsalted butter: Adds a little extra richness and helps make the ganache extra shiny.
- Pinch of sea salt (optional): Trust me, a tiny pinch of flaky sea salt on top of the chocolate ganache takes this pie to a whole new level!
How to Make It
Alright, let’s make some magic happen! Follow these simple steps, and you’ll have a stunning pie ready to chill.
Step 1: Crust Time! In a medium bowl, combine your chocolate cookie crumbs with the melted butter (and optional sugar, if using). Stir everything together until the crumbs are evenly moistened and look like wet sand. When you press a little bit between your fingers, it should hold its shape. Pour this mixture into a 9-inch pie dish. Use the bottom of a glass or a flat measuring cup to firmly press the mixture into the bottom and up the sides of the dish. Make sure it’s packed down well! Pop the crust into the freezer for about 15 minutes while you make the filling. This helps it set up nicely.
Step 2: Whip the Peanut Butter Dream. In a large bowl, beat the softened cream cheese with an electric mixer until it’s super smooth and no lumps remain. Add in the creamy peanut butter, sifted powdered sugar, vanilla extract, and salt. Beat again until everything is well combined and creamy. Don’t overmix – just until it’s smooth.
Step 3: Lighten Things Up. In a separate, clean bowl (or if your mixer has two bowls, use the second one), pour the chilled heavy cream. Whip the cream with your electric mixer on medium-high speed until stiff peaks form. This means when you lift the beaters, the peaks stand up straight without drooping.
Step 4: Fold with Love. This part is important! Gently fold the whipped cream into the peanut butter mixture. Do this in three additions. Add about a third of the whipped cream to the peanut butter mixture and gently fold it in with a spatula until mostly combined. Repeat with the second third, and then the final third. The goal is to lighten the peanut butter mixture without deflating the whipped cream. Be gentle! Once it’s just combined and looks light and airy, stop folding.
Step 5: Assemble and Chill (Part 1). Spoon the peanut butter mousse into your chilled pie crust. Spread it out evenly with a spatula, making the top as smooth as you can. Cover the pie loosely with plastic wrap (try not to let the plastic touch the mousse directly if you can!) and refrigerate for a minimum of 2 hours. It needs to be firm before adding the ganache.
Step 6: Make the Ganache. While the pie chills for its final hour, or when the pie is almost done chilling, make the chocolate ganache. Place the semi-sweet chocolate chips and the tablespoon of butter in a heatproof bowl. In a small saucepan or the microwave, heat the ½ cup of heavy cream until it’s steaming around the edges (don’t let it boil!). Pour the hot cream over the chocolate chips and butter in the bowl. Let it sit undisturbed for about 3 minutes to let the chocolate melt. Then, starting from the center of the bowl, gently stir with a whisk or spatula in small circles, gradually working your way outwards. Keep stirring until the mixture is completely smooth, glossy, and beautiful. If you like, stir in a pinch of sea salt here too!
Step 7: Ganache Top & Chill (Part 2). Take the chilled pie out of the fridge. Pour the warm (but not hot!) ganache over the top of the peanut butter mousse. Gently tilt the pie dish to help the ganache spread evenly all the way to the edges. If needed, you can use an offset spatula to help it along, but often tilting is enough for a smooth finish. Place the pie back in the refrigerator for at least 1 more hour, or until the ganache is set.
Step 8: Slice and Enjoy! When you’re ready to slice, here’s my best tip for clean cuts: dip a sharp knife in hot water for a few seconds, wipe it dry, and then make your slice. Repeat this for each slice. It helps glide through the ganache and mousse cleanly. Garnish each slice with a sprinkle of crushed peanuts, mini chocolate chips, or chocolate shavings if you like! Then, prepare for happy groans from everyone who takes a bite.
Substitutions & Additions
Want to play around with the recipe a little? Here are some ideas:
- Crust Variations: No chocolate cookies? Use regular graham cracker crumbs! Want a gluten-free version? Use gluten-free chocolate sandwich cookies. You could even try a pretzel crust for an extra salty kick (reduce or omit the salt in the mousse if you do!).
- Peanut Butter: Stick to standard creamy for the mousse stability, but you could swirl a little melted crunchy peanut butter or even some peanut butter cups chopped up into the mousse before chilling for extra texture!
- Chocolate: Use milk chocolate chips for the ganache if you prefer a sweeter, less intense chocolate flavor.
- Mix-Ins & Toppings: Get creative!
- Fold chopped Reese’s Peanut Butter Cups into the mousse before chilling.
- Sprinkle chopped peanuts or mini chocolate chips over the ganache before it sets.
- Add a drizzle of melted peanut butter or white chocolate over the set ganache.
- Top with a dollop of whipped cream before serving.
Tips for Success
- Room Temperature Cream Cheese: I can’t stress this enough! Cold cream cheese is hard to beat smooth and can leave you with lumps in your mousse. Plan ahead and let it soften.
- Chilled Heavy Cream: This is key for whipping up stiff peaks. If your cream is even slightly warm, it won’t whip properly.
- Gentle Folding: Be careful when folding the whipped cream into the peanut butter mixture. You want to keep that lovely airiness you just whipped in!
- Chill Time is Your Friend: Don’t rush the chilling process. The mousse and ganache need adequate time in the fridge to set up properly, making it much easier to slice. Minimum times are given, but longer is always better if you have the time.
- Clean Slices: The hot water trick for the knife is a game-changer for getting pretty slices through that firm ganache layer.
- Make Ahead: This pie is fantastic for making ahead! You can make the entire pie, including the ganache, a day or two in advance. Just cover it loosely with plastic wrap once it’s fully set.
How to Store It
Once the pie is fully set, cover it loosely with plastic wrap or place it in an airtight pie carrier. Store it in the refrigerator. It will keep well for 3-4 days. The crust might soften slightly over time, but the filling stays delicious.
Can you freeze this pie? Yes! You can freeze individual slices or the whole pie (well-wrapped). Wrap slices tightly in plastic wrap and then foil, or place in a freezer-safe container. A whole pie can be wrapped tightly in several layers of plastic wrap and then a layer of foil. Thaw slices in the refrigerator for a few hours, or the whole pie overnight. It’s best enjoyed within 1-2 months if frozen.
FAQs
Here are a few common questions you might have:
Q: Can I use natural peanut butter?
A: I strongly recommend using standard creamy peanut butter (like Jif or Skippy) for the mousse. Natural peanut butter can separate and doesn’t always provide the same stable, creamy texture needed for this no-bake filling.
Q: My ganache isn’t smooth, what happened?
A: This usually happens if the cream wasn’t hot enough or you stirred too vigorously too soon. Make sure the cream is steaming. Pour it over the chips and butter and let it sit for the full 3 minutes before stirring. Then, stir gently from the center outwards. If it’s still lumpy, you can try gently heating it over a double boiler (a bowl set over a pot of simmering water) and stirring until smooth, but be careful not to overheat.
Q: How far in advance can I make this pie?
A: You can definitely make the entire pie, including the ganache layer, up to 2 days in advance. Just keep it covered in the refrigerator.
Q: Do I have to sift the powdered sugar?
A: Sifting helps prevent tiny lumps of sugar in your smooth mousse. While you might get away without it, I highly recommend it for the best texture!

Giant Reese’s Peanut Butter Cup Pie (No-Bake!)
Ingredients
Equipment
Method
- Step 1: Crust Time! In a medium bowl, combine chocolate cookie crumbs with melted butter (and optional sugar, if using). Stir until crumbs are evenly moistened and look like wet sand. Pour mixture into a 9-inch pie dish. Use the bottom of a glass or flat measuring cup to firmly press the mixture into the bottom and up the sides. Pop the crust into the freezer for about 15 minutes while you make the filling.
- Step 2: Whip the Peanut Butter Dream. In a large bowl, beat the softened cream cheese with an electric mixer until super smooth. Add creamy peanut butter, sifted powdered sugar, vanilla extract, and salt. Beat again until well combined and creamy. Don’t overmix – just until smooth.
- Step 3: Lighten Things Up. In a separate, clean bowl, pour the chilled heavy cream. Whip the cream with your electric mixer on medium-high speed until stiff peaks form.
- Step 4: Fold with Love. Gently fold the whipped cream into the peanut butter mixture in three additions using a spatula until just combined and looks light and airy. Be gentle!
- Step 5: Assemble and Chill (Part 1). Spoon the peanut butter mousse into your chilled pie crust. Spread it out evenly with a spatula. Cover the pie loosely with plastic wrap and refrigerate for a minimum of 2 hours to firm up.
- Step 6: Make the Ganache. Place semi-sweet chocolate chips and 1 tbsp butter in a heatproof bowl. Heat ½ cup heavy cream in a small saucepan or microwave until steaming. Pour hot cream over chocolate chips and butter. Let sit for about 3 minutes. Stir gently from the center outwards with a whisk or spatula until completely smooth and glossy. Optionally, stir in a pinch of sea salt.
- Step 7: Ganache Top & Chill (Part 2). Take the chilled pie out of the fridge. Pour the warm (but not hot!) ganache over the top of the peanut butter mousse. Gently tilt the pie dish to help the ganache spread evenly. Place the pie back in the refrigerator for at least 1 more hour, or until the ganache is set.
- Step 8: Slice and Enjoy! For clean cuts, dip a sharp knife in hot water, wipe dry, slice, and repeat for each slice. Garnish each slice with a sprinkle of crushed peanuts, mini chocolate chips, or chocolate shavings if you like. Serve immediately.