Oh, friends. Gather ’round, because we need to talk about something truly magical. Remember that feeling when you unwrapped a Reese’s Peanut Butter Cup as a kid (or, let’s be honest, yesterday)? That perfect combination of smooth chocolate and creamy, slightly salty peanut butter? What if I told you you could capture that exact feeling, amplify it, and serve it up in a glorious, easy-to-make pie?
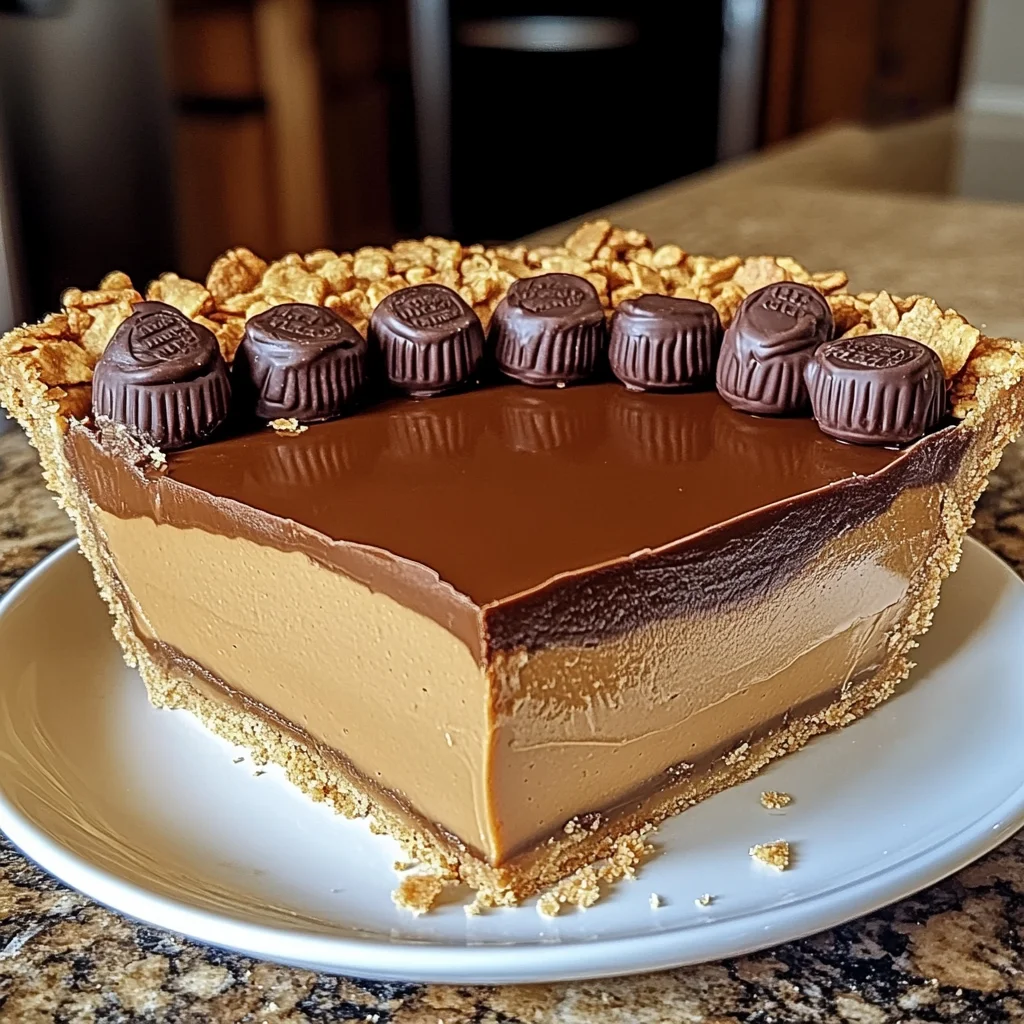
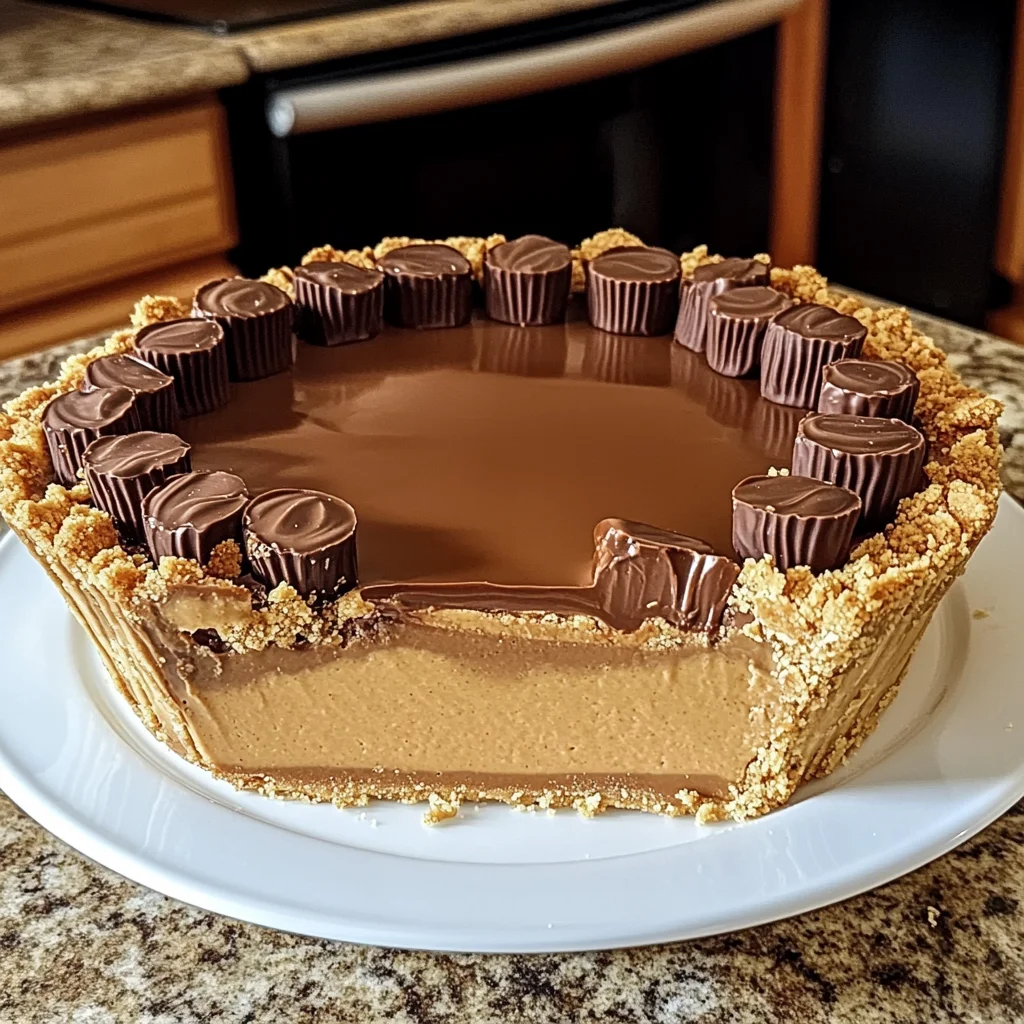
Yep, I’m talking about this Giant Reese’s Peanut Butter Cup Pie! It’s a no-bake wonder that layers that classic combo over a simple graham cracker crust, topped with even more Reese’s goodness. It’s the kind of dessert that brings instant smiles, makes birthdays extra special, and honestly, is just perfect for a Tuesday evening when you need a little chocolate-peanut butter hug. Trust me, this recipe is so simple, you’ll wonder why you haven’t made it sooner!
Why You’ll Love This Recipe
- Fast: Minimal prep time means you can get this pie chilling in no time.
- Easy: No oven required! Just simple mixing and layering.
- Giftable: Bring this to a potluck or party and watch it disappear!
- Crowd-pleasing: Who doesn’t love the Reese’s combo? It’s a universal favorite.
- No-Bake: Perfect for hot days or when you just don’t want to turn on the oven.
Ingredients
Let’s get our goodies together! Here’s what you’ll need to make this dreamy pie happen:
- For the Chocolate Ganache Base:
- 2½ cups milk chocolate chips: Go for a good quality brand you love – it makes a difference!
- 2 tbsp vegetable oil or shortening: This helps the ganache stay nice and smooth when chilled.
- ½ cup hot water: Just off the boil works best for melting those chips.
- For the Peanut Butter Filling:
- 1 cup creamy peanut butter: Your favorite brand is perfect here. Smooth is key for that fluffy texture.
- 1 cup powdered sugar: Sift it if it’s clumpy, but often whisking is enough.
- 1½ cups heavy cream, whipped to stiff peaks: Cold cream whips up best! Get it nice and stiff – you’ll be folding it in.
- ½ tsp salt (optional): A tiny pinch enhances the peanut butter flavor and balances the sweetness, but feel free to skip if you’re sensitive to salt.
- 10 whole Reese’s Peanut Butter Cups, chopped (plus extra for topping): The star of the show! Chop them up into bite-sized pieces.
- For the Graham Cracker Crust:
- 1½ cups graham cracker crumbs: You can buy pre-made crumbs or crush full sheets yourself (about 10-12 sheets).
- 6 tbsp unsalted melted butter: Gives us that classic, sturdy crust.
- ¼ cup granulated sugar: Adds a little sweetness to the crust.
How to Make It
Alright, let’s get this pie assembled! It’s mostly just mixing and layering. You got this!
1. Prepare the Chocolate Ganache Base
Okay, first things first, the chocolate layer that goes on the bottom. I know, it seems a little backward, but trust the process! Grab a medium bowl and toss in your milk chocolate chips and that little bit of oil or shortening. Now, carefully pour about half a cup of hot water over the top. Don’t stir yet! Just let it sit there for 2 or 3 minutes. This gentle heat melts the chocolate without risking burning it. After a couple of minutes, grab a spatula or whisk and stir, stir, stir until it’s completely smooth and glossy. It should look absolutely divine! Pour about half of this beautiful ganache into the bottom of your 9-inch tart pan or pie dish. Tilt and spread it around to cover the bottom evenly. Now, pop that dish into the fridge for about 15-20 minutes. You want that chocolate to set up nicely so it forms a solid base for the crust.
2. Make the Graham Cracker Crust
While the chocolate base is chilling, let’s whip up the crust. In a small bowl, combine your graham cracker crumbs, melted butter, and sugar. Give it a good mix with a fork or your hands until it looks like wet sand – all the crumbs should be coated in butter. Now, take your pie dish out of the fridge (the chocolate should be firm to the touch) and pour the graham cracker mixture right on top of the set ganache layer. Use the bottom of a glass or measuring cup, or just your clean fingers, to press the crumbs down firmly and evenly over the chocolate. Make sure you get into the edges! Pop the dish back into the fridge while you make the peanut butter filling.
3. Create the Fluffy Peanut Butter Layer
This is where the magic happens – the light and airy peanut butter mousse! Grab a large mixing bowl. Scoop in your creamy peanut butter and powdered sugar. Grab your electric mixer (or a sturdy whisk and some elbow grease!) and beat them together until the mixture looks lighter in color and is nice and fluffy. It should look almost like a thick frosting. Now, grab that lovely whipped cream you made (nice stiff peaks, remember?). This is the important part: using a spatula, gently fold the whipped cream into the peanut butter mixture. Don’t beat it! You want to preserve all that wonderful air you whipped into the cream. Fold until there are no white streaks left and it’s all one beautiful, light peanut butter cloud. Spoon this amazing peanut butter mousse evenly over the chilled graham cracker crust. Use the back of a spoon or a spatula to spread it out smoothly. Now, grab those chopped Reese’s cups you prepared and sprinkle them generously over the peanut butter layer. Oh yes.
4. Finish with Remaining Ganache
Remember that leftover chocolate ganache from step 1? It might have thickened up a bit. If it’s too firm to pour, you can gently warm it slightly (a few seconds in the microwave or over a bowl of warm water) just until it’s pourable again, but not hot. Carefully spoon or pour the remaining ganache over the peanut butter layer. Use your spatula to gently spread it all the way to the edges, covering the peanut butter. Don’t worry if a little peanut butter peeks through – it adds character! Smooth the top as best you can, and then go wild with those extra chopped Reese’s pieces you set aside for garnish. Sprinkle them all over the top! You can even add a few full mini Reese’s cups if you like. The more, the merrier, right?
5. Chill Until Set
Okay, the hard part is over! Now comes the waiting game. Cover the pie loosely with plastic wrap and pop it back into the refrigerator. It needs at least 4 hours to set up properly so the layers are distinct and firm enough to slice. Honestly, I find that chilling it overnight is even better if you can manage the wait. It lets all those flavors meld together and the pie becomes perfectly sliceable.
6. Slice & Serve
When you’re ready for pie heaven, take it out of the fridge. If you used a tart pan with a removable bottom, you can carefully push it up and place the pie on a serving plate. If you used a pie dish, simply grab a sharp knife and cut yourself a generous slice. Serve it chilled and prepare for happy groans from everyone who takes a bite!
Substitutions & Additions
Want to play around with the recipe? Here are a few ideas:
- Different Chocolate: Not a milk chocolate fan? You could try semi-sweet or even dark chocolate for the ganache, though you might need slightly less hot water as dark chocolate is less forgiving.
- Crunchy Peanut Butter: While creamy is recommended for the smooth filling, you could try crunchy peanut butter for added texture, just know the filling won’t be quite as smooth.
- Different Crust: Instead of graham cracker, try crushed chocolate cookies (like Oreos, with or without the cream filling) for a chocolate crust!
- Add-ins: Swirl a little melted caramel or hot fudge into the peanut butter layer before chilling.
- More Candy! Feel free to sprinkle other chopped candy bars that pair well with chocolate and peanut butter (like Butterfinger or Snickers) over the top or mixed into the peanut butter layer.
- Nuts: Add some chopped peanuts or pecans to the crust mixture or sprinkled on top for extra crunch.
Tips for Success
A few little pointers to help you make this pie perfectly every time:
- Whip Cream Until Stiff: Make sure your heavy cream is really cold and you whip it until it holds stiff peaks. This gives the peanut butter filling its light, airy texture.
- Fold, Don’t Stir: When combining the whipped cream and peanut butter mixture, be gentle! Folding preserves the air in the whipped cream. Use a spatula and cut through the center, then scoop from the bottom and fold over the top, rotating the bowl.
- Chill Time is Crucial: Don’t skimp on the chilling time! This is a no-bake pie, so the fridge is what sets it. At least 4 hours, or preferably overnight, ensures clean slices.
- Grease Your Pan (Optional): If you’re worried about sticking, especially in a regular pie dish, you can lightly grease the bottom and sides before adding the first ganache layer.
- Cutting Clean Slices: For super clean slices, dip your knife in hot water and wipe it dry between each cut.
How to Store It
Keep this delicious pie covered and stored in the refrigerator. It will stay good for 3-4 days. The graham cracker crust might soften slightly over time, but the flavors will still be amazing! You can freeze slices or the whole pie (well-wrapped) for up to a month, but the texture of the filling and crust might change a little upon thawing. Thaw overnight in the refrigerator before serving.
FAQs
Got questions? I’ve got answers!
Q: Can I use homemade graham cracker crumbs?
A: Absolutely! Just crush graham crackers in a food processor or put them in a bag and smash them with a rolling pin until you have fine crumbs.
Q: Do I have to use a tart pan?
A: Nope! A standard 9-inch pie dish works perfectly fine. A tart pan with a removable bottom just makes for a beautiful presentation if you plan to take it out of the pan.
Q: Can I use a different kind of peanut butter?
A: Creamy is best for the filling texture. Natural peanut butter that separates might not give you the same smooth, fluffy result.
Q: My ganache isn’t melting smoothly. What did I do wrong?
A: The water might not have been hot enough, or you might have stirred too soon. If it looks broken or lumpy, try setting the bowl over a pan of gently simmering water (don’t let the bottom of the bowl touch the water) and stirring gently until it comes together. Don’t overheat it!
So there you have it! An incredibly easy, intensely satisfying Giant Reese’s Peanut Butter Cup Pie that is guaranteed to be a hit. Go make one and bring some chocolate-peanut butter joy into your life!

Giant Reese's Peanut Butter Cup Pie: An Easy No-Bake Dream!
Ingredients
Equipment
Method
- Step 1: Prepare the Chocolate Ganache Base In a medium bowl, toss milk chocolate chips and oil/shortening. Pour ½ cup hot water over top. Let sit 2–3 minutes, then stir until smooth and glossy. Pour about half the ganache into a 9-inch tart pan or pie dish, spreading to cover the bottom. Refrigerate 15–20 minutes until set.
- Step 2: Make the Graham Cracker Crust While ganache chills, combine graham cracker crumbs, melted butter, and sugar in a small bowl. Mix until crumbs are coated. Remove dish from fridge. Pour crumb mixture over the set ganache. Press down firmly and evenly over the chocolate. Refrigerate while making the filling.
- Step 3: Create the Fluffy Peanut Butter Layer In a large mixing bowl, beat creamy peanut butter and powdered sugar until lighter and fluffy. Gently fold in the whipped heavy cream with a spatula until no white streaks remain. Spoon this peanut butter mousse evenly over the chilled graham cracker crust. Spread smoothly. Sprinkle chopped Reese's cups over the peanut butter layer.
- Step 4: Finish with Remaining Ganache Gently warm the remaining chocolate ganache if needed until pourable. Carefully spoon or pour it over the peanut butter layer, spreading to the edges. Smooth the top and sprinkle with extra chopped Reese's pieces or mini cups for garnish.
- Step 5: Chill Until Set Cover the pie loosely with plastic wrap and refrigerate for at least 4 hours, or preferably overnight, until completely set.
- Step 6: Slice & Serve Once set, slice the pie using a sharp knife. For cleaner slices, dip the knife in hot water and wipe dry between cuts. Serve chilled.