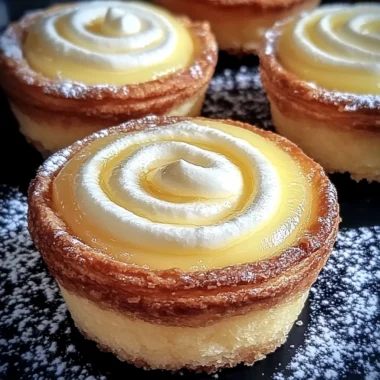
There’s something so comforting about biting into a rich, fudgy brownie paired with creamy peanut butter. It instantly takes me back to cozy afternoons spent in the kitchen with friends, laughing and sharing sweet treats. These Fudgy Brownie Peanut Butter Tacos bring that nostalgic feeling to a whole new level, transforming classic flavors into a fun, handheld dessert that’s as delightful to eat as it is to make. Trust me, once you try these, they’ll become your go-to for parties, gifts, or just a special indulgence at home.
Not only are these tacos incredibly delicious, but they’re also surprisingly simple and quick to whip up. The brownie shells are thin and fudgy, folding perfectly into taco shapes without cracking, while the peanut butter mousse filling is fluffy and luscious. Plus, with a sprinkle of crushed cookies and a drizzle of chocolate syrup, they look as good as they taste. Whether you’re new to baking or a seasoned pro, this recipe is approachable and guaranteed to impress.
Why You’ll Love Fudgy Brownie Peanut Butter Tacos
- Fast: From batter to bite in under an hour, including chilling time.
- Easy: Simple ingredients and straightforward steps make it beginner-friendly.
- Giftable: These brownies in taco form make for a unique and charming edible gift.
- Crowd-pleasing: Peanut butter and chocolate are a beloved combo that everyone enjoys.
Ingredients
Let’s break down the essentials for these scrumptious brownies and mousse filling. Each ingredient plays an important role in the final texture and flavor.
For the Fudgy Brownie Shells
- Granulated sugar (1 cup): Adds sweetness and helps create a shiny, crackly top.
- Unsalted butter (½ cup, melted): Gives richness and moisture. I always recommend slightly cooling the melted butter so it doesn’t cook the eggs.
- Large eggs (2, room temperature): Eggs bind the batter and contribute to the fudgy texture.
- Vanilla extract (1 teaspoon): A little vanilla enhances the chocolate flavor beautifully.
- All-purpose flour (½ cup): Provides structure without making the brownies cakey.
- Unsweetened cocoa powder (½ cup, sifted): The heart of the chocolate flavor. Sifting prevents lumps and ensures smooth batter.
- Salt (¼ teaspoon): Balances sweetness and enhances chocolate taste.
- Baking powder (¼ teaspoon): Just enough lift to keep the shells tender but sturdy.
For the Peanut Butter Mousse Filling
- Creamy peanut butter (1 cup): I recommend classic creamy, not natural style, for the best texture and sweetness.
- Cream cheese (4 ounces, softened): Adds tang and creaminess, giving the mousse a lovely balance.
- Powdered sugar (1 cup): Sweetens and helps achieve a smooth, fluffy filling.
- Vanilla extract (1 teaspoon): Enhances the filling’s flavor just like in the shells.
- Heavy whipping cream (1 cup, cold): Whipped to stiff peaks, it lightens the mousse into a fluffy cloud of peanut butter goodness.
Toppings
- Crushed chocolate sandwich cookies or peanut butter cookies for a crunchy contrast.
- Chocolate syrup or warmed hot fudge sauce for that extra decadent drizzle.
How to Make Fudgy Brownie Peanut Butter Tacos
This recipe is all about timing and technique. The brownie shells need just the right bake to be flexible enough to shape while warm but firm enough to hold the filling. Here’s how you do it:
- Preheat your oven to 350°F (175°C) and line two large baking sheets with parchment paper. This helps the brownies bake evenly and prevents sticking.
- Mix the wet ingredients: In a medium bowl, whisk together the melted butter and granulated sugar until combined. Then add the eggs and vanilla extract, whisking until the mixture is smooth and glossy. This step is key to creating that fudgy shine on top.
- Combine dry ingredients: Sift together the flour, cocoa powder, salt, and baking powder. This ensures no lumps and distributes the rising agents evenly.
- Fold dry into wet: Gently fold the dry ingredients into the wet using a spatula. Be careful not to overmix—overworking the batter can make the brownies tough instead of tender and fudgy.
- Shape the brownie shells: Drop heaping tablespoons of the batter onto the parchment-lined baking sheets, spacing them about 4 inches apart. Spread each mound into a thin, even circle about 5 to 6 inches in diameter using the back of a spoon. The thinner the shell, the easier it will be to shape.
- Bake one sheet at a time for 6 to 8 minutes. You’re looking for edges that are set but centers that still appear slightly underdone. This is the magic moment when the brownies are pliable enough to mold.
- Shape the tacos: Quickly remove the brownie rounds from the oven and cool for 30 seconds. While still warm, carefully lift each round with a thin metal spatula and drape it over a wooden spoon handle, rolling pin, or the edge of a loaf pan. Press lightly to help them keep the U-shape and set the curve. Repeat with remaining rounds and let them cool completely.
- Make the peanut butter mousse: In a large mixing bowl, beat the softened cream cheese and peanut butter until smooth. Add powdered sugar and vanilla extract, mixing until fully incorporated.
- Whip the cream: In a separate bowl, whip the cold heavy cream until stiff peaks form. Gently fold the whipped cream into the peanut butter mixture in two additions, mixing until light and fluffy. This step creates a mousse that’s airy yet rich.
- Chill the mousse: Refrigerate the mousse for at least 30 minutes to let it firm up slightly, making it easier to pipe.
- Assemble the tacos: Transfer the chilled mousse into a piping bag fitted with a star tip (or any tip you prefer). Pipe a generous amount into each cooled brownie shell.
- Add toppings: Sprinkle crushed cookies over the exposed filling and drizzle with chocolate syrup or warm fudge sauce for that irresistible finishing touch.
- Final chill: Place the assembled tacos in the refrigerator for 15 to 20 minutes before serving. They’re best enjoyed chilled, with the mousse firm but soft and the shells still tender.
If you love creative desserts, these brownie peanut butter tacos remind me of the fun twists you can try with familiar flavors, much like the playful vibe in my easy peanut butter cup dump cake recipe or the indulgent layers in the caramel brownie cheesecake. It’s amazing how a little creativity makes classic ingredients feel new!
Substitutions & Additions
Feel free to customize these brownies and mousse to suit your taste or dietary needs. Here are some swaps and upgrades I love:
- Nut Butters: Swap peanut butter for almond butter or cashew butter for a different nutty twist. Just make sure it’s creamy and not natural to keep the mousse smooth.
- Cookie Toppings: Instead of crushed chocolate sandwich cookies, try peanut butter cookies, pretzel crumbs for a salty crunch, or chopped nuts like roasted peanuts or pecans.
- Chocolate Variations: Use dark cocoa powder for a richer, more intense chocolate flavor. Or swirl a bit of melted chocolate into the batter before baking for marbled brownie shells.
- Fruit Add-ins: Add fresh raspberries or sliced bananas on top of the mousse for a fruity surprise. It pairs beautifully with the peanut butter and chocolate combo.
- Spices: For a cozy touch, mix a pinch of cinnamon or a dash of espresso powder into the brownie batter. This subtle addition deepens the flavor.
- Vegan Option: Substitute dairy ingredients with vegan butter, coconut cream, and use a flax egg (1 tbsp ground flaxseed + 3 tbsp water) to make it vegan-friendly.
Don’t hesitate to experiment! I once tried a batch with a sprinkle of sea salt on top before baking the shells, and it added a delightful contrast to the sweet filling. If you enjoy layered desserts, you might also like the dreamy textures in my no-bake peanut butter cheesecake bars, which share that creamy, rich peanut butter vibe.
Tips for Success
Making these brownie peanut butter tacos is fun but requires a bit of care to get perfect results. Here are some of my best tips to help you nail it every time:
- Don’t overbake the shells: The key to flexible shells is pulling them out while the centers are still slightly underdone. They’ll finish setting as they cool.
- Shape while warm: Work quickly when draping the brownie rounds. They harden fast, so if they cool too much before shaping, they might crack.
- Use a thin metal spatula: This tool makes lifting the delicate brownie shells easier without tearing.
- Chill the mousse: Give the mousse enough time to firm up in the fridge for easier piping and a better texture.
- Pipe generously: Don’t be shy with the peanut butter mousse. The creamy filling is what makes these tacos extra special.
- Prep ahead: You can bake and shape the brownie shells a day in advance. Store them in an airtight container at room temperature, and fill just before serving.
- Keep mousse chilled: This dessert is best served cold, so keep it refrigerated until just before serving to maintain its fluffy texture.
For dessert ideas that combine rich, fudgy brownies with creamy fillings, you might enjoy my no-bake brownie cheesecake cups. They’re another delicious way to satisfy your chocolate cravings with minimal fuss.
How to Store Fudgy Brownie Peanut Butter Tacos
Storage is pretty straightforward with these delightful little treats. Since the mousse contains dairy, they need to be kept refrigerated.
- Refrigerator: Store the assembled tacos in an airtight container in the fridge for up to 3 days. They’ll stay fresh and maintain their texture.
- Brownie shells only: If you want to prep ahead, keep the shaped brownie shells at room temperature in an airtight container for up to 2 days. Fill and decorate just before serving to keep the shells from getting soggy.
- Freezing: I don’t recommend freezing the filled tacos as the mousse texture can change upon thawing. However, the brownie shells can be frozen unfilled for up to a month. Thaw at room temperature before filling.
When ready to serve, you can add a quick drizzle of additional chocolate sauce or a fresh sprinkle of crushed cookies to refresh their appearance and taste.
FAQs
Can I use natural peanut butter instead of creamy peanut butter?
Natural peanut butter tends to be thinner and can separate, which affects the mousse texture. For the best creamy and stable filling, stick with classic creamy peanut butter.
Can I make the brownie shells gluten-free?
Yes! Substitute the all-purpose flour with a 1:1 gluten-free baking flour blend. Just be sure it contains xanthan gum or another binder to keep the shells from crumbling.
How do I keep the brownie shells from cracking when shaping?
Timing is everything. Make sure you shape the shells while they’re still warm and flexible. Using a thin spatula helps lift them gently. If they cool too much, they become brittle and more likely to crack.
Can I prepare these a day in advance?
Absolutely! Bake and shape the shells up to a day ahead and store at room temperature. Make the mousse and fill the shells shortly before serving to keep everything fresh and delicious.
These fudgy brownie peanut butter tacos are a wonderful way to impress your family and guests with something a little different but totally irresistible. They’re perfect for birthdays, potlucks, or a cozy night in. If you love mixing up unique desserts, you might also enjoy the playful flavors in my Muddy Buddies recipe, which also combines sweet and salty in a fun way.
Now it’s your turn to give these a try! I can’t wait to hear how much you and your loved ones enjoy these delightful brownie peanut butter tacos. Happy baking!
Don’t forget to follow us on Pinterest for more delicious recipes and kitchen inspiration!

Fudgy Brownie Peanut Butter Tacos
Ingredients
Equipment
Method
- Step 1: Preheat oven to 350°F (175°C) and line two large baking sheets with parchment paper.
- Step 2: In a medium bowl, whisk melted butter and granulated sugar until combined. Add eggs and vanilla extract; whisk until smooth and glossy.
- Step 3: Sift together flour, cocoa powder, salt, and baking powder. Gently fold into wet ingredients with a spatula, careful not to overmix.
- Step 4: Drop heaping tablespoons of batter onto prepared sheets about 4 inches apart. Spread into thin 5-6 inch circles.
- Step 5: Bake one sheet at a time for 6-8 minutes until edges are set but centers slightly underdone for pliability.
- Step 6: Remove rounds and cool 30 seconds. While warm, lift with a thin metal spatula and drape over a spoon handle or rolling pin to shape into tacos. Press lightly and let cool completely.
- Step 7: In a large bowl, beat cream cheese and peanut butter until smooth. Add powdered sugar and vanilla, mixing until fully incorporated.
- Step 8: In a separate bowl, whip cold heavy cream to stiff peaks. Fold whipped cream gently into peanut butter mixture in two additions until light and fluffy.
- Step 9: Refrigerate mousse at least 30 minutes to firm slightly for easier piping.
- Step 10: Transfer mousse to a piping bag fitted with a star tip. Pipe generous amounts into each cooled brownie shell.
- Step 11: Sprinkle crushed cookies over exposed filling and drizzle with chocolate syrup or warm fudge sauce.
- Step 12: Chill assembled tacos in refrigerator for 15-20 minutes before serving to allow mousse to set while keeping shells tender.