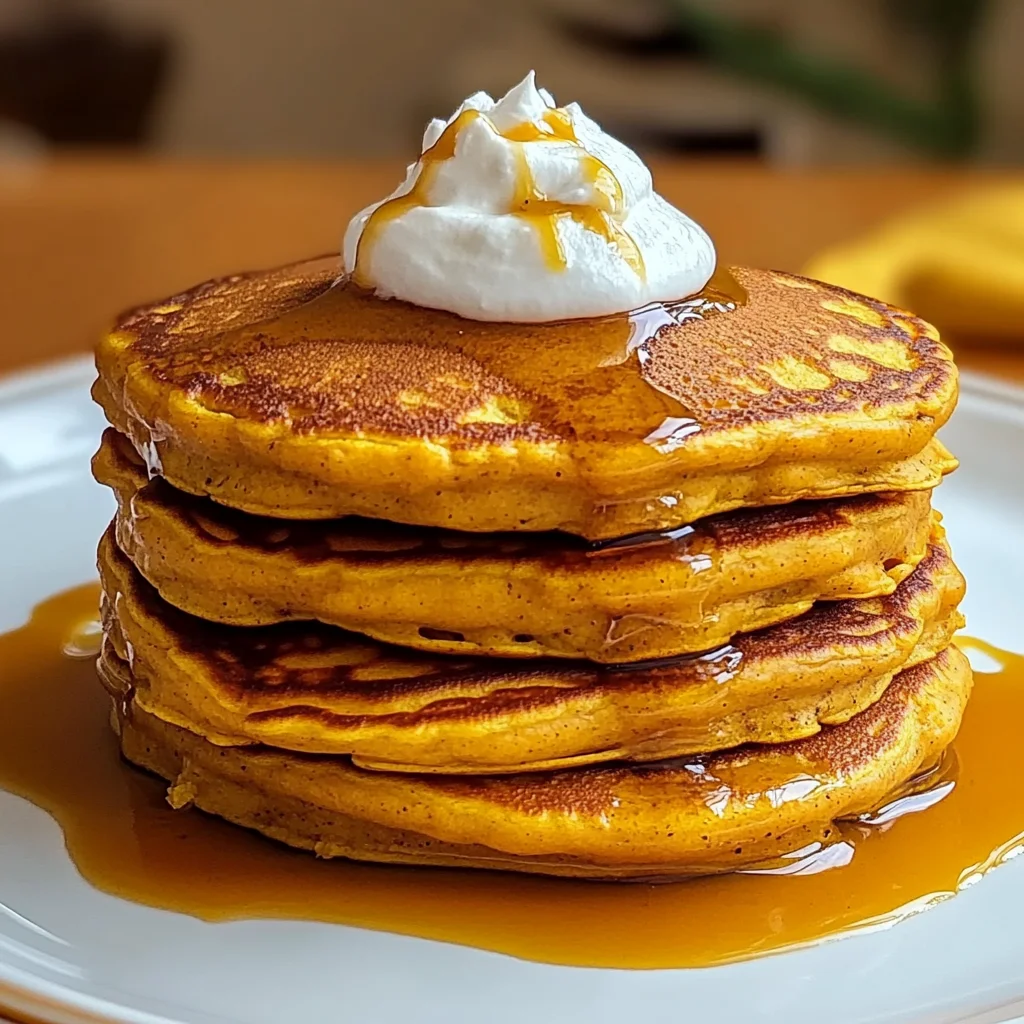
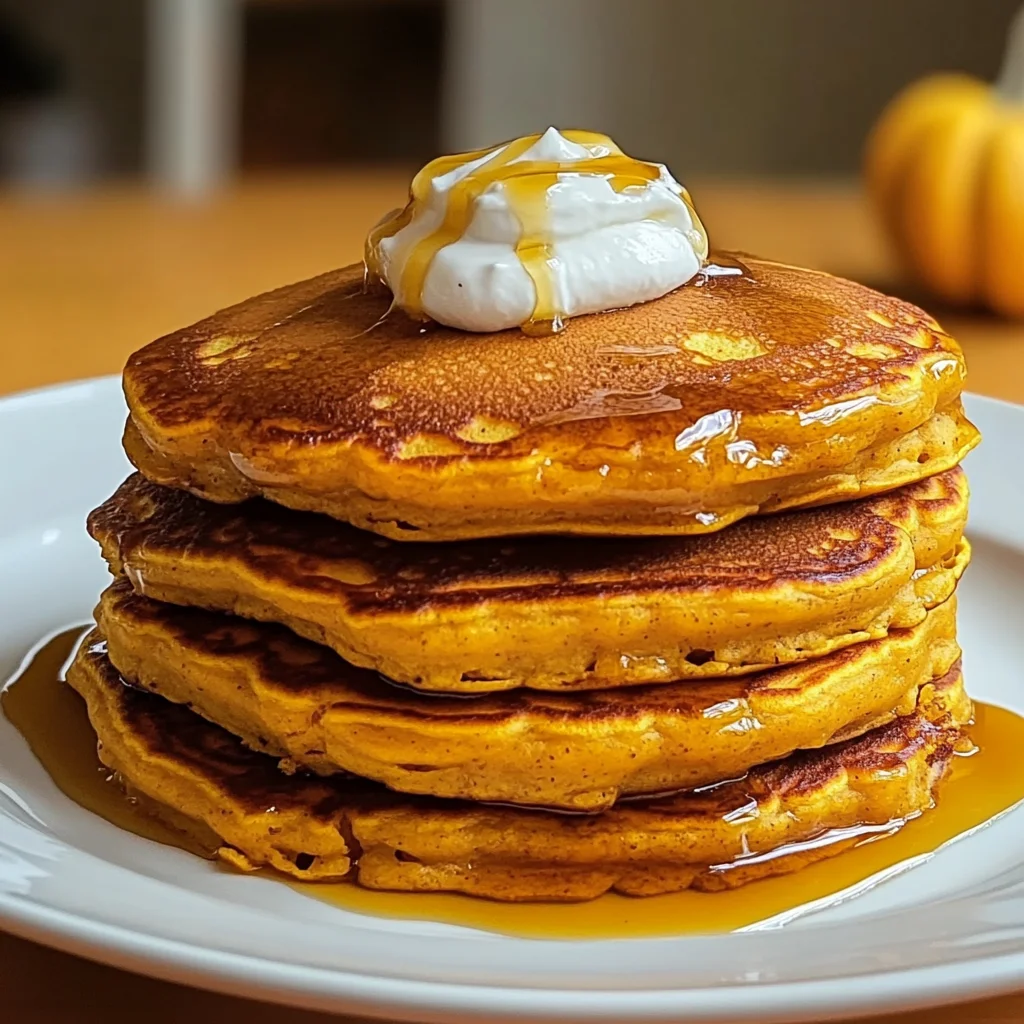
Oh, friend, there’s just something magical about those first crisp days of fall, isn’t there? The air turns cool, the leaves start to put on their spectacular show, and suddenly, all I want to do is cozy up with a warm mug of coffee and the comforting smell of pumpkin spice wafting through my kitchen. If you’re anything like me, you’re probably dreaming of a breakfast that embodies all that autumnal joy, and let me tell you, these Fluffy Pumpkin Pancakes are exactly what you’ve been craving. They’re like a warm hug on a plate, brimming with all the best flavors of the season, and unbelievably easy to whip up. Seriously, you’ll be amazed at how quickly you can go from sleepy morning to a stack of golden, pumpkin-spiced perfection.
Why You’ll Love Fluffy Pumpkin Pancakes
- Fast: From mixing bowl to plate in no time, perfect for busy mornings.
- Easy: Simple steps and common ingredients mean anyone can make these!
- Giftable: Stack them up and tie with a ribbon for a sweet neighbor treat (uncooked batter or cooked pancakes).
- Crowd-pleasing: A guaranteed hit with kids and adults alike, making brunch a breeze.
Ingredients
- 1 ½ cups all-purpose flour (or gluten-free 1:1 blend): The foundation of our fluffy stacks! If you’re going gluten-free, a good 1:1 blend works beautifully here.
- 2 tablespoons granulated sugar (or coconut sugar): Just enough sweetness to enhance the pumpkin without being overly sugary. Coconut sugar adds a lovely caramel note too.
- 2 teaspoons baking powder: Our secret weapon for incredible lift!
- ½ teaspoon baking soda: Works with the acidity in the pumpkin and milk to create even more fluffiness.
- ½ teaspoon salt: A pinch that brightens all the flavors. Don’t skip it!
- 1 ½ teaspoons ground cinnamon: The star spice of pumpkin season!
- ¼ teaspoon ground nutmeg: Adds that classic warm, nutty undertone.
- ⅛ teaspoon ground cloves: A tiny bit goes a long way to give that deep, rich pumpkin spice aroma.
- 1 cup canned pumpkin purée (not pie filling): Make sure it’s pure pumpkin, not the pre-spiced pie filling, so you can control the flavor.
- 1 cup milk (dairy, oat, or almond): Use whatever milk you have on hand; they all work wonderfully.
- 1 large egg: Binds everything together and adds richness.
- 2 tablespoons melted butter or neutral oil, plus extra for greasing griddle: For tenderness and a lovely golden crisp edge.
- 1 teaspoon pure vanilla extract: Because everything is better with a splash of vanilla!
- Optional: 1 tablespoon maple syrup (for batter): If you like your pancakes a little sweeter, this is a great addition.
How to Make Fluffy Pumpkin Pancakes
Ready to get cooking? Let’s dive in! You’ll find this process so satisfying, and the aroma alone is worth the effort.
- Whisk Dry Ingredients: Grab your biggest bowl. Sift together the flour, sugar, baking powder, baking soda, salt, cinnamon, nutmeg, and cloves. Then, give them a good whisk until they’re all perfectly blended. This ensures all those wonderful leavening agents and spices are evenly distributed, so every pancake is a flavor bomb!
- Mix Wet Ingredients: In a separate bowl, it’s time to bring in the stars of the show! Whisk together your pumpkin purée, milk, egg, melted butter or oil, and vanilla. If you’re adding that optional tablespoon of maple syrup for a touch more sweetness, stir it in now.
- Combine Gently: Now for the magic moment! Pour the wet ingredients into the dry ingredients. Take a spatula or a wooden spoon and stir, but here’s my golden rule: stir just until combined. A few lumps are totally okay, even desirable! Overmixing is the enemy of fluffy pancakes; it develops the gluten too much, making them tough. Trust me on this – gentle is best for that pillowy texture we’re after. If you’ve enjoyed making other light and airy breakfasts like our fluffy lemon ricotta pancakes, you know the secret is in that gentle hand!
- Rest the Batter: Give your batter a little break. Let it sit for about 5 minutes. This short rest allows the flour to fully hydrate and the leavening agents to start doing their job, leading to even fluffier pancakes.
- Preheat & Grease: While your batter is resting, place a non-stick skillet or griddle over medium-low heat. It’s important to start with medium-low heat to ensure the pancakes cook through without burning. Lightly grease it with a little extra butter or oil. To test if it’s ready, flick a drop of water onto the surface; if it sizzles gently and evaporates, you’re good to go!
- Cook Pancakes: Using a ¼ cup measuring cup, pour portions of batter onto your preheated griddle. Don’t overcrowd the pan! Cook until you see bubbles forming on the surface and the edges start to look set (this usually takes 2–3 minutes). Then, with a gentle flip, cook for another 1–2 minutes until they’re beautifully golden brown and cooked through.
- Keep Warm: As you finish cooking batches, transfer your glorious pancakes to a baking sheet and pop them into a 200°F (95°C) oven to keep them warm while you cook the rest of the batter. That way, everyone gets a hot, fresh stack!
Substitutions & Additions
This recipe is super versatile, so feel free to get creative! Here are some ideas to make these pumpkin pancakes uniquely yours:
- Chocolate Chips: A handful of mini chocolate chips (dark, milk, or white!) stirred into the batter is always a crowd-pleaser.
- Nuts: Toasted pecans or walnuts add a lovely crunch and nutty flavor that pairs wonderfully with pumpkin.
- Extra Spices: If you love a bolder spice profile, a pinch of ground ginger or allspice can really make these flavors sing.
- Cream Cheese Swirl: For an extra decadent treat, mix a couple of tablespoons of softened cream cheese with a little sugar and vanilla. Dollop small amounts on the pancakes after pouring the batter, then swirl lightly with a toothpick before cooking.
- Toppings Galore: Beyond classic maple syrup, try a dollop of whipped cream, a sprinkle of candied nuts, fresh apple slices, or a drizzle of caramel sauce.
- Other Fall Treats: If you’re in a full-on pumpkin mood, you might also adore these homemade pumpkin swirl muffins for another delicious breakfast or snack!
Tips for Success
Achieving pancake perfection is easy with these little pointers:
- Don’t Overmix the Batter: I can’t stress this enough! Lumps are your friends. Overmixing leads to tough pancakes, and we want soft, fluffy ones.
- Adjust Heat as Needed: Griddle temperatures can fluctuate. If your pancakes are browning too quickly on the outside but not cooking through, turn the heat down. If they’re taking forever to brown, nudge it up a bit.
- Give Them Space: Don’t overcrowd your griddle. Cooking just a few at a time allows for even cooking and easier flipping.
- Make Ahead: You can whisk together the dry ingredients and store them in an airtight container. When you’re ready for pancakes, just combine with the wet ingredients. You can also mix the wet ingredients ahead and store them in the fridge for up to 24 hours. Just give them a quick whisk before combining with the dry mix.
- Rest is Best: That 5-minute rest really does make a difference in the final texture, so try not to skip it.
- Embrace the Season: If you’re passionate about pumpkin, consider trying a pumpkin banana loaf for another delightful baked good that captures the essence of fall.
How to Store Fluffy Pumpkin Pancakes
Got leftovers? Lucky you! Here’s how to keep them fresh:
- Refrigerator: Cooked pancakes can be stored in an airtight container in the refrigerator for 2-3 days.
- Freezer: For longer storage, place cooled pancakes in a single layer on a baking sheet and freeze until solid. Then, transfer them to a freezer-safe bag or container, separating layers with parchment paper to prevent sticking. They’ll keep well for up to 1 month.
- Reheating: Pop frozen pancakes directly into a toaster, microwave, or warm them on a lightly greased skillet until heated through.
FAQs
Q: Can I use pumpkin pie filling instead of pumpkin purée?
A: No, I highly recommend using pure canned pumpkin purée. Pumpkin pie filling already has spices and sugar added, which would throw off the balance of this recipe. We want to control those delicious fall flavors ourselves!
Q: How do I get my pancakes extra fluffy?
A: The key is not to overmix the batter! Stir just until the wet and dry ingredients are combined, even if there are a few lumps. Also, letting the batter rest for 5 minutes helps activate the leavening agents for maximum fluffiness.
Q: Can I make the batter the night before?
A: While you can mix the dry ingredients ahead of time and store them, I generally don’t recommend mixing the wet and dry ingredients the night before. The baking soda and baking powder start reacting once wet, and your pancakes might lose some of their fluffiness if the batter sits too long.
Q: What are the best toppings for pumpkin pancakes?
A: Classic maple syrup is always a winner! But for an extra treat, try a dollop of whipped cream, a sprinkle of toasted pecans, a dusting of powdered sugar, or even a drizzle of homemade caramel sauce.
For more delicious recipe inspiration, be sure to follow us on Pinterest!
Fluffy Pumpkin Pancakes
Ingredients
Equipment
Method
- Step 1: Grab your biggest bowl. Sift together the flour, sugar, baking powder, baking soda, salt, cinnamon, nutmeg, and cloves. Then, give them a good whisk until they're all perfectly blended. This ensures all those wonderful leavening agents and spices are evenly distributed, so every pancake is a flavor bomb!
- Step 2: In a separate bowl, it's time to bring in the stars of the show! Whisk together your pumpkin purée, milk, egg, melted butter or oil, and vanilla. If you're adding that optional tablespoon of maple syrup for a touch more sweetness, stir it in now.
- Step 3: Now for the magic moment! Pour the wet ingredients into the dry ingredients. Take a spatula or a wooden spoon and stir, but here's my golden rule: stir just until combined. A few lumps are totally okay, even desirable! Overmixing is the enemy of fluffy pancakes; it develops the gluten too much, making them tough. Trust me on this – gentle is best for that pillowy texture we're after!
- Step 4: Give your batter a little break. Let it sit for about 5 minutes. This short rest allows the flour to fully hydrate and the leavening agents to start doing their job, leading to even fluffier pancakes.
- Step 5: While your batter is resting, place a non-stick skillet or griddle over medium-low heat. It's important to start with medium-low heat to ensure the pancakes cook through without burning. Lightly grease it with a little extra butter or oil. To test if it's ready, flick a drop of water onto the surface; if it sizzles gently and evaporates, you’re good to go!
- Step 6: Using a ¼ cup measuring cup, pour portions of batter onto your preheated griddle. Don't overcrowd the pan! Cook until you see bubbles forming on the surface and the edges start to look set (this usually takes 2–3 minutes). Then, with a gentle flip, cook for another 1–2 minutes until they're beautifully golden brown and cooked through.
- Step 7: As you finish cooking batches, transfer your glorious pancakes to a baking sheet and pop them into a 200°F (95°C) oven to keep them warm while you cook the rest of the batter. That way, everyone gets a hot, fresh stack!