There’s just something incredibly satisfying about a crunchy, tangy snack, isn’t there? Growing up, I always loved reaching into the fridge for a crisp pickle spear or a handful of fresh veggies. This recipe for Pickle Pepper Snack Jars takes that nostalgic feeling and packages it into the most delightful, easy-to-grab portions! Whether you need a quick pick-me-up, a vibrant side for lunch, or a charming homemade gift, these jars are an absolute winner. They’re also fantastic for keeping things light and fresh, much like our Easy Fresh Corn and Tomato Salad, perfect for those sunny afternoons. You’ll be amazed at how simple it is to create such a burst of flavor!
Why You’ll Love Pickle Pepper Snack Jars
- Fast: Seriously, you can whip these up in minutes!
- Easy: No cooking required, just layering and pouring.
- Giftable: They make adorable, thoughtful presents for friends and neighbors.
- Crowd-pleasing: A hit with both pickle lovers and veggie enthusiasts alike.
Ingredients
Gathering your ingredients for these snack jars is as easy as pie – or should I say, as easy as pickles! Here’s what you’ll need to create these vibrant little powerhouses:
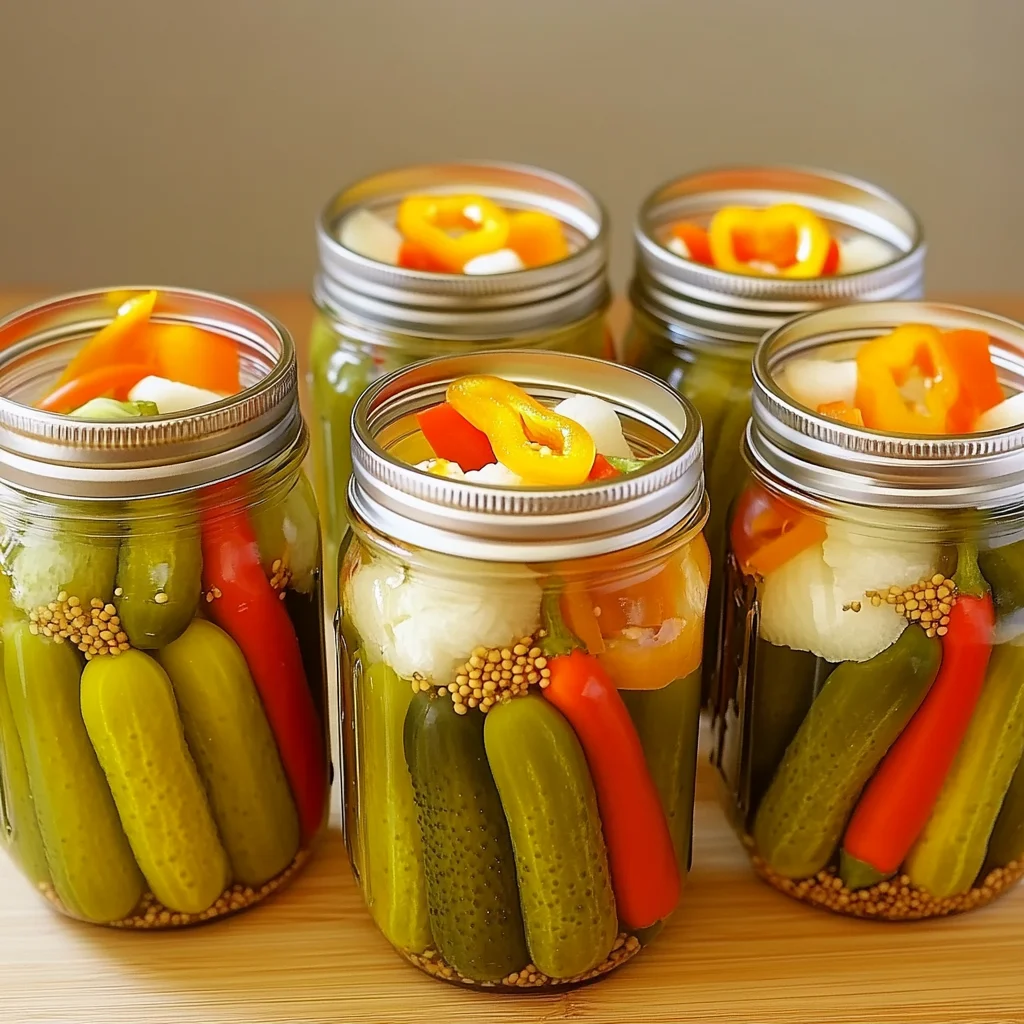
- 1 cup dill pickle spears, cut into chunks: These are the star of our show, bringing that classic, zesty dill flavor we all adore. Choose good quality, crisp pickles for the best crunch!
- 1/2 cup mini sweet peppers, sliced: You’ll love the pop of color and mild sweetness these bring. They’re such a cheerful addition!
- 1/2 cup baby carrots: For that satisfying, earthy crunch that stands up beautifully to the pickle brine.
- 1/2 cup cauliflower florets: These little trees are fantastic at soaking up all the tangy goodness, becoming tender-crisp and full of flavor.
- 1 cup pickle brine (from the jar): Don’t even think about tossing that leftover pickle juice! It’s liquid gold for this recipe, packed with all the flavor we need.
How to Make Pickle Pepper Snack Jars
Ready to get started? This is where the magic happens, and trust me, it’s practically effortless!
- First things first, grab those clean, small jars. Pint-sized or half-pint jars work perfectly for individual servings. I love using clear jars so you can see all the colorful veggies inside!
- Now, it’s time to get layering! Carefully place your dill pickle chunks at the bottom of each jar. Then, add a layer of your sliced mini sweet peppers, followed by the baby carrots, and finally, the cauliflower florets. You’re building a little veggie masterpiece!
- Once your jars are beautifully layered, it’s time for the magic touch. Slowly pour the pickle brine over the vegetables until they are fully covered. Make sure every piece gets a good soak! This is what infuses them with that irresistible tangy flavor.
- Seal the jars tightly with their lids and pop them into the refrigerator. Let them chill for at least 2 hours. This crucial step allows all those wonderful flavors to meld together, transforming your fresh veggies into zesty, pickled delights.
- When you’re ready for a snack, simply grab a jar, open it up, and serve chilled directly from the jar. It couldn’t be easier to enjoy!
Substitutions & Additions
The beauty of these snack jars is how incredibly versatile they are! Feel free to get creative and make them your own. Here are some ideas to inspire you:
- Other Vegetables: Swap or add other crisp vegetables like cucumber slices, broccoli florets, sliced red onion, cherry tomatoes, green beans, or even radishes for a peppery kick.
- Flavor Boosters: Amp up the taste with a few whole garlic cloves, fresh dill sprigs, a pinch of red pepper flakes for some heat, or even a tiny bit of sugar if you prefer a slightly sweet and sour profile.
- Different Brine: While dill pickle brine is classic, don’t limit yourself! If you have leftover brine from a jar of pickled jalapeños, give that a try for an extra spicy version. And if you’re looking for another unique pickled treat with a delightful sweet-and-spicy twist, you absolutely have to check out our recipe for Pineapple Cowboy Candy – it’s a game-changer!
Tips for Success
While these Pickle Pepper Snack Jars are super straightforward, a few little tips can help ensure they turn out perfectly crunchy and flavorful every time:
- Choose Crisp Veggies: The fresher and crisper your vegetables are to start, the better the final texture will be. Avoid any limp or bruised produce.
- Brine Coverage is Key: Make absolutely sure all your vegetables are fully submerged in the pickle brine. This not only ensures even flavoring but also helps with preservation.
- Don’t Rush the Chill Time: I know it’s tempting to dive in, but those two hours in the fridge are essential for the flavors to truly meld and for the veggies to absorb that delicious tang. For an even deeper flavor, let them chill overnight!
- Jar Size Matters: Small jars are great for individual servings, making them perfect for lunchboxes or portion control. Larger jars work well if you’re making a batch for a gathering.
- Clean Jars: Always use clean jars and lids. While not strictly canning, cleanliness helps keep your snacks fresh longer.
- Beyond the Jar: If you love the tangy kick of pickles, you might also enjoy making our Dill Pickle Chicken Salad for another delightful meal. It’s fantastic for sandwiches or wraps!
How to Store Pickle Pepper Snack Jars
Once you’ve assembled your beautiful snack jars, proper storage is simple! Keep them sealed tightly and always refrigerate them. Thanks to the pickle brine, these jars will stay fresh and deliciously crisp for about 1 to 2 weeks in the refrigerator. The longer they sit, the more intense the pickled flavor will become, which is a bonus for some!
FAQs
Got a few more questions? I’ve got answers!
Q: Can I use homemade pickle brine instead of store-bought?
A: Absolutely! If you have a favorite homemade dill pickle recipe, feel free to use its brine. A simple brine can also be made with vinegar, water, salt, and a touch of sugar.
Q: What kind of jars are best for this recipe?
A: Any clean, sealable glass jars work! Mason jars are perfect because they seal well and come in various convenient sizes like pint or half-pint. Repurposed jam or sauce jars work too!
Q: Can I add different seasonings to the brine?
A: Yes, definitely! Feel free to experiment with a bay leaf, a few peppercorns, mustard seeds, or even a dried chili pepper for an extra layer of flavor and heat.
Q: Are these suitable for meal prep?
A: They are absolutely perfect for meal prep! Make a batch at the beginning of the week, and you’ll have grab-and-go healthy snacks or a vibrant side dish ready whenever you need them.
For more delicious and easy recipes, be sure to follow us on Pinterest!

Zesty & Refreshing Pickle Pepper Snack Jars
Ingredients
Equipment
Method
- Step 1: Grab clean, small jars. Pint-sized or half-pint jars work perfectly for individual servings.
- Step 2: Layer your dill pickle chunks at the bottom of each jar. Then, add a layer of your sliced mini sweet peppers, followed by the baby carrots, and finally, the cauliflower florets.
- Step 3: Slowly pour the pickle brine over the vegetables until they are fully covered. Make sure every piece gets a good soak.
- Step 4: Seal the jars tightly with their lids and pop them into the refrigerator. Let them chill for at least 2 hours. This allows all those wonderful flavors to meld together.
- Step 5: When ready for a snack, simply grab a jar, open it up, and serve chilled directly from the jar.