Oh, friends. Let me tell you about a little cookie creation that brings together two of my absolute favorite things: the cozy comfort of a classic peanut butter cookie and the gooey, chocolatey magic of s’mores. If you’ve ever wished you could capture that campfire feeling without, you know, actually building a fire, this recipe is for you! These Peanut Butter S’mores Sandwich Cookies are seriously easy, surprisingly quick, and they deliver on all the nostalgic flavor fronts. Get ready to make some happy memories in your kitchen!
Why You’ll Love This Recipe
- Fast: From mixing bowl to cookie jar in under an hour!
- Easy: Simple ingredients, straightforward steps – perfect for bakers of any level.
- Giftable: Box these beauties up, and you’ll be the most popular person around.
- Crowd-pleasing: Who doesn’t love peanut butter AND s’mores? It’s a winning combo!
Ingredients
Here’s what you’ll need to whip up a batch of these delightful cookie sandwiches. (Makes about 10–12 glorious sandwich cookies!)
- For the Peanut Butter Cookies:
- 1 cup creamy peanut butter (Make sure it’s the classic kind, like Jif or Skippy, not the natural separation-prone stuff – it makes a difference in the cookie texture!)
- ½ cup granulated sugar (Simple sweetness!)
- ½ cup light brown sugar, packed (Adds chewiness and that lovely molasses note.)
- 1 large egg (Our binder!)
- 1 tsp vanilla extract (Always essential for warm, comforting flavor.)
- ½ tsp baking soda (Helps them rise just right.)
- ¼ tsp salt (Balances all that sweet and nutty flavor.)
- For the S’mores Filling:
- 1 cup milk chocolate chips (Or chop up your favorite milk chocolate bar for extra decadence!)
- 1 cup mini marshmallows (The perfect little pillows of sweetness!)
- Optional: 2–3 graham crackers, crushed (For that classic s’mores crunch around the edge.)
How to Make It
Alright, let’s get baking! It’s truly a breeze, I promise.
Step 1: Make Those Perfect Peanut Butter Cookies
First, we need our cookie bases. These are super simple peanut butter cookies that bake up soft and chewy.
- Preheat your oven to 350°F (175°C). Grab a baking sheet and line it with parchment paper – this makes cleanup a dream!
- In a medium bowl, toss in the creamy peanut butter, granulated sugar, light brown sugar, egg, vanilla extract, baking soda, and salt. Give it a good mix until everything is completely smooth and well combined. It should be a nice, thick dough.
- Time to scoop! Use a tablespoon measure or a small cookie scoop to portion out the dough. Roll each portion into a ball between your palms. Place these balls onto your prepared baking sheet, leaving about 2 inches of space between them. They won’t spread too much, but they need a little room.
- Now for the classic peanut butter cookie touch – the fork! Gently press down on each cookie ball with a fork, then press again perpendicular to create that iconic crisscross pattern. This helps flatten them slightly and gives them a lovely texture.
- Pop the baking sheet into your preheated oven and bake for 8–10 minutes. You’re looking for the edges to be lightly golden brown. The centers might still look a little soft, but that’s okay! They’ll set up as they cool, and you want a slightly softer cookie for a sandwich.
- This is important: Let the cookies cool completely on the baking sheet before you even think about moving them. They’re fragile when hot!
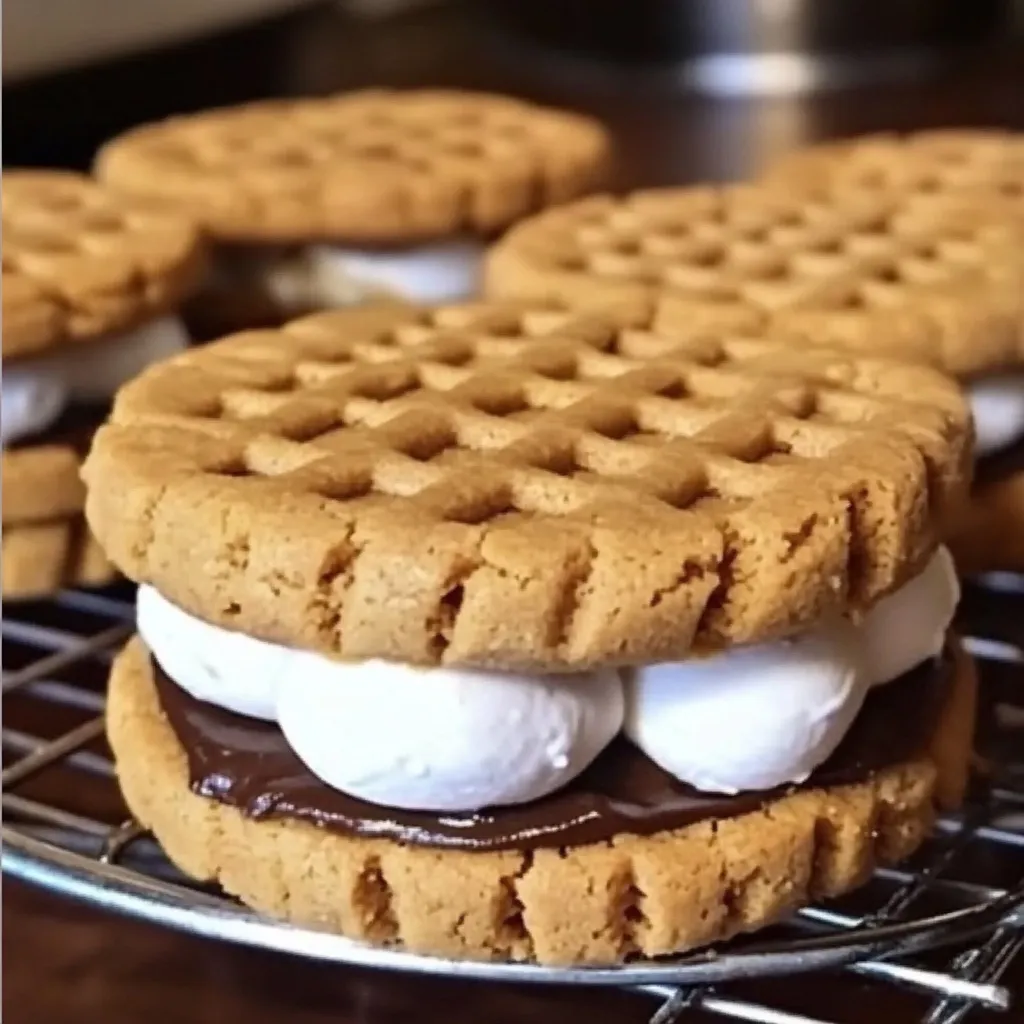
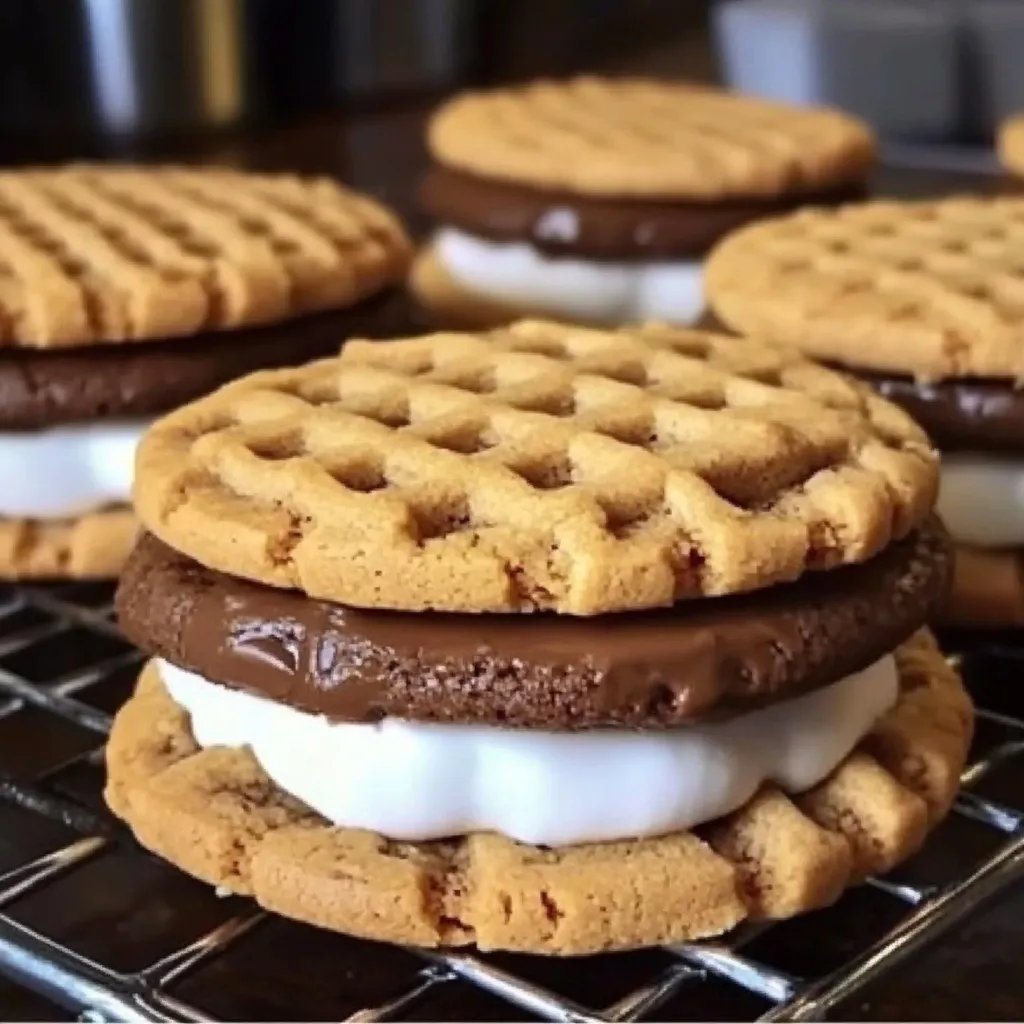
Step 2: Assemble the Gooey S’mores Sandwiches
Now for the fun part – bringing in the s’mores! This is where the magic happens.
- Melt your chocolate chips. You can do this in the microwave (in a microwave-safe bowl, heat in 30-second bursts, stirring after each, until smooth) or using a double boiler on the stovetop. Either way works great!
- Once your cookies are totally cool, flip half of them over so the flat bottom side is facing up. Spread approximately ½ teaspoon of melted chocolate onto the flat side of each of these flipped cookies.
- Generously sprinkle those adorable mini marshmallows evenly over the melted chocolate on each cookie. Pile ’em up, but try to keep them mostly centered so they don’t spill over too much when toasted.
- Now, the toasting! Move your oven rack so it’s about 6-8 inches away from the broiler element. Place the baking sheet with the marshmallow-topped cookies under the broiler. This is the part where you need to watch them like a hawk! Broil for just 10–20 seconds, or until the marshmallows are lightly golden and puffy. Seriously, walk away for even a second and they might turn black! Keep a close eye on them.
- As soon as the marshmallows are toasted to your liking, pull the tray out. Gently press a second plain peanut butter cookie (the other half of your batch!) onto the toasted marshmallow layer of each cookie to create a sandwich. The warm marshmallows will help the two cookies stick together.
Step 3: Optional Graham Cracker Crunch
Want that authentic s’mores edge? Add some graham cracker crumbs!
- While the marshmallow filling is still a little soft and warm, take each assembled sandwich cookie and gently roll the edges in crushed graham crackers. This adds a lovely texture and extra s’mores flavor.
- Allow the finished sandwich cookies to cool completely on the baking sheet or a wire rack. This lets the chocolate filling set up a bit.
Substitutions & Additions
Feeling creative? Here are a few ways to tweak this recipe!
- Different Chocolate: Swap milk chocolate for semi-sweet or even dark chocolate chips for a richer flavor.
- Different Nut Butter: While this recipe is specifically tested for creamy peanut butter, you could experiment with other nut butters, but the texture might change slightly.
- Add Texture to Cookies: Want some crunch in the peanut butter cookies themselves? Add a handful of chopped peanuts or even mini chocolate chips to the cookie dough.
- Flaky Sea Salt: A sprinkle of flaky sea salt over the melted chocolate before adding marshmallows adds a wonderful sweet and salty contrast.
- No Broiler? No Problem: If you don’t have a broiler or are nervous to use it, you could try using a kitchen torch to carefully toast the marshmallows instead (do this before pressing the top cookie on). Or, you could skip toasting the marshmallows entirely – they just won’t have that classic s’mores puff and char.
Tips for Success
A few pointers to make sure your cookie sandwiches turn out perfectly every time!
- Use the Right Peanut Butter: Seriously, stick to creamy, not-natural peanut butter for the best cookie texture here.
- Don’t Overbake the Cookies: Remember, they continue to set up as they cool. Pull them out when the edges are just golden.
- Cool Cookies Completely: This is crucial before assembling. Hot cookies will melt the chocolate too much and potentially fall apart.
- Watch the Broiler! I can’t stress this enough. Broilers are powerful and toast marshmallows in seconds. Stay right there and keep an eye on them.
- Prep Ahead: You can bake the peanut butter cookies a day or two in advance and store them in an airtight container. Assemble the s’mores sandwiches just before serving for the best results.
How to Store It
These cookies are best enjoyed fresh, especially with that soft, gooey center. However, you can store leftovers.
- Store cooled cookies in a single layer in an airtight container at room temperature for 2-3 days. If stacking, place parchment or wax paper between layers to prevent sticking.
- The texture of the marshmallow will change slightly over time, becoming less gooey and more firm.
FAQs
- Can I use natural peanut butter?
I highly recommend using traditional creamy peanut butter (like Jif or Skippy) for this specific cookie base. Natural peanut butter has a different fat content and can result in cookies that are too crumbly or greasy for a sturdy sandwich base.
- What if I don’t have a broiler?
You can try carefully toasting the marshmallows with a kitchen torch before adding the top cookie. Alternatively, you can simply skip the toasting step – the marshmallows won’t be puffy and charred, but you’ll still get the flavor combination.
- Can I make bigger cookies?
Absolutely! Just be aware that larger cookies will require a longer baking time. Keep an eye on them and wait until the edges are golden before removing them from the oven. The yield will also be lower.
- Why did my marshmallows burn instantly under the broiler?
The broiler is very powerful! You likely had the rack too close to the heating element or didn’t watch them closely enough. They toast incredibly fast, often in 10-20 seconds depending on your oven. Keep the rack lower next time (6-8 inches away) and stay right there, ready to pull them out as soon as they’re golden.

Easy Peanut Butter S’mores Sandwich Cookies (No Campfire Needed!)
Ingredients
Equipment
Method
- Step 1: Preheat oven to 350°F (175°C). Line a baking sheet with parchment paper.
- Step 2: In a medium bowl, mix peanut butter, granulated sugar, light brown sugar, egg, vanilla extract, baking soda, and salt until smooth and well combined into a thick dough.
- Step 3: Use a tablespoon measure or small cookie scoop to portion dough. Roll into balls and place on the prepared baking sheet, leaving about 2 inches of space.
- Step 4: Gently press down on each cookie ball with a fork, then press again perpendicular to create a crisscross pattern.
- Step 5: Bake for 8–10 minutes, until edges are lightly golden brown. Centers may look soft but will set as they cool.
- Step 6: Let the cookies cool completely on the baking sheet before moving.
- Step 7: Melt chocolate chips in a microwave-safe bowl (30-second bursts, stirring) or using a double boiler until smooth.
- Step 8: Once cookies are cool, flip half of them over. Spread approximately ½ teaspoon of melted chocolate onto the flat side of each flipped cookie.
- Step 9: Generously sprinkle mini marshmallows evenly over the melted chocolate on each cookie. Keep them mostly centered.
- Step 10: Move oven rack 6-8 inches from broiler element. Place marshmallow-topped cookies under broiler. Watch constantly and broil for 10–20 seconds until marshmallows are lightly golden and puffy. Remove immediately.
- Step 11: Gently press a second plain peanut butter cookie onto the toasted marshmallow layer of each cookie to create a sandwich. The warm marshmallows will help them stick.
- Step 12: Optional: While marshmallow filling is still soft, gently roll the edges of each assembled cookie in crushed graham crackers.
- Step 13: Allow finished sandwich cookies to cool completely on the baking sheet or a wire rack for the chocolate filling to set.