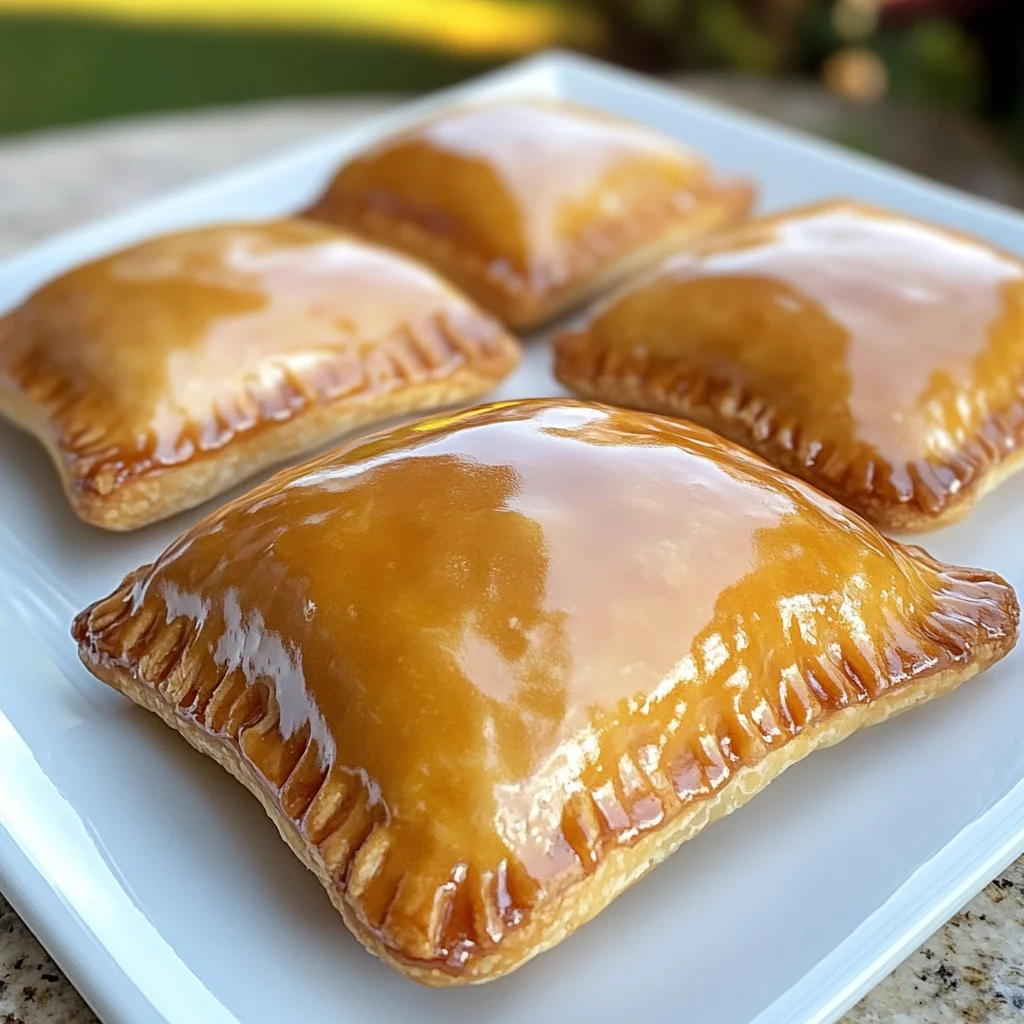
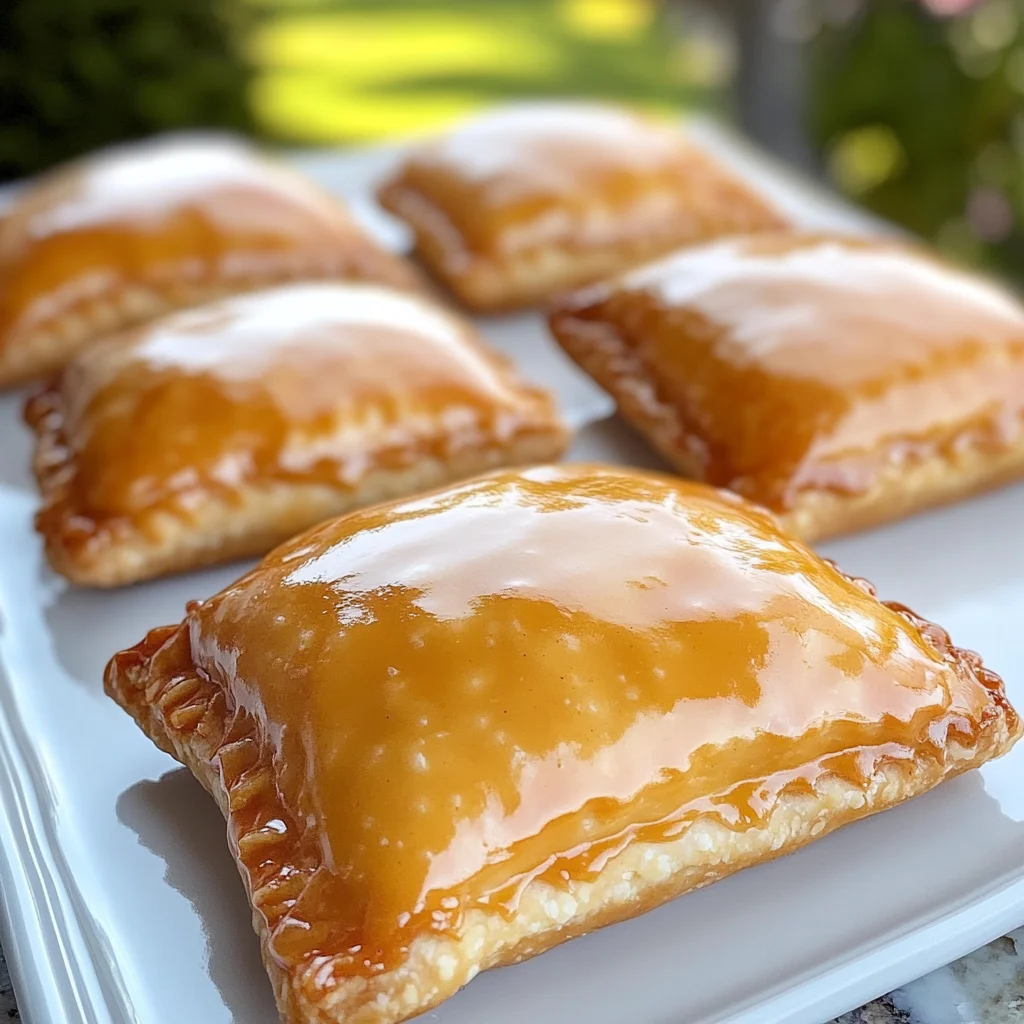
Hey there, friend! There’s something just so comforting and nostalgic about peach cobbler, isn’t there? It brings back memories of warm summer evenings, maybe sitting on a porch swing, spooning up that sweet, bubbly goodness with a scoop of melting ice cream. But sometimes, you just want that feeling in a quick, easy, grab-and-go bite. And that’s where these Peach Cobbler Donut Hand Pies come in!
Think of them as miniature pockets of pure peachy joy, wrapped in flaky pastry and topped with a sweet, simple glaze that reminds me just a little bit of my favorite donut shop. They’re way easier than a whole cobbler, perfect for sharing (or not!), and seriously addictive. Ready to whip up a batch?
Why You’ll Love This Recipe
- Fast: Using pre-made pie crusts slashes your prep time! You’ll be enjoying these treats in no time.
- Easy: No complicated techniques here! If you can fold dough and use a fork, you’ve got this.
- Giftable: Box ’em up and share the love! They make a charming homemade gift.
- Crowd-Pleasing: Seriously, who can resist a mini pie, especially one tasting like warm peach cobbler with a sweet glaze?
Ingredients
Gather ’round, let’s talk ingredients! Nothing too fancy here, just simple things that come together beautifully.
- For the Peach Filling:
- 2 cups fresh or canned peaches, diced: If using fresh, make sure they’re ripe and sweet! Canned work perfectly too – just drain them well. We’re dicing them small so they fit nicely in our little pies.
- ¼ cup granulated sugar & 2 tbsp brown sugar: This sweetens our peaches and the brown sugar adds a lovely depth.
- 1 tbsp cornstarch: Our secret weapon for thickening! It helps turn the bubbly peach juices into a nice, spoonable filling that won’t make our pies soggy.
- ½ tsp cinnamon & ¼ tsp nutmeg: These classic spices bring that warm, comforting cobbler flavor we all know and love.
- 1 tsp vanilla extract: A splash of vanilla always enhances fruit flavors.
- 1 tbsp lemon juice: This brightens up the peaches and balances the sweetness. Don’t skip it!
- For the Dough:
- 1 package (2 count) refrigerated pie crusts: This is where the “easy” really shines! You can absolutely use your favorite homemade pie dough if you prefer, but store-bought makes these a weeknight possibility.
- 1 large egg, beaten (for egg wash): This gives our hand pies a beautiful golden-brown finish and helps them look extra professional.
- For the Glaze:
- 1 cup powdered sugar: The base for our simple, sweet donut-style glaze.
- 2 tbsp milk or heavy cream: This thins out the sugar and makes it pourable. Cream will give you a slightly richer glaze.
- ½ tsp vanilla extract: More vanilla because, well, why not?
How to Make It
Alright, apron on! Let’s make some magic happen. It’s simpler than you think!
- Whip up the filling: In a medium saucepan, combine your diced peaches, both sugars, cornstarch, cinnamon, nutmeg, vanilla, and lemon juice. Pop it on your stove over medium heat. Now, stir, stir, stir! You’ll see it start to bubble and thicken up. This usually takes about 5-7 minutes. Once it looks like a nice, jammy consistency, take it off the heat and let it cool completely. This is super important – hot filling equals sad, messy pies! I sometimes make the filling ahead of time and pop it in the fridge.
- Prep the dough: Preheat your oven to 375°F (190°C). Grab a baking sheet and line it with parchment paper – makes clean-up a breeze! Unroll your pie crusts. Now, you need a cutter. A 4-6 inch round cutter works great, or you can even use a bowl or a clean can to trace and cut around. No cutter? No problem! Just use a knife to freehand cut squares or rough circles. You should get several shapes from each crust.
- Fill ’em up: Spoon a small amount of your completely cooled peach filling onto one half of each dough circle (or square). Don’t overfill, or they’ll burst! Fold the other half of the dough over the filling to create a half-moon shape (or a triangle if you cut squares). Now, grab a fork and firmly press the edges all around to seal them tight. This crimping also makes them look extra cute! Brush the tops of your sealed hand pies with the beaten egg wash.
- Bake time! Carefully place your hand pies onto the prepared baking sheet. Slide them into your preheated oven and bake for 18-22 minutes. You’re looking for them to be beautifully golden brown and slightly puffed. Once they’re ready, take them out and let them cool slightly right on the baking sheet. They need a few minutes to firm up.
- Glaze ’em: While they’re cooling a bit, whisk together the powdered sugar, milk (start with the smaller amount), and vanilla in a small bowl until it’s smooth and pourable. If it’s too thick, add just a tiny splash more milk until you get the consistency you like.
- Finishing touch: Once the hand pies aren’t piping hot but still warm, you can either drizzle the glaze generously over the tops or carefully dip the top of each pie into the glaze. Let them sit for a few minutes so the glaze can set before you dive in!
Substitutions & Additions
One of the fun parts about baking is making it your own! Here are a few ideas:
- Peaches: Not a peach fan? Try apple, cherry, or even mixed berries for the filling! Adjust sugar based on the fruit’s sweetness.
- Dough: If you’re feeling ambitious or already have a favorite recipe, go for homemade pie dough! Puff pastry would also make delightful, flakier hand pies.
- Spice it up: Add a pinch of cardamom or ginger to the peach filling for extra warmth.
- Different Glaze: Skip the donut glaze and sprinkle the tops with turbinado sugar before baking for a crunchy finish, or make a simple icing with powdered sugar and lemon juice for a tangier twist.
- Add-ins: Stir in a tablespoon of finely chopped pecans or walnuts into the cooled peach filling for a little crunch.
Tips for Success
Want to make sure your hand pies turn out perfect every time? Keep these tips in mind:
- Cool the Filling! I know I said it before, but seriously, this is the most common mistake. Hot filling will melt the dough and cause leaks. Let it cool completely!
- Don’t Overfill: A tablespoon or two is usually plenty. Too much filling means blowouts in the oven.
- Seal it Tight: Take your time crimping the edges with the fork. Press firmly to make sure the dough is sealed all the way around. You can also lightly moisten the edge of the bottom dough circle with a little water before folding over the top.
- Egg Wash Power: Don’t skip the egg wash! It gives that beautiful color and slight sheen.
- Prep Ahead: You can make the peach filling a day or two in advance and store it in an airtight container in the fridge.
How to Store It
These little beauties are best enjoyed the day they are made when the crust is flakiest. However, you can store leftovers.
Keep cooled hand pies in an airtight container at room temperature for 1-2 days. For longer storage, you can refrigerate them for up to 4 days. They might lose a little crispness in the fridge, but they’ll still taste delicious!
To refresh, pop them in a toaster oven or regular oven at a low temperature (around 300°F) for 5-10 minutes until warmed through and slightly crispy again. I wouldn’t recommend microwaving them, as it can make the crust soggy.
FAQs
Got questions? I’ve got answers!
Can I use frozen peaches?
Absolutely! Thaw them first and drain off any excess liquid before dicing and using them in the filling. You might need to cook the filling a minute or two longer to thicken.
What if my dough is sticking?
Lightly flour your surface and your rolling pin. Keep the dough cold – if it gets too warm, pop it back in the fridge for 10-15 minutes.
Can I skip the glaze?
You sure can! They are still wonderful baked plain. You could also sprinkle them with coarse sugar or cinnamon sugar before baking instead of using the egg wash.
My filling leaked out! What did I do wrong?
This usually happens if the filling wasn’t cooled completely, or if the edges weren’t sealed tightly enough. Make sure that fork crimp is firm all the way around!

Easy Peach Cobbler Hand Pies with Donut Glaze
Ingredients
Equipment
Method
- Step 1: Whip up the filling: In a medium saucepan, combine your diced peaches, both sugars, cornstarch, cinnamon, nutmeg, vanilla, and lemon juice. Pop it on your stove over medium heat. Stir until it starts to bubble and thicken, about 5–7 minutes. Once it looks like a nice, jammy consistency, take it off the heat and let it cool completely.
- Step 2: Prep the dough: Preheat your oven to 375°F (190°C). Line a baking sheet with parchment paper. Unroll your pie crusts. Use a 4–6 inch round cutter, a bowl, clean can, or knife to cut shapes (circles, squares). You should get several shapes from each crust.
- Step 3: Fill 'em up: Spoon a small amount of your completely cooled peach filling onto one half of each dough shape (circle or square). Fold the other half of the dough over the filling to create a half-moon or triangle shape. Use a fork to firmly press the edges all around to seal them tight. Brush the tops of your sealed hand pies with the beaten egg wash.
- Step 4: Bake time! Carefully place your hand pies onto the prepared baking sheet. Slide them into your preheated oven and bake for 18–22 minutes until beautifully golden brown and slightly puffed. Take them out and let them cool slightly right on the baking sheet.
- Step 5: Glaze 'em: While they're cooling a bit, whisk together the powdered sugar, milk (start with the smaller amount), and vanilla in a small bowl until it's smooth and pourable. If it's too thick, add just a tiny splash more milk until you get the consistency you like.
- Step 6: Finishing touch: Once the hand pies aren't piping hot but still warm, either drizzle the glaze generously over the tops or carefully dip the top of each pie into the glaze. Let them sit for a few minutes so the glaze can set before serving.