Oh, friend! Close your eyes for just a second and think back. Remember those long, lazy summer days? The sound of the ice cream truck jingling down the street? And that pure joy of biting into a frosty, sweet-tart orange creamsicle pop? It was pure magic, wasn’t it?
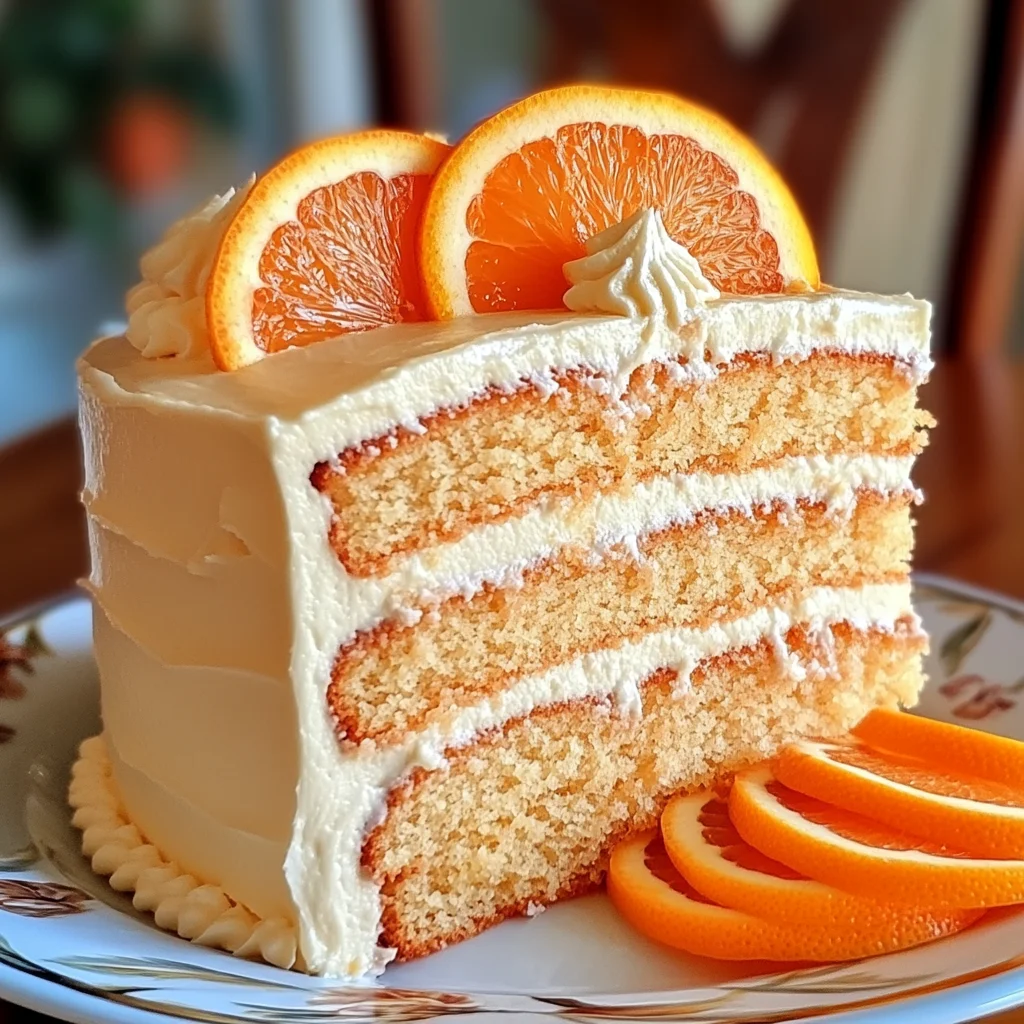
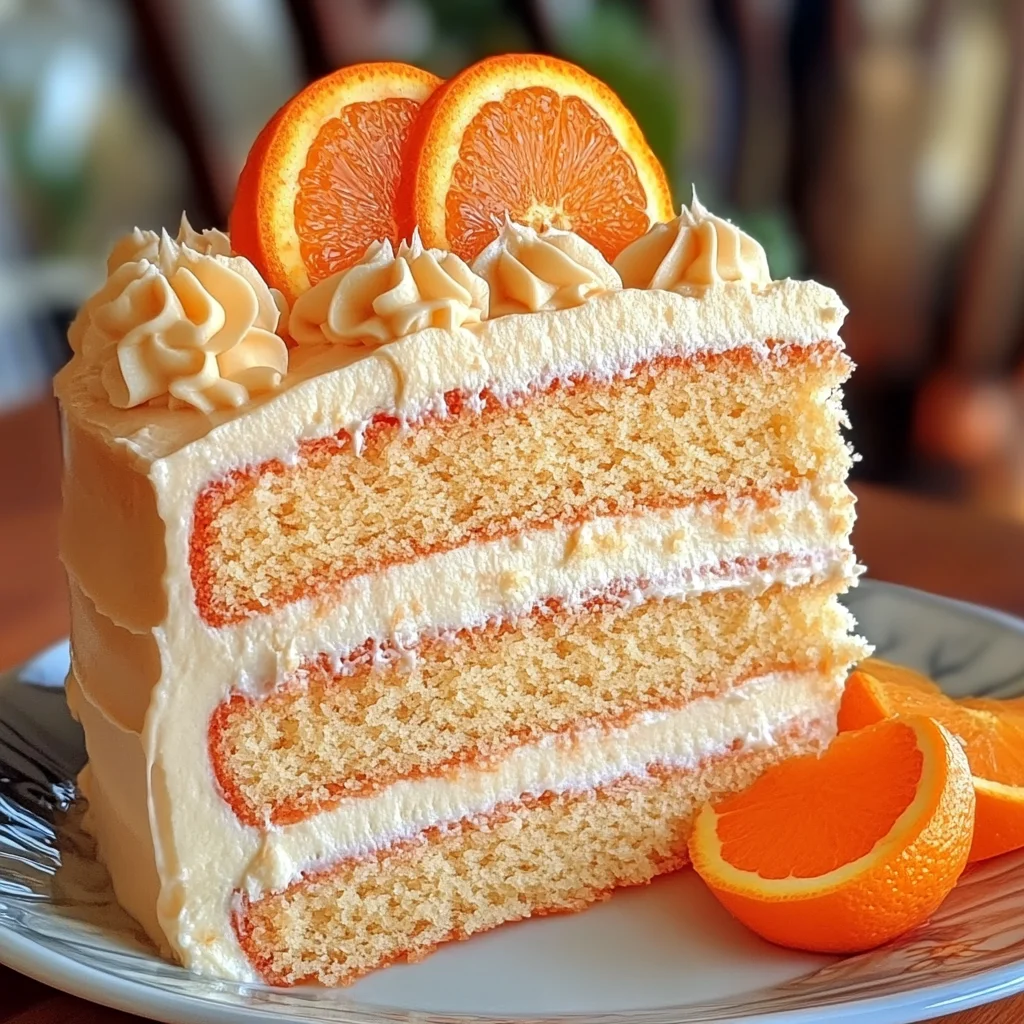
Well, get ready to bring that exact feeling right into your kitchen! This Orange Creamsicle Layer Cake captures all that nostalgic deliciousness in cake form. We’re talking moist, fluffy orange cake layers paired with the dreamiest, cloud-like orange buttercream frosting. It’s vibrant, it’s cheerful, and honestly, it’s a total showstopper. But shhh… don’t tell anyone how truly simple it is to make. It can be our little secret!
Why You’ll Love This Recipe
- Fast-ish! For a layer cake, this comes together pretty quickly, especially if you prep ahead.
- Easy Peasy: No fancy techniques required! If you can mix and bake, you can make this cake.
- Giftable Goodness: Wrap up a slice (or the whole cake!) for a friend, and you’re guaranteed smiles.
- Crowd-Pleasing: This flavor is universally loved! Kids and adults alike will swoon over it.
Ingredients
Gathering your ingredients is the first step to sunshine! Here’s what you’ll need:
Orange Cake:
- 225g (1 cup) unsalted butter, softened: Make sure it’s really soft – like, you can easily press a finger into it. This is key for a tender cake!
- 300g (2 cups) granulated sugar: Just good old white sugar for sweetness and moisture.
- 4 large eggs: Room temperature is best! They incorporate into the batter much more smoothly.
- 2 tsp vanilla extract: A classic flavor pairing that enhances the orange.
- 280g (2½ cups) all-purpose flour: The backbone of our cake layers.
- 2 tsp baking powder: Our leavening agent, helping the cake rise beautifully.
- ¼ tsp salt: Balances the sweetness and brings out all the flavors.
- 1 tbsp fresh orange zest: This is where a lot of the bright orange flavor comes from! Zest just the colored part, not the bitter white pith.
- 120ml (½ cup) fresh orange juice: Use fresh-squeezed for the best flavor!
- 120ml (½ cup) whole milk: Adds moisture and richness to the cake.
Orange Buttercream Frosting:
- 225g (1 cup) unsalted butter, softened: Again, super soft butter is crucial for fluffy frosting!
- 600g (4 cups) powdered sugar: Also called confectioners’ sugar or icing sugar. Sift it if it’s clumpy!
- 1 tsp vanilla extract: A lovely complement to the orange.
- 1–2 tbsp fresh orange juice: Start with one, add the second if you need a thinner consistency.
- 1 tbsp fresh orange zest: More zest for that signature creamsicle tang!
Decoration:
- Sliced oranges: Adds a fresh, vibrant touch and looks so pretty!
- Whipped cream or additional frosting for piping: Totally optional, but piping makes it look extra special.
How to Make It
Ready? Let’s bake this beauty! Follow these simple steps:
- Preheat your oven to 175°C (350°F). Get three 8-inch round cake pans ready. Grease them well, then line the bottoms with parchment paper. Greasing the parchment too is a good idea! This helps ensure your cakes don’t stick.
- In a big mixing bowl (or the bowl of your stand mixer), beat together the softened butter and granulated sugar. Cream them until the mixture is light and fluffy – this usually takes 3-5 minutes on medium speed. Scrape down the sides of the bowl as needed.
- Add your eggs one at a time, beating well after each one is added. Make sure each egg is fully incorporated before adding the next.
- Stir in the vanilla extract.
- In a separate medium bowl, whisk together the flour, baking powder, salt, fresh orange zest, and… wait! The recipe says add orange juice here, but we want to add the dry ingredients and wet ingredients (juice and milk) alternately. Let’s correct that step based on standard cake methods for a perfect crumb! In that separate bowl, just whisk together the flour, baking powder, salt, and orange zest. Set aside.
- In a small bowl or jug, whisk together the fresh orange juice and whole milk.
- Now, we’ll add the dry ingredients and the milk/juice mixture to the butter mixture, alternating between them. Start by adding about a third of the dry ingredients and mixing on low speed just until it’s mostly incorporated. Then add half of the milk/juice mixture and mix just until combined. Repeat with the second third of the dry ingredients, then the rest of the milk/juice, and finally the last third of the dry ingredients. Mix only until no streaks of flour remain. Do not overmix! Overmixing develops the gluten too much and can make your cake tough. A few small lumps are okay.
- Divide the batter evenly among your three prepared cake pans. You can eyeball it or use a scale for precision!
- Bake for 25–30 minutes. You’ll know they’re done when the edges start pulling away from the pan slightly and a toothpick inserted into the center of each cake comes out clean.
- Let the cakes cool in their pans on a wire rack for about 10-15 minutes. They need this time to firm up before you handle them.
- After 10-15 minutes, carefully flip the cakes out onto the wire rack to cool completely. Remove the parchment paper. Make sure they are absolutely cold before you even think about frosting them!
- While the cakes cool, let’s make that amazing frosting! In a large mixing bowl, beat your softened butter until it’s smooth and creamy.
- Gradually add the powdered sugar, beating on low speed. I like to add about a cup at a time, mixing until it’s incorporated before adding more. This prevents a powdered sugar cloud explosion in your kitchen!
- Once all the powdered sugar is in, add the vanilla extract, 1 tablespoon of fresh orange juice, and the orange zest.
- Now, beat the frosting on medium-high speed for 3–4 minutes. This is crucial for making it light, fluffy, and smooth! If the frosting seems too thick, add the second tablespoon of orange juice, a teaspoon at a time, beating until you reach your desired consistency.
- Once your cakes are completely cool, it’s time to assemble! Place one cooled cake layer on your cake stand or serving plate.
- Spread a generous layer of that dreamy orange buttercream frosting evenly over the top using an offset spatula or knife.
- Carefully place the second cake layer on top and repeat with another layer of frosting.
- Add the third cake layer on top.
- Now, for the crumb coat! Use an offset spatula to apply a thin layer of frosting all over the top and sides of the cake. This layer doesn’t need to look pretty; its job is to trap any loose crumbs so your final layer of frosting is smooth.
- Chill the cake in the refrigerator for 15–20 minutes. This allows the crumb coat to set and firm up, making the final frosting step much easier.
- Apply a final, thicker, smooth layer of frosting over the sides and top of the cake. Take your time here to get it nice and smooth!
- If you like, load some frosting into a piping bag fitted with a star tip and pipe pretty dollops around the top edge of the cake.
- For a beautiful finish, arrange fresh orange slices around the base of the cake and perhaps a few on top.
- Slice into this gorgeous cake and serve immediately!
Substitutions & Additions
Want to put your own spin on it? Here are a few ideas:
- Different Citrus: Swap out the orange zest and juice for lemon or lime for a Lemon Creamsicle or Lime Creamsicle cake!
- Add Extract: For an even punchier orange flavor, you can add a teaspoon or two of clear orange extract to the cake batter and the frosting.
- Color Pop: Add a drop or two of orange gel food coloring to the frosting for a more vibrant color, mimicking the look of a creamsicle pop.
- Orange Segments: For an extra burst of freshness, place a layer of thinly sliced, peeled orange segments between the cake layers before frosting.
- Cream Cheese Frosting: Not a fan of buttercream? An orange-flavored cream cheese frosting would also be absolutely divine!
Tips for Success
A few little pointers to help you nail this cake every time:
- Room Temp is Your Friend: Make sure your butter, eggs, milk, and orange juice are all at room temperature. This helps the batter emulsify properly, resulting in a smoother, more tender cake.
- Measure Accurately: Especially for baking! Use a kitchen scale for flour if possible, or the spoon-and-level method if using cups (spoon flour into the cup and level off with a straight edge, don’t scoop directly from the bag).
- Don’t Overmix! I’ll say it again because it’s important! Mix the batter just until the dry ingredients are incorporated.
- Cool Cakes Completely: Frosting a warm cake is a recipe for disaster (and a melted mess!).
- The Crumb Coat Works: Don’t skip the crumb coat and chilling step! It makes applying the final layer of frosting SO much easier and cleaner.
How to Store It
If by some miracle you have leftovers (it’s unlikely!), here’s how to keep them fresh:
- Store the cake in an airtight cake carrier or container at room temperature for up to 2-3 days.
- For longer storage or if your kitchen is warm, keep the cake in an airtight container in the refrigerator for up to 5-7 days. Let slices come to room temperature for about 15-20 minutes before serving for the best flavor and texture.
- You can also freeze frosted or unfrosted cake layers. Wrap them tightly in plastic wrap, then in foil. They’ll keep in the freezer for up to 2-3 months. Thaw in the refrigerator overnight before frosting or serving.
FAQs
Can I use bottled orange juice?
Yes, you can, but fresh-squeezed juice will give you a much brighter, more authentic orange flavor. If using bottled, look for 100% pure orange juice without added sugar.
Can I make this cake gluten-free?
You can try substituting the all-purpose flour with a good quality gluten-free all-purpose baking blend (one that contains xanthan gum). Results can vary depending on the blend, but it’s often successful!
My frosting is too thick/thin. How do I fix it?
If it’s too thick, add more orange juice (or a splash of milk) a teaspoon at a time, beating until it’s smooth. If it’s too thin, add a tablespoon or two more powdered sugar, beating until incorporated and thickens.
Can I turn this into cupcakes?
Absolutely! The baking time will be shorter, usually around 18-22 minutes. This recipe should yield about 24-30 cupcakes.
There you have it, friend! Your own slice of sunshine and nostalgia. I hope you make this Orange Creamsicle Layer Cake and that it brings as much joy to your table as it does to mine. Happy baking!

Easy Homemade Orange Creamsicle Cake
Ingredients
Equipment
Method
- Step 1: Preheat your oven to 175°C (350°F). Get three 8-inch round cake pans ready. Grease them well, then line the bottoms with parchment paper. Grease the parchment too.
- Step 2: In a big mixing bowl (or the bowl of your stand mixer), beat together the softened butter and granulated sugar until the mixture is light and fluffy (3-5 minutes). Scrape down the sides as needed.
- Step 3: Add your eggs one at a time, beating well after each is fully incorporated.
- Step 4: Stir in the vanilla extract.
- Step 5: In a separate medium bowl, whisk together the flour, baking powder, salt, and orange zest. Set aside.
- Step 6: In a small bowl or jug, whisk together the fresh orange juice and whole milk.
- Step 7: Add the dry ingredients and the milk/juice mixture to the butter mixture, alternating between them. Start with about a third of the dry ingredients, mix on low until mostly incorporated. Add half of the milk/juice, mix until combined. Repeat with the second third of dry ingredients, then the rest of the milk/juice, and finally the last third of dry ingredients. Mix only until no streaks of flour remain. Do not overmix.
- Step 8: Divide the batter evenly among your three prepared cake pans.
- Step 9: Bake for 25–30 minutes, or until the edges pull away and a toothpick inserted into the center comes out clean.
- Step 10: Let the cakes cool in their pans on a wire rack for about 10-15 minutes.
- Step 11: Carefully flip the cakes out onto the wire rack to cool completely. Remove the parchment paper. Ensure they are absolutely cold before frosting.
- Step 12: While the cakes cool, make the frosting. In a large mixing bowl, beat softened butter until smooth and creamy.
- Step 13: Gradually add powdered sugar, beating on low speed about a cup at a time until incorporated.
- Step 14: Once all the powdered sugar is in, add the vanilla extract, 1 tablespoon of fresh orange juice, and the orange zest.
- Step 15: Beat the frosting on medium-high speed for 3–4 minutes until light, fluffy, and smooth. If too thick, add the second tablespoon of orange juice, a teaspoon at a time, beating until desired consistency.
- Step 16: Once cakes are completely cool, place one layer on your cake stand. Spread a generous layer of frosting evenly over the top.
- Step 17: Carefully place the second cake layer on top and repeat with another layer of frosting.
- Step 18: Add the third cake layer on top.
- Step 19: Apply a thin crumb coat layer of frosting all over the top and sides of the cake using an offset spatula.
- Step 20: Chill the cake in the refrigerator for 15–20 minutes to set the crumb coat.
- Step 21: Apply a final, thicker, smooth layer of frosting over the sides and top of the cake.
- Step 22: Optionally, pipe decorative dollops around the top edge of the cake with additional frosting or whipped cream.
- Step 23: Arrange fresh orange slices around the base and/or on top for decoration. Slice and serve immediately.