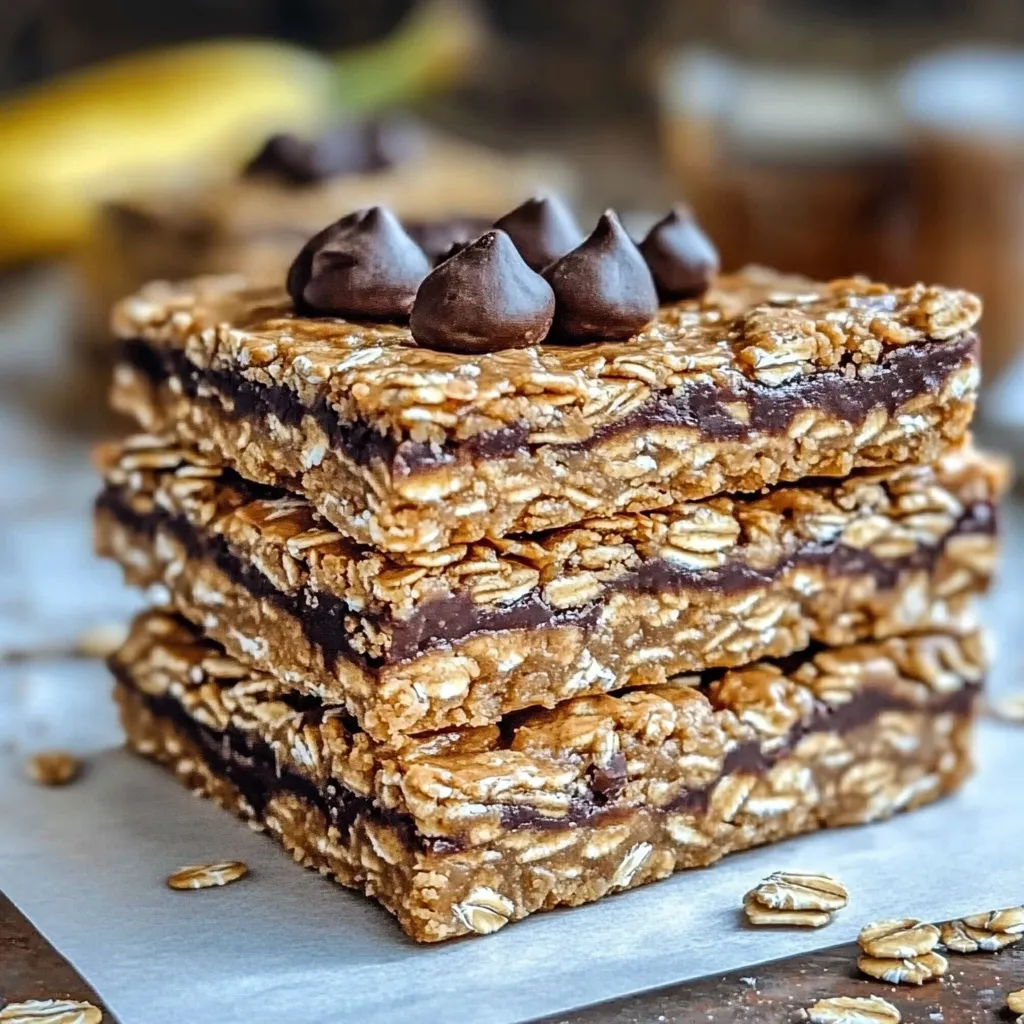
Remember those mornings when you needed something quick, wholesome, and utterly delicious to grab and go? Or maybe an afternoon craving for a sweet treat that wouldn’t undo all your good intentions? Well, friend, I’ve got a recipe that’s about to become your kitchen MVP. These Banana Peanut Butter Oatmeal Bars are pure magic – packed with comforting flavors, incredibly easy to whip up, and best of all, there’s no baking involved! They truly are the perfect blend of simple ingredients coming together to create something memorable and oh-so-satisfying.
Why You’ll Love Banana Peanut Butter Oatmeal Bars
- Fast: Seriously, you’ll have these mixed and chilling in less than 15 minutes.
- Easy: No ovens, no complicated steps, just stir and press!
- Giftable: Wrap a few up with a pretty ribbon, and you’ve got a thoughtful homemade gift.
- Crowd-pleasing: Kids and adults alike devour these. Perfect for lunchboxes or a post-dinner nibble.
- Healthy-ish: Full of good-for-you ingredients like oats, bananas, and flaxseed.
Ingredients
Gathering your ingredients is half the fun! Here’s what you’ll need for these delightful bars:
- 2 ripe bananas, mashed: The riper, the better! Those brown spots mean extra natural sweetness and easier mashing.
- 1/2 cup creamy peanut butter: Your favorite brand will work perfectly. If you prefer, natural peanut butter is great too, just be sure to stir it well.
- 1/4 cup honey or maple syrup: This adds just the right touch of sweetness and helps bind everything together. Feel free to adjust to your taste!
- 1 teaspoon vanilla extract: A little splash of vanilla elevates all the other flavors, adding that classic bakery aroma.
- 2 cups old-fashioned rolled oats: These are the backbone of our bars, providing that lovely chewy texture and fiber.
- 1/4 cup ground flaxseed: A nutritional powerhouse! It adds healthy fats and helps hold the bars together. You won’t even taste it, I promise!
- 1/4 cup chopped nuts (optional): Walnuts or pecans add a wonderful crunch and extra flavor.
- 1/4 cup mini chocolate chips or dried fruit (optional): For a little extra indulgence or a burst of fruity sweetness.
- A pinch of salt: Just a tiny bit enhances all the sweet and nutty flavors. Don’t skip it!
How to Make Banana Peanut Butter Oatmeal Bars
Let’s get those hands a little sticky and make some magic! You’ll be amazed at how simple this process is, and soon enough, you’ll be enjoying your very own batch of homemade goodness. If you love discovering fuss-free recipes, be sure to check out our collection of easy-to-follow recipes for more kitchen inspiration!
- Mash ‘Em Up: Grab a large mixing bowl and your ripe bananas. Use a fork or a potato masher to mash them until they’re nice and smooth. A few small lumps are totally fine and add character!
- Wet Ingredients Unite: To your mashed bananas, add the creamy peanut butter, honey (or maple syrup), and vanilla extract. Give it a good stir until everything is beautifully smooth and evenly combined. It should look like a glorious, sweet, nutty paste.
- Dry Meets Wet: Now, it’s time to bring in the stars of the show! Add your rolled oats, ground flaxseed, and that essential pinch of salt to the wet mixture. Stir thoroughly, making sure all those dry bits are well coated and distributed. You want every bite to be perfectly balanced.
- Fold in the Goodies: If you’re using them, gently fold in your chopped nuts, chocolate chips, or dried fruit. This is where you can really personalize your bars! I love a mix of mini chocolate chips and a few pecans for that extra texture.
- Prepare Your Dish: Line an 8×8-inch baking dish with parchment paper. Make sure to leave a bit of an overhang on the sides – this is your secret weapon for easily lifting the whole slab out later.
- Press It Down: Transfer the delicious mixture into your prepared dish. Now, here’s where you get to use a little elbow grease! Use a spatula, or even your clean hands, to press the mixture down firmly and evenly into the dish. The more compact it is, the better your bars will hold together.
- Chill Out: This is the most important step for structural integrity! Place the dish in the refrigerator for at least 2 hours, or until the bars are completely firm. Don’t rush this part – patience will be rewarded with perfect bars.
- Slice and Serve: Once the mixture is set, use the parchment paper overhang to gently lift the entire block out of the dish. Place it on a cutting board and slice it into bars or squares of your desired size. Voila!
Substitutions & Additions
One of the best things about these bars is how versatile they are! Feel free to get creative:
- Nut Butter Swap: Not a peanut butter fan? Almond butter, cashew butter, or sunflower seed butter (for a nut-free option) work beautifully too!
- Sweetener Alternatives: Agave nectar or brown rice syrup can be used in place of honey or maple syrup.
- Extra Crunch: Add toasted shredded coconut, pumpkin seeds, or sunflower seeds for more texture and nutrients.
- Flavor Boost: Stir in a dash of cinnamon, a pinch of nutmeg, or even some orange zest for a different flavor profile.
- Chocolate Lovers: Dark chocolate chips, white chocolate chips, or even a drizzle of melted chocolate over the top once chilled would be divine. If you’re a big fan of chocolatey, no-bake treats, you might also adore our No-Bake Reese’s Peanut Butter Bars!
- Fruity Fun: Experiment with other dried fruits like dried cranberries, cherries, or finely chopped apricots.
Tips for Success
- Use Ripe Bananas: I can’t stress this enough! Ripe (even overripe) bananas are naturally sweeter and mash much more easily, contributing to a smoother texture and richer flavor.
- Press Firmly: This is key to preventing crumbly bars. Really get in there and press the mixture down tightly into the pan.
- Don’t Skip the Chill Time: The refrigerator time allows the oats to soften and the mixture to firm up, making them easy to slice and hold their shape. If you’re in a hurry, you can pop them in the freezer for about 30-45 minutes.
- Parchment Paper is Your Friend: It makes for super easy removal and cleanup. Don’t skip this step!
- Storage for Best Texture: Keep them in an airtight container in the fridge to maintain their firmness and freshness.
How to Store Banana Peanut Butter Oatmeal Bars
These bars are best kept cold to maintain their firm texture and extend their freshness. Pop them in an airtight container in the refrigerator for up to 5-7 days. If you want to make a big batch, they also freeze beautifully! Just wrap individual bars in plastic wrap and then place them in a freezer-safe bag or container. They’ll keep in the freezer for up to 3 months. When you’re ready to enjoy, simply grab one from the freezer and let it thaw on the counter for a few minutes, or pop it in the microwave for a few seconds if you like them slightly warm and gooey.
FAQs
Q: Can I use quick oats instead of old-fashioned rolled oats?
A: While old-fashioned rolled oats give the best chewy texture, you can use quick oats if that’s all you have. The texture of the bars might be a bit softer and less chewy.
Q: Are these bars gluten-free?
A: Yes, as long as you use certified gluten-free rolled oats, these bars are naturally gluten-free.
Q: Can I add protein powder to these bars?
A: Absolutely! You can add 1-2 scoops of your favorite unflavored or vanilla protein powder when you add the oats and flaxseed. You might need to add a tiny splash more liquid (like milk or a bit more honey) if the mixture becomes too dry.
Q: Can I make these without a food processor?
A: Yes, this recipe is designed to be made without a food processor! All you need is a bowl and a fork/masher for the bananas, and then a good sturdy spoon or spatula for mixing.
For more delicious and easy recipes, make sure to follow us on Pinterest!
Easy No-Bake Banana Peanut Butter Oatmeal Bars
Ingredients
Equipment
Method
- Step 1: Mash ‘Em Up: Grab a large mixing bowl and your ripe bananas. Use a fork or a potato masher to mash them until they’re nice and smooth. A few small lumps are totally fine and add character!
- Step 2: Wet Ingredients Unite: To your mashed bananas, add the creamy peanut butter, honey (or maple syrup), and vanilla extract. Give it a good stir until everything is beautifully smooth and evenly combined. It should look like a glorious, sweet, nutty paste.
- Step 3: Dry Meets Wet: Now, it’s time to bring in the stars of the show! Add your rolled oats, ground flaxseed, and that essential pinch of salt to the wet mixture. Stir thoroughly, making sure all those dry bits are well coated and distributed. You want every bite to be perfectly balanced.
- Step 4: Fold in the Goodies: If you’re using them, gently fold in your chopped nuts, chocolate chips, or dried fruit. This is where you can really personalize your bars! I love a mix of mini chocolate chips and a few pecans for that extra texture.
- Step 5: Prepare Your Dish: Line an 8×8-inch baking dish with parchment paper. Make sure to leave a bit of an overhang on the sides – this is your secret weapon for easily lifting the whole slab out later.
- Step 6: Press It Down: Transfer the delicious mixture into your prepared dish. Now, here’s where you get to use a little elbow grease! Use a spatula, or even your clean hands, to press the mixture down firmly and evenly into the dish. The more compact it is, the better your bars will hold together.
- Step 7: Chill Out: This is the most important step for structural integrity! Place the dish in the refrigerator for at least 2 hours, or until the bars are completely firm. Don’t rush this part – patience will be rewarded with perfect bars.
- Step 8: Slice and Serve: Once the mixture is set, use the parchment paper overhang to gently lift the entire block out of the dish. Place it on a cutting board and slice it into bars or squares of your desired size. Voila!