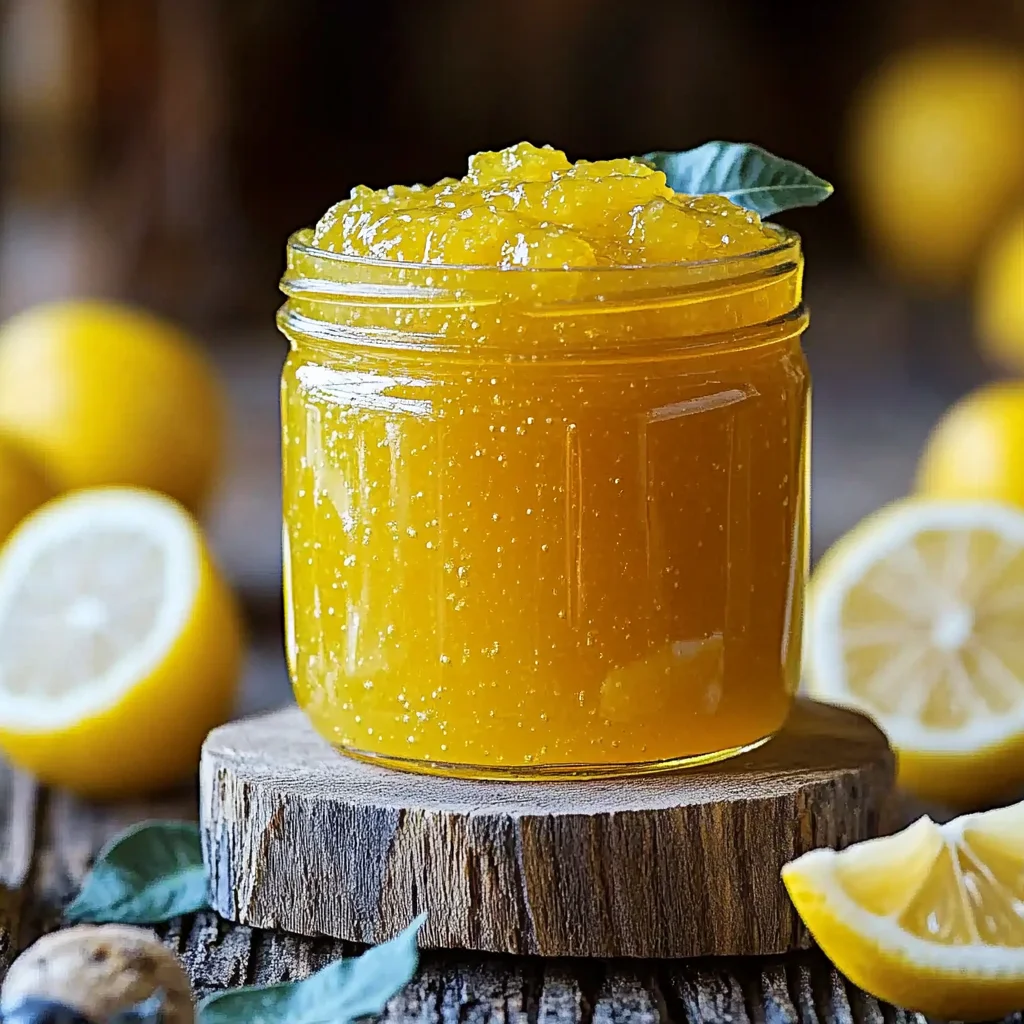
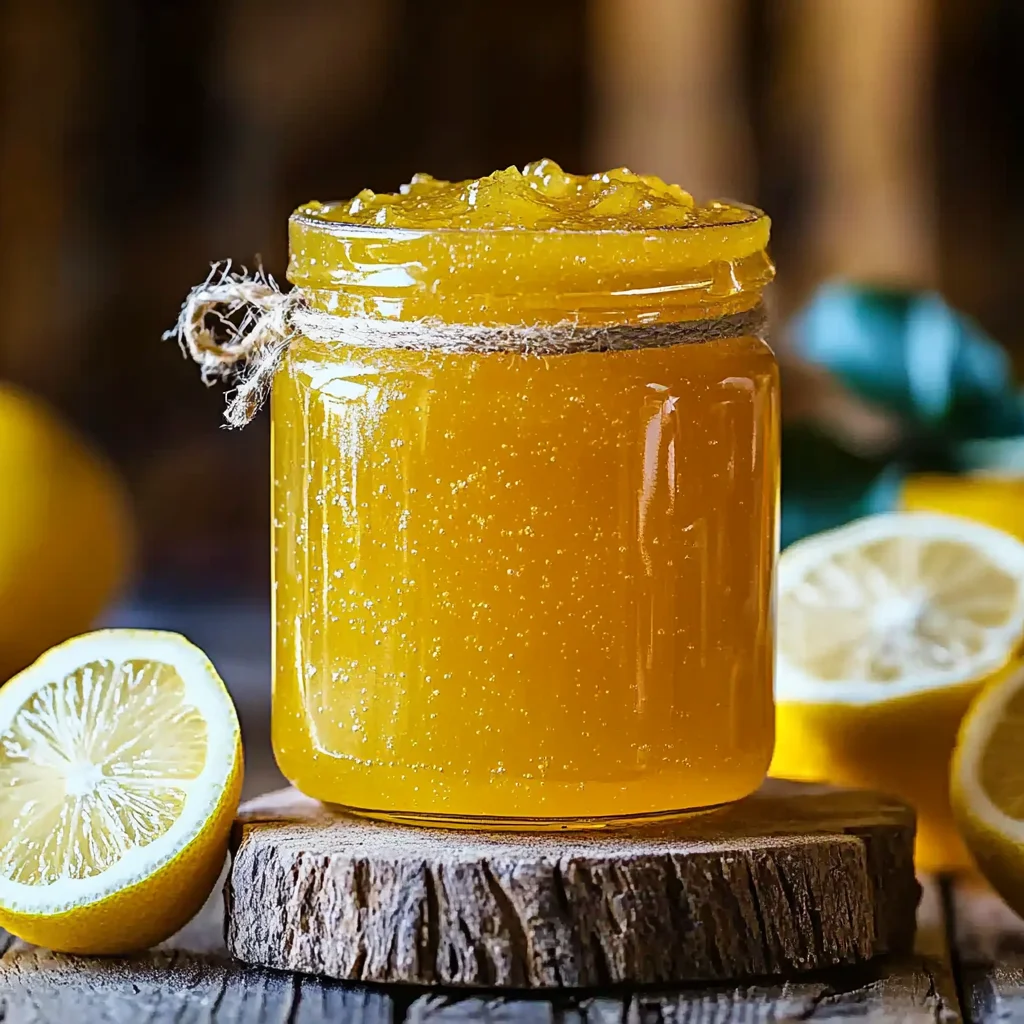
Remember those lazy summer mornings, fresh toast, and a jar of something utterly bright and zesty? Or maybe a cozy winter afternoon, a cup of tea, and a burst of sunshine on your scone? That’s exactly what this Italian Lemon Jam brings to the table. It’s not just a recipe; it’s a little jar of happiness, a taste of the Amalfi Coast right in your kitchen. And guess what? It’s shockingly easy, surprisingly quick, and unbelievably memorable. You won’t believe how much flavor you can get from just a few simple ingredients. Get ready to fall in love with the pure, unadulterated sunshine of homemade lemon jam!
Why You’ll Love Italian Lemon Jam
- Fast
- Easy
- Giftable
- Crowd-pleasing
Ingredients
Gather your simple treasures; this jam doesn’t need much to shine!
- 4 medium organic lemons (about 1 cup thinly sliced): Go organic if you can! Since we’re using the whole lemon, rind and all, you want them free from pesticides for the purest flavor and zestiest punch.
- 1 cup granulated sugar: The sweet backbone of our jam, helping it to thicken beautifully and balance that glorious lemon tartness. It’s what gives our jam that lovely glossy finish!
- 2 cups water: Our liquid friend that helps soften those lemon slices and gets the simmering party started, ensuring everything cooks down perfectly.
How to Make Italian Lemon Jam
Ready to transform humble lemons into liquid gold? Let’s get cooking!
- Prepare Lemons: First things first, give those beautiful lemons a good rinse and a pat dry. This is super important since we’re using the entire fruit, peel and all! Now, for the slicing: aim for paper-thin slices. The thinner you slice them, the more quickly they’ll break down and release all their vibrant flavor, making your jam smooth and delightful. As you slice, keep a sharp eye out for any seeds and pluck them right out. Nobody wants a bitter surprise in their perfect jam!
- Simmer Lemons: Next, gently place all your thinly sliced lemon beauties and the water into a medium saucepan. Pop it onto your stovetop and bring it to a gentle simmer over medium heat. Let it dance there for about 10 minutes, stirring occasionally. You’ll notice the lemon rinds starting to soften – that’s exactly what we want! This step is key to extracting all that vibrant lemon flavor and starting the jam-making magic.
- Thicken Jam: Now for the transformation! Add the granulated sugar to the saucepan. Stir it in until it dissolves completely, then continue to simmer your jam for another 20-25 minutes. You’ll need to stir often, especially as it thickens, to make sure nothing sticks to the bottom and that the sugar truly melts into that lemony goodness. As it cooks, you’ll see it start to thicken and get this gorgeous, glossy sheen. To know it’s just right, take a small spoonful and place it on a chilled plate. Let it cool for a moment, then push it with your finger – if it wrinkles and holds its shape, you’ve hit the jackpot! This jam is wonderful on everything from toast to a dollop on your favorite Fluffy Lemon Ricotta Pancakes, adding that perfect bright punch.
- Jar and Store: Once your jam reaches that perfect consistency, carefully remove it from the heat and let it cool slightly. It will continue to thicken as it cools, so don’t worry if it still seems a little liquidy in the pot. Now, for the final touch: transfer the warm jam into sterilized jars. Be careful, it’s hot! Seal those jars up, and let them cool completely to room temperature on your counter before popping them into the refrigerator. If you’re looking for another delightful way to enjoy lemons, I highly recommend checking out how to make Homemade Lemon Curd Donuts – they are simply divine and pair wonderfully with citrus flavors!
Substitutions & Additions
This lemon jam is fantastic as is, but if you’re feeling a little adventurous, here are some ways to customize it and make it uniquely yours!
- Spice It Up: Add a tiny pinch of grated fresh ginger or a cinnamon stick during the initial simmering phase for a warm, spicy note. Just be sure to remove the cinnamon stick before jarring!
- Herbaceous Twist: A sprig of fresh rosemary or thyme simmered with the lemons can add an unexpected, sophisticated layer of flavor that’s truly gourmet.
- Vanilla Bean Dream: Scrape half a vanilla bean into the jam while it simmers for a truly luxurious, aromatic experience. The vanilla complements the lemon beautifully.
- Citrus Mix: Feel free to swap out one of the lemons for an orange or a lime for a more complex citrus blend. Just ensure they are also organic and thinly sliced!
- Sweetener Swap: While granulated sugar works best for texture and clarity, you can experiment with swapping a quarter of the granulated sugar for brown sugar for a deeper molasses note, though it might change the color slightly.
Tips for Success
Even though this jam is super easy, a few tricks can make it absolutely perfect every time!
- Slice Thinly: I can’t stress this enough! Thinner slices mean a smoother jam, better flavor extraction, and a more pleasant texture. A mandoline slicer can be your best friend here for even slices, but a sharp knife and a steady hand work beautifully too.
- Remove Seeds Diligently: Lemon seeds, and even some of the white pith, contain compounds that can make your jam bitter. Be thorough in removing them before simmering to ensure a bright, sweet-tart flavor.
- Sterilize Your Jars: While this recipe is for a small batch and intended for refrigeration, properly sterilized jars help prolong shelf life and prevent any unwanted spoilage. You can boil them, run them through a hot dishwasher cycle, or bake them in a low oven.
- Don’t Rush the Simmer: The 20-25 minute thickening time is crucial. It allows the natural pectin in the lemons to activate and the excess water to evaporate, giving you that perfect jam consistency. Keep stirring, especially towards the end, to prevent scorching!
- Perfect Pectin: Lemons naturally contain a good amount of pectin, which is what helps the jam set. This recipe relies entirely on that natural pectin, so there’s no need to add any commercial pectin!
How to Store Italian Lemon Jam
Once you’ve made your glorious batch of lemon jam, you’ll want to know how to keep it fresh and delicious for as long as possible!
Store your Italian Lemon Jam in airtight, sterilized jars in the refrigerator. It will keep beautifully for up to 3-4 weeks, though I doubt it will last that long once you start enjoying it! If you make a larger batch and want to keep it longer, you can freeze it in freezer-safe containers for up to 6 months. Just be sure to leave a little headspace at the top of your container, as the jam will expand slightly when frozen.
FAQs
Got questions? I’ve got answers!
- Q: Can I use Meyer lemons for this jam?
A: Absolutely! Meyer lemons are fantastic for jam. They’re generally a bit sweeter and less tart than regular lemons, so your jam might be a touch milder and sweeter. Feel free to adjust the sugar slightly if you prefer a tarter jam. - Q: Why did my jam not thicken?
A: The most common reason for jam not thickening is not simmering it long enough. Make sure you’re cooking it until it reaches that “holds its shape” consistency test on a chilled plate. Also, ensure your lemon slices were thin enough to release their natural pectin effectively into the mixture. - Q: What else can I use this jam on besides toast?
A: Oh, the possibilities are endless! Beyond toast and delicious breakfast items like pancakes, try it as a filling for tarts, small cakes, or even thumbprint cookies. It’s lovely swirled into plain yogurt, spooned over scones, or even as a bright glaze for grilled chicken or fish. For another fantastic lemony treat, this jam would be absolutely divine as a topping for an Easy Lemon Blueberry Trifle, adding an extra layer of zesty sweetness!
For more delicious homemade recipes and kitchen inspiration, be sure to follow us on Pinterest!

Easy Homemade Italian Lemon Jam
Ingredients
Equipment
Method
- Step 1: First things first, give those beautiful lemons a good rinse and a pat dry. This is super important since we're using the entire fruit, peel and all! Now, for the slicing: aim for paper-thin slices. The thinner you slice them, the more quickly they'll break down and release all their vibrant flavor, making your jam smooth and delightful. As you slice, keep a sharp eye out for any seeds and pluck them right out. Nobody wants a bitter surprise in their perfect jam!
- Step 2: Next, gently place all your thinly sliced lemon beauties and the water into a medium saucepan. Pop it onto your stovetop and bring it to a gentle simmer over medium heat. Let it dance there for about 10 minutes, stirring occasionally. You’ll notice the lemon rinds starting to soften – that’s exactly what we want! This step is key to extracting all that vibrant lemon flavor and starting the jam-making magic.
- Step 3: Now for the transformation! Add the granulated sugar to the saucepan. Stir it in until it dissolves completely, then continue to simmer your jam for another 20-25 minutes. You’ll need to stir often, especially as it thickens, to make sure nothing sticks to the bottom and that the sugar truly melts into that lemony goodness. As it cooks, you'll see it start to thicken and get this gorgeous, glossy sheen. To know it’s just right, take a small spoonful and place it on a chilled plate. Let it cool for a moment, then push it with your finger – if it wrinkles and holds its shape, you’ve hit the jackpot! This jam is wonderful on everything from toast to a dollop on your favorite Fluffy Lemon Ricotta Pancakes, adding that perfect bright punch.
- Step 4: Once your jam reaches that perfect consistency, carefully remove it from the heat and let it cool slightly. It will continue to thicken as it cools, so don’t worry if it still seems a little liquidy in the pot. Now, for the final touch: transfer the warm jam into sterilized jars. Be careful, it's hot! Seal those jars up, and let them cool completely to room temperature on your counter before popping them into the refrigerator. If you're looking for another delightful way to enjoy lemons, I highly recommend checking out how to make Homemade Lemon Curd Donuts – they are simply divine and pair wonderfully with citrus flavors!
Notes
- Spice It Up: Add a tiny pinch of grated fresh ginger or a cinnamon stick during the initial simmering phase for a warm, spicy note. Just be sure to remove the cinnamon stick before jarring!
- Herbaceous Twist: A sprig of fresh rosemary or thyme simmered with the lemons can add an unexpected, sophisticated layer of flavor that's truly gourmet.
- Vanilla Bean Dream: Scrape half a vanilla bean into the jam while it simmers for a truly luxurious, aromatic experience. The vanilla complements the lemon beautifully.
- Citrus Mix: Feel free to swap out one of the lemons for an orange or a lime for a more complex citrus blend. Just ensure they are also organic and thinly sliced!
- Sweetener Swap: While granulated sugar works best for texture and clarity, you can experiment with swapping a quarter of the granulated sugar for brown sugar for a deeper molasses note, though it might change the color slightly.
- Slice Thinly: Thinner slices mean a smoother jam, better flavor extraction, and a more pleasant texture. A mandoline slicer can be your best friend here for even slices, but a sharp knife and a steady hand work beautifully too.
- Remove Seeds Diligently: Lemon seeds, and even some of the white pith, contain compounds that can make your jam bitter. Be thorough in removing them before simmering to ensure a bright, sweet-tart flavor.
- Sterilize Your Jars: While this recipe is for a small batch and intended for refrigeration, properly sterilized jars help prolong shelf life and prevent any unwanted spoilage. You can boil them, run them through a hot dishwasher cycle, or bake them in a low oven.
- Don't Rush the Simmer: The 20-25 minute thickening time is crucial. It allows the natural pectin in the lemons to activate and the excess water to evaporate, giving you that perfect jam consistency. Keep stirring, especially towards the end, to prevent scorching!
- Perfect Pectin: Lemons naturally contain a good amount of pectin, which is what helps the jam set. This recipe relies entirely on that natural pectin, so there’s no need to add any commercial pectin!