Oh, Halloween! Can you smell it? That crisp, cool air, the faint scent of pumpkin spice, and the giddy excitement of costumes and trick-or-treating. For me, some of the fondest memories involve not just collecting candy, but making delicious, spooky treats at home. There’s just something magical about transforming simple ingredients into something frightfully fun. And this year, I’ve got the perfect recipe to add to your Halloween traditions: these incredible Halloween Cupcakes! They’re so easy to whip up, you’ll wonder why you ever bought store-bought. Quick to make, super memorable, and utterly delicious – they’re guaranteed to bring a smile to every ghoulish face!
Why You’ll Love Halloween Cupcakes
- Fast: Perfect for last-minute party prep or a spontaneous baking session.
- Easy: Simple ingredients and straightforward decorating make these a breeze for bakers of all levels.
- Giftable: Package them up for teachers, neighbors, or as a sweet treat for trick-or-treaters (if you’re feeling extra generous!).
- Crowd-Pleasing: With fun designs and delicious buttercream, everyone will find a favorite.
Ingredients
Gather your spooky supplies! These ingredients are easy to find and come together to create a hauntingly good dessert.
- 12 cupcakes: Whether you use your favorite pumpkin recipe, a classic vanilla, chocolate, or even a store-bought mix for convenience, the base is up to you! If you’re looking for more delicious pumpkin-flavored treats, be sure to check out some of my other fall favorites.
- 1 ½ cups (340g) unsalted butter, softened: The star of our buttercream! Make sure it’s properly softened for that smooth, creamy texture.
- 6 cups (720g) confectioners’ sugar: Also known as powdered sugar. This gives our frosting its structure and sweetness.
- 6 Tablespoons (60ml) heavy cream, half-and-half, or whole milk, at room temperature: This liquid gold brings the buttercream to life, making it wonderfully smooth and spreadable.
- 2 teaspoons pure vanilla extract: A must-have for classic, comforting flavor.
- Salt, to taste: Just a pinch can balance the sweetness and really make the vanilla pop.
- Gel food coloring: Leaf Green, Fuchsia, Violet, Super Black, Orange. Gel colors are fantastic because they give vibrant hues without thinning your frosting.
- Assorted candy eyeballs: Small, large, and mini sizes! These are key to bringing our monsters and spiders to life.
- Oreo Mini cookies: Perfect for our creepy-crawly spider design.
- Optional: Sprinkles: A little extra sparkle never hurt anyone!
Equipment You’ll Need
No need for fancy gadgets here, just a few kitchen essentials to make decorating a breeze:
- Handheld or stand mixer: For whipping that perfect buttercream.
- Piping bags (several): You’ll want one for each color of frosting.
- 2 couplers (optional): These are super handy if you want to switch between different piping tips with the same color frosting!
- Piping tips:
- Small open star tip (e.g., Wilton 21)
- Large petal tip (e.g., Wilton 125)
- Small round tip (e.g., Wilton 4)
- Spatula: For folding your buttercream and spreading frosting.
How to Make Halloween Cupcakes
Alright, grab your apron, put on your favorite spooky playlist, and let’s get decorating! This is where the magic happens.
- Prepare Buttercream: First things first, get that glorious buttercream ready. In your stand mixer with a paddle attachment (or using your trusty handheld mixer), beat the softened unsalted butter on medium speed. Let it go for about 2 minutes until it’s super creamy and light. This step is crucial for airy frosting!
- Add Remaining Ingredients: Now, gradually add in 5 ½ cups of confectioners’ sugar, the heavy cream (or half-and-half/milk), and that wonderful vanilla extract. Start beating on low speed for just about 30 seconds to avoid a sugar cloud in your kitchen! Then, bump it up to medium-high speed and beat for a full 2 minutes. You’ll see it transform into beautiful, fluffy frosting.
- Refine Buttercream: Time to taste! If your frosting is a little too sweet for your liking, add a tiny pinch of salt (around ⅛ teaspoon). If you notice any stubborn air bubbles, gently fold the buttercream with a spatula for a minute or two. This helps achieve that perfectly smooth, silky consistency that’s a dream to pipe.
- Adjust Consistency: Baking is all about feeling it out, right? If your frosting seems a little too thin, you can add up to ½ cup more confectioners’ sugar, a little at a time, until it thickens up. If it’s too thick and stiff, just add more heavy cream, 1 tablespoon at a time, until you hit that sweet spot of pipeable perfection.
- Color Frosting: Now for the fun part – bringing those Halloween colors to life! Divide your luscious buttercream into separate bowls. Get out your gel food colorings: Leaf Green, Orange, Super Black. For a vibrant purple, combine Fuchsia and Violet gel. Mix each color until you achieve the spooky shades you desire. Don’t forget to leave one portion white for some of our designs!
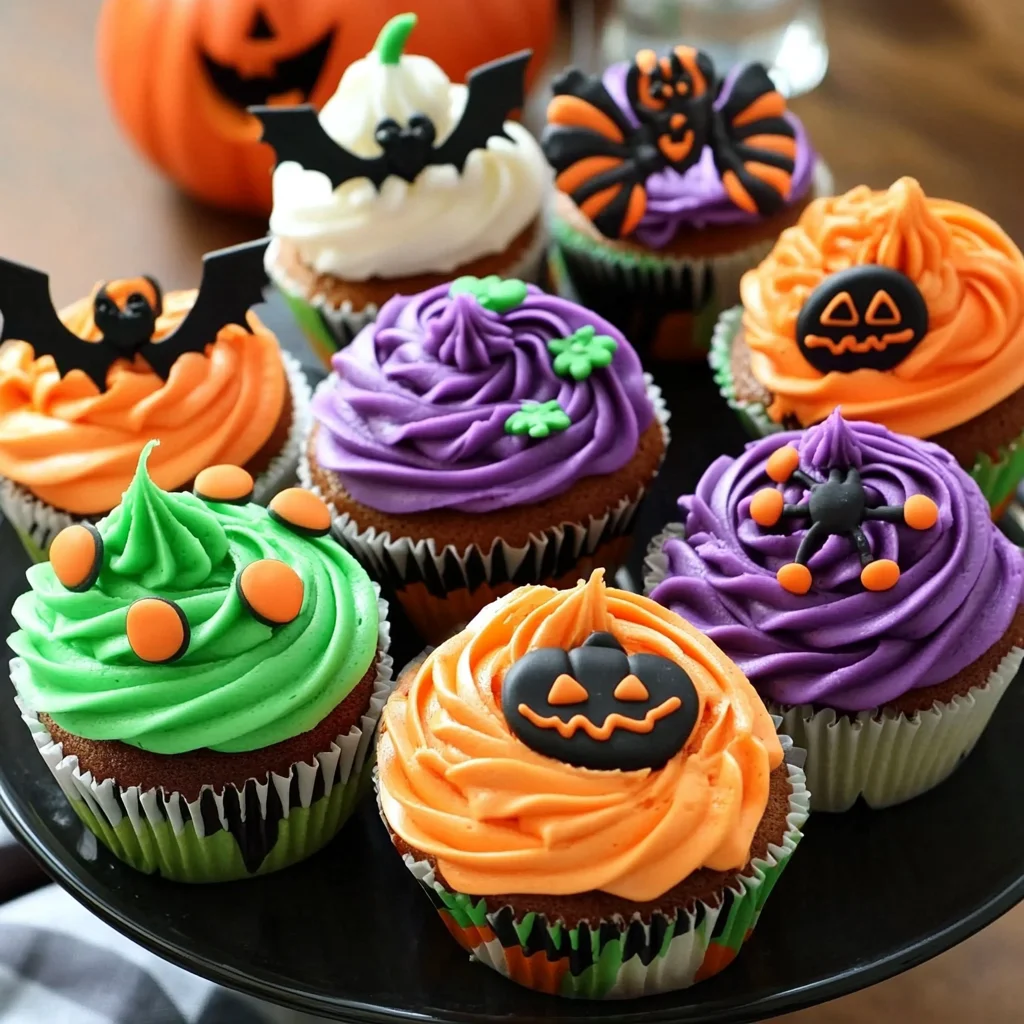
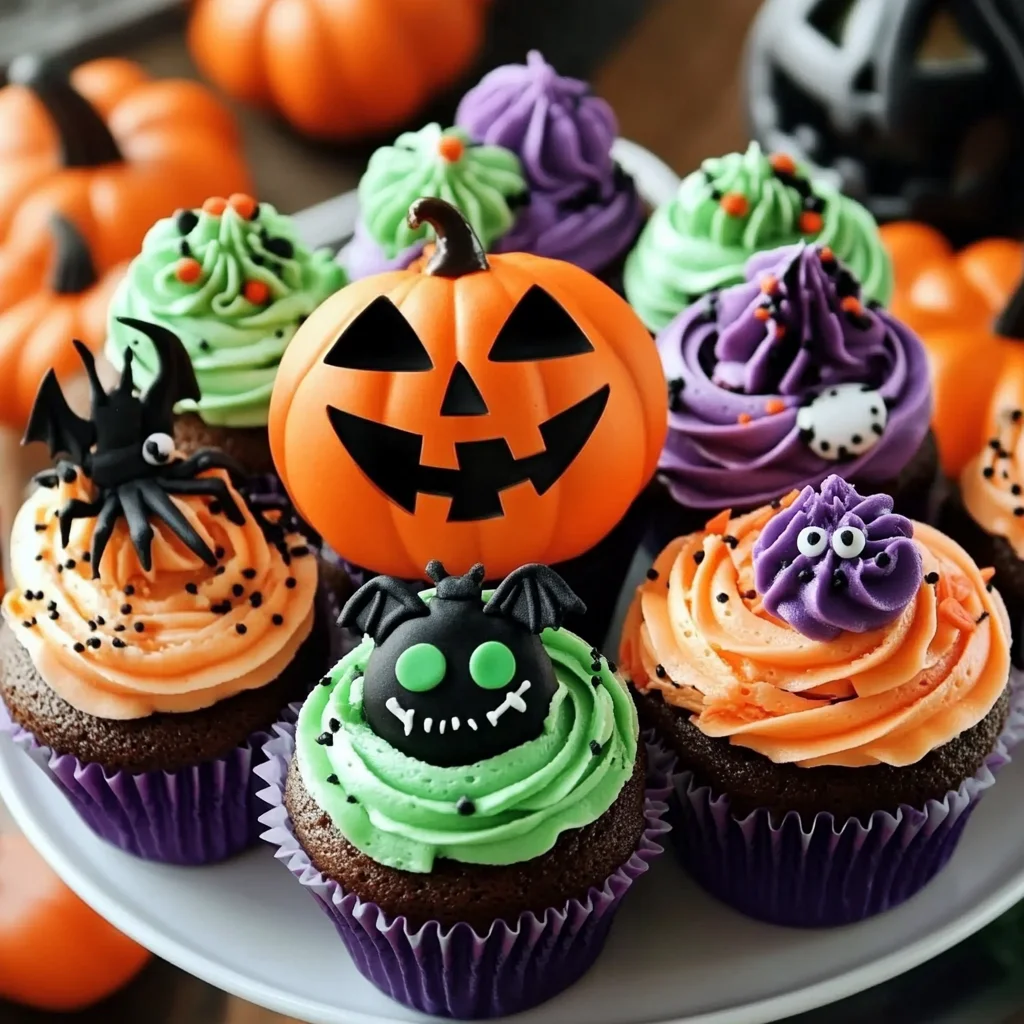
- Green Spiral Design: This one is wonderfully simple! Fit a piping bag with your small open star tip (like a Wilton 21) and fill it with your vibrant green frosting. Start piping a spiral on the cupcake, working from the outside edge inward. Once you’re done, gently press a large candy eyeball right into the center of the green swirl. Voila – a cyclops monster!
- Purple Monster Design: For these fluffy monsters, fill a piping bag with your purple frosting. You can use the same small open star tip or just cut the tip off the bag for a blobby look. Cover the entire cupcake with piped stars or little blobs, applying steady, even pressure. Before the frosting sets, press small candy eyeballs randomly into the purple “fur.” If you want to add extra pizzazz, a sprinkle of black or silver sprinkles would look fantastic here!
- Pumpkin Design: This is where we get artistic! You’ll need three piping bags for this: one with orange frosting (fitted with the large petal tip, e.g., Wilton 125), one with green frosting (small open star tip, e.g., Wilton 21), and one with black frosting (small round tip, e.g., Wilton 4). To create the pumpkin, pipe rounded lines of orange frosting from the top of the cupcake to the bottom, alternating sides and working towards the center. This builds that classic pumpkin shape. Then, use your green frosting to pipe a cute little stem on top, and finally, use the black frosting to pipe on a spooky or silly pumpkin face.
- Spider Web Design: This one is always a hit! First, use a spatula to spread a smooth, even layer of white frosting over the top of your cupcake. Next, fill a piping bag with black frosting and fit it with your small round tip (like a Wilton 4). Pipe criss-cross lines on the white frosting, like a tic-tac-toe board. Then, connect those lines with curved lines to create a convincing spider web pattern. For the spider, carefully place half an Oreo Mini cookie on the web. Pipe two little black dots for eyes onto the Oreo, then attach two mini candy eyeballs on top of the black dots. Finish by piping eight skinny spider legs around the Oreo body. Spooky and sweet!
Substitutions & Additions
One of the best things about baking is making it your own! Here are some ideas to customize your Halloween cupcakes:
- Cupcake Flavors: Don’t feel limited! Chocolate, red velvet, vanilla, or even a spiced apple cupcake would be fantastic under these decorations.
- Frosting Flavors: Add a drop of almond extract, peppermint extract, or even a hint of espresso powder to your buttercream for a different flavor profile. Just make sure it complements the colors!
- Candy Overload: Beyond eyeballs and Oreos, think mini candy corn, gummy worms, chocolate spiders, or even crushed candy bars for extra texture and fun.
- Spooky Sprinkles: Use Halloween-themed sprinkle mixes – bats, ghosts, pumpkins, or just orange and black jimmies.
- Edible Glitter: A dusting of edible glitter can make your monster cupcakes shimmer under the moonlight!
- Melted Chocolate Details: Instead of piping, you could drizzle melted white chocolate (colored with gel food coloring) for web effects or use melted dark chocolate for fine details.
Tips for Success
Want to make sure your Halloween cupcakes are the talk of the neighborhood? Keep these pro tips in mind:
- Room Temperature Butter is Key: I cannot stress this enough! If your butter isn’t perfectly softened (not melted!), your buttercream won’t be as smooth and fluffy. It should yield easily when pressed but not be greasy.
- Don’t Overmix the Buttercream: Once the sugar and liquid are incorporated, beat until light and fluffy, but don’t go overboard. Overmixing can incorporate too much air, making it harder to pipe neatly.
- Gel Food Coloring is Your Friend: Liquid food coloring can thin your frosting, making it difficult to achieve bold colors. Gel food coloring provides intense color without changing the consistency.
- Practice Makes Perfect: If you’re new to piping, don’t worry! Grab a piece of parchment paper or a plate and practice your swirls and lines before tackling the actual cupcakes. You can always scrape the practice frosting back into the bag.
- Prep Ahead: You can bake your cupcakes a day in advance and store them in an airtight container at room temperature. The buttercream can also be made a day ahead and stored in the fridge (see storage tips below). Just bring it to room temperature and re-whip before decorating.
How to Store Halloween Cupcakes
Once your masterpieces are decorated, you’ll want to keep them fresh until it’s time to enjoy them!
For a few hours before serving, your beautifully decorated cupcakes can stay out at room temperature. If you need to store them longer, or if your kitchen is particularly warm, it’s best to keep them covered in an airtight container and refrigerate them. They will stay fresh and delicious for up to 5 days this way. Just let them come to room temperature for about 15-30 minutes before serving for the best flavor and texture.
FAQs
Q: Can I use a store-bought cupcake mix for these?
A: Absolutely! Using a store-bought mix is a fantastic shortcut that saves time and makes this recipe even easier. The focus here is on the fun decoration!
Q: Can I make the buttercream ahead of time?
A: Yes, you can! Prepare the buttercream as instructed, then store it in an airtight container in the refrigerator for up to a week. When you’re ready to use it, let it come to room temperature for an hour or two, then re-whip it with your mixer until it’s light and fluffy again.
Q: What if I don’t have piping bags or tips?
A: No problem! You can still make beautiful cupcakes. For spreading frosting, a regular butter knife or small spatula works great. For piping, simply snip a corner off a sturdy Ziploc bag. You won’t get the intricate tip designs, but you can still pipe lines, dots, and even fill the cupcake tops beautifully!
Q: How do I get truly vibrant colors with my frosting?
A: The secret is using gel food coloring, not the liquid drops! Gel colors are concentrated and won’t thin your frosting, allowing you to achieve rich, intense shades without compromising the buttercream’s consistency.
For more delicious recipes and baking inspiration, follow us on Pinterest!

Wickedly Easy Halloween Cupcakes
Ingredients
Equipment
Method
- Step 1: Prepare Buttercream: In your stand mixer with a paddle attachment (or using a handheld mixer), beat the softened unsalted butter on medium speed for about 2 minutes until super creamy and light. This step is crucial for airy frosting!
- Step 2: Add Remaining Ingredients: Gradually add in 5 ½ cups of confectioners' sugar, the heavy cream (or half-and-half/milk), and the vanilla extract. Start beating on low speed for about 30 seconds to avoid a sugar cloud. Then, bump it up to medium-high speed and beat for a full 2 minutes until it transforms into beautiful, fluffy frosting.
- Step 3: Refine Buttercream: If your frosting is too sweet, add a tiny pinch of salt (around ⅛ teaspoon). If you notice any stubborn air bubbles, gently fold the buttercream with a spatula for a minute or two to achieve a perfectly smooth, silky consistency.
- Step 4: Adjust Consistency: If your frosting seems too thin, add up to ½ cup more confectioners' sugar, a little at a time, until it thickens. If it's too thick, add more heavy cream, 1 tablespoon at a time, until you hit the sweet spot of pipeable perfection.
- Step 5: Color Frosting: Divide your buttercream into separate bowls. Use gel food colorings to create Leaf Green, Orange, Super Black, and a vibrant purple (by combining Fuchsia and Violet gel). Mix each color until desired shades are achieved. Leave one portion white for some designs.
- Step 6: Green Spiral Design: Fit a piping bag with a small open star tip (like a Wilton 21) and fill it with green frosting. Pipe a spiral on the cupcake, working from the outside edge inward. Gently press a large candy eyeball right into the center of the green swirl to create a cyclops monster.
- Step 7: Purple Monster Design: Fill a piping bag with purple frosting (using a small open star tip or just cutting the tip off the bag). Cover the entire cupcake with piped stars or little blobs, applying steady, even pressure. Before the frosting sets, press small candy eyeballs randomly into the purple 'fur.' Optionally, add black or silver sprinkles.
- Step 8: Pumpkin Design: You'll need three piping bags: one with orange frosting (fitted with a large petal tip, e.g., Wilton 125), one with green frosting (small open star tip, e.g., Wilton 21), and one with black frosting (small round tip, e.g., Wilton 4). Pipe rounded lines of orange frosting from top to bottom, alternating sides, to build the pumpkin shape. Use green frosting for a small stem on top, and black frosting to pipe a spooky or silly pumpkin face.
- Step 9: Spider Web Design: First, use a spatula to spread a smooth, even layer of white frosting over the cupcake. Fill a piping bag with black frosting and fit it with a small round tip (like a Wilton 4). Pipe criss-cross lines like a tic-tac-toe board, then connect them with curved lines to create a spider web pattern. Place half an Oreo Mini cookie on the web for the spider body. Pipe two little black dots for eyes onto the Oreo, then attach two mini candy eyeballs on top of the black dots. Finish by piping eight skinny spider legs around the Oreo body.