Hey there, fellow kitchen adventurers! Do you remember those childhood moments that just felt like pure magic? Maybe it was a simple trick your grandma showed you, or a clever craft that seemed to come alive right before your eyes. Well, get ready to revisit that sense of wonder, because today we’re diving into a super simple, absolutely mesmerizing “recipe” for fun that you can whip up right in your kitchen. No baking, no cooking, just pure, vibrant science that will dazzle kids and adults alike! This isn’t just an experiment; it’s a little burst of joy, a quiet moment of observation, and a fantastic way to light up any afternoon.
Why You’ll Love This Vibrant Colorful Oil and Water Experiment
- Fast: Seriously, from gathering your supplies to watching the magic unfold, this takes mere minutes!
- Easy: If you can pour and stir, you can do this. No complex steps, no tricky techniques.
- Mesmerizing: The way the colors burst and swirl is genuinely captivating. You’ll find yourself watching it over and over!
- Educational: It’s a fantastic, hands-on way to introduce basic science concepts like density and immiscibility (don’t worry, we won’t use that word in the instructions!).
- Fun for All Ages: Toddlers will be entranced, older kids will be curious, and you’ll find it pretty soothing too!
- Uses Common Household Items: Everything you need is probably in your pantry already.
Ingredients (aka Your Magic Supplies!)

Gather ’round, because these are your secret ingredients for a truly spectacular show! You probably have most of these hiding in your kitchen right now.
- 1 Empty Jar: A clear glass jar is best for seeing all the action – think a clean pickle jar, an old spaghetti sauce jar, or even a tall drinking glass. The clearer, the better for that vibrant display!
- 3 Tablespoons Cooking Oil: Any kind will do! Vegetable oil, canola oil, sunflower oil, or even baby oil if you have it. This is our “magic separator.”
- Liquid Food Coloring: This is where the rainbow comes in! Grab your favorite colors. The bolder, the better for that dazzling effect.
- Water: Just good old tap water. Simple, yet essential!
- 1 Small Bowl: This is for our colorful oil concoction before it joins the main event.
- Paper Towels: A trusty sidekick for any little drips or spills. Because science (the fun kind) can sometimes get a little messy!
- 1 Spoon: For gentle stirring and careful pouring.
How to Make This Vibrant Colorful Oil and Water Experiment
Alright, let’s get this kitchen science party started! Just follow these easy steps, and prepare to be amazed.
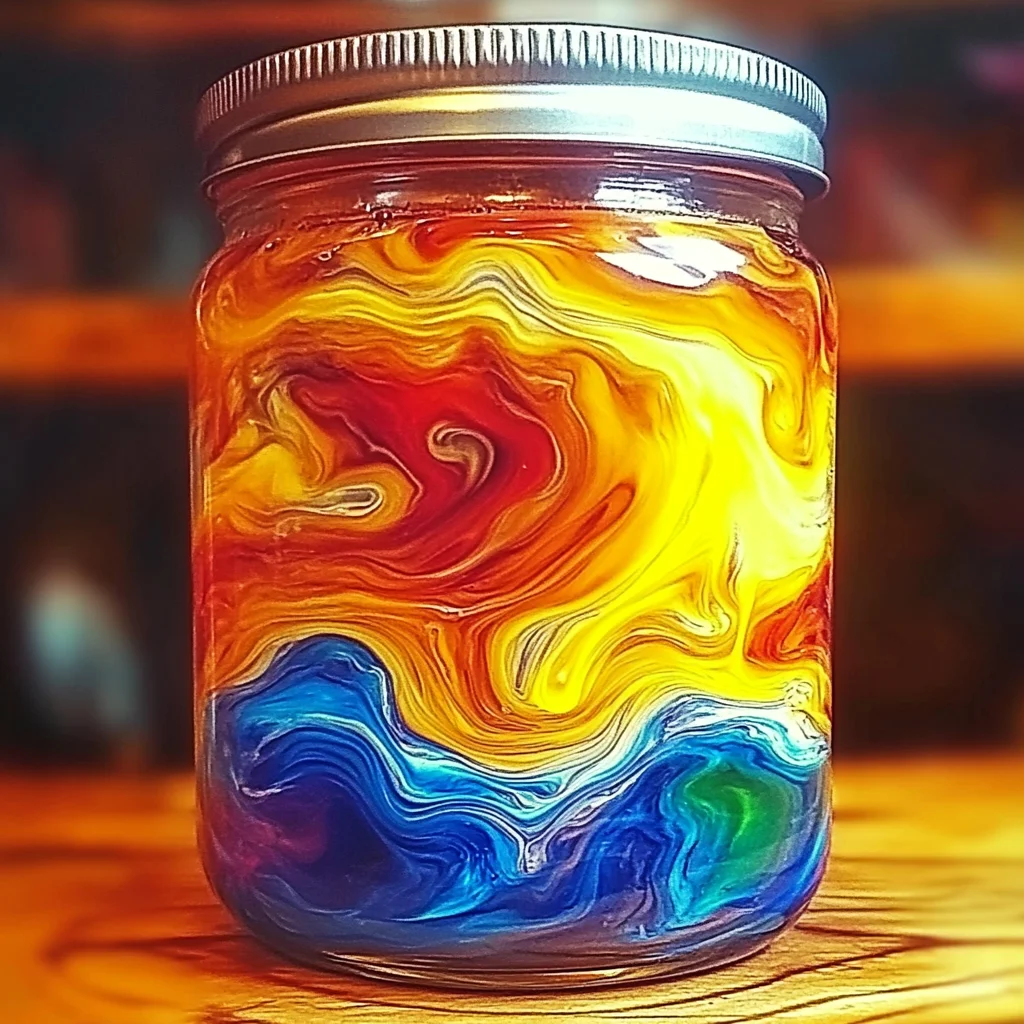
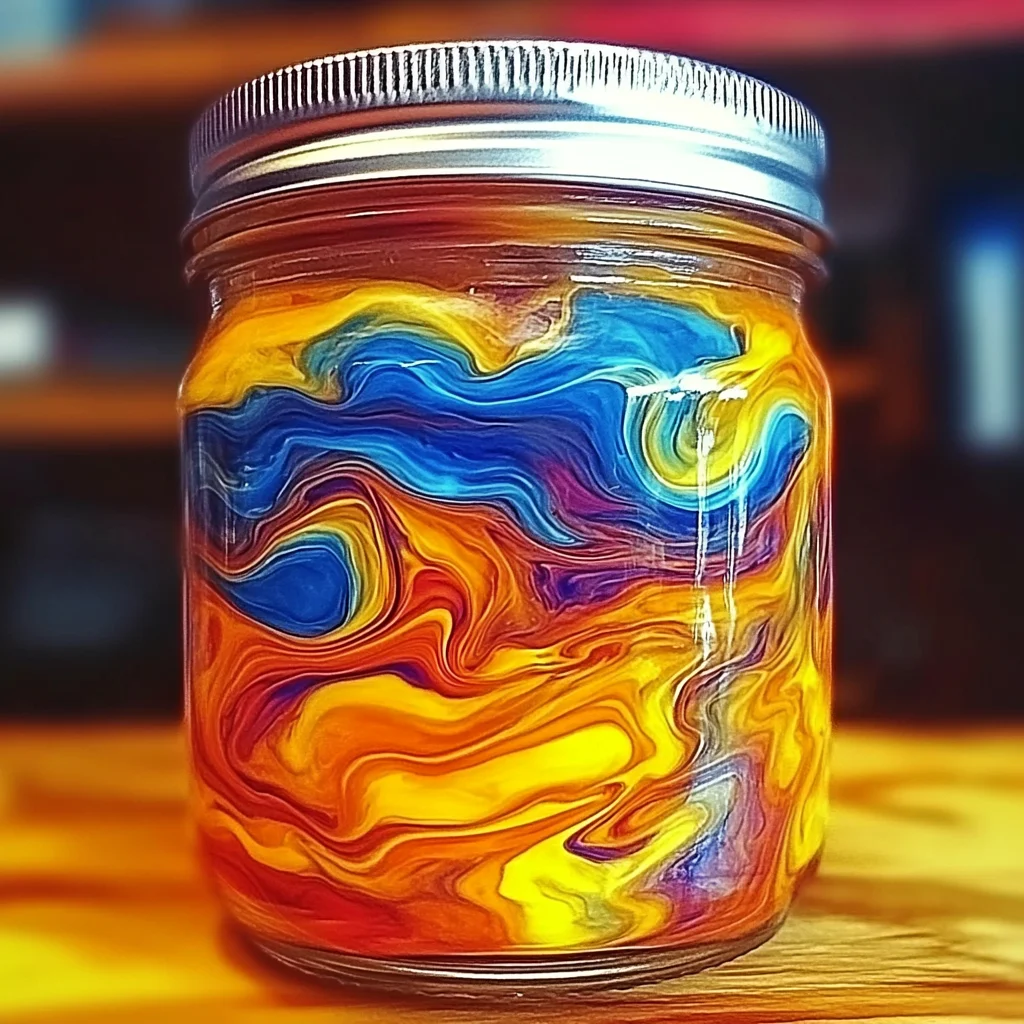
- Set the Stage with Water: First things first, grab your empty jar and fill it up about three-quarters of the way with water. You want to leave a little room at the top for all the colorful action to unfold. Think of it as preparing the canvas for your liquid masterpiece!
- Prep Your Oil: Now, in your separate small bowl, pour in about three tablespoons of cooking oil. Don’t worry too much about exact measurements here; a little more or less is totally fine for this kind of fun.
- Add the Burst of Color: Here’s where the real excitement begins! Add three to five drops of your desired liquid food coloring directly into the oil. If you want a rainbow explosion, feel free to add a few drops of different colors. Watch closely as the drops sit on top of the oil – isn’t that cool already? They’re already showing off their “no-mixing” properties!
- Gentle Stirring Magic: Take your spoon and gently, I mean gently, stir the oil and food coloring together. You’re not trying to mix them completely, but rather create these incredible little swirls and tiny colored droplets within the oil. It’s like creating miniature lava lamps in your bowl, and it’s a crucial step for those amazing bursts later on!
- The Grand Finale – Pour and Observe! Now for the moment you’ve been waiting for! Very carefully, pour your colorful oil mixture into the jar of water. Take your time and watch closely. The oil will float right on top of the water, but those little, vibrant colored droplets you stirred into the oil will slowly start to sink through the oil layer. As they pass through the oil and finally hit the water, they’ll burst into incredible, vibrant trails, creating a dazzling, ever-changing display of color. It’s absolutely mesmerizing and happens right before your eyes! For another creative activity that brings a little sparkle into your home, consider trying out some easy DIY suncatchers for more visual delights.
Substitutions & Additions
Want to mix things up or take your experiment to the next level? Here are a few ideas:
- Oil Varieties: Try different types of clear oils! Baby oil, for instance, is often a bit thicker and might create a slightly different, slower-moving effect.
- Sparkle Factor: A tiny pinch of fine glitter mixed with the oil before adding the food coloring can add an extra magical shimmer to your colorful bursts.
- Different Containers: Instead of one large jar, try several clear drinking glasses or smaller jars with different color combinations in each. It makes for a beautiful, colorful display!
- Lava Lamp Effect: For an even more dynamic show, after pouring the colorful oil into the water, drop in half of an Alka-Seltzer tablet. Watch as the bubbles carry the colored oil droplets up and down, creating a fantastic, temporary lava lamp!
- Natural Colors: If you’re out of food coloring, you could try natural color extracts like beet juice for red, turmeric for yellow (though it might stain!), or even a drop of watered-down tempera paint for a more opaque effect (just be mindful of cleanup).
Tips for Success
To ensure your oil and water experiment is as vibrant and captivating as possible, keep these friendly tips in mind:
- Gentle Stirring is Key: Remember, you’re not trying to fully combine the food coloring with the oil in step 4. The goal is to break the food coloring into tiny droplets within the oil. Over-mixing can make the drops too small to create dramatic bursts.
- Patience is a Virtue: The beauty of this experiment is watching the slow, deliberate descent and burst of the colors. Don’t rush it! Encourage everyone to observe quietly.
- Optimal Lighting: Place your jar near a window or under good light to really make those colors pop and sparkle as they expand.
- Experiment with Color Combinations: Don’t be afraid to try mixing primary colors (red, yellow, blue) in your oil bowl to see if new colors emerge when they hit the water.
- Have Paper Towels Handy: Just in case of any splashes or drips during the pouring stage. It’s all part of the fun!
How to Store This Vibrant Colorful Oil and Water Experiment
This beautiful display is a bit of a temporary art installation! While you can enjoy watching it for quite some time, eventually the food coloring will fully dissipate into the water, and the oil will remain floating on top. Since it’s made with common household liquids, disposal is easy. You can simply pour the contents down the drain with plenty of water. There’s no need to try and “store” it, as the magic is in the fresh, active observation. Just enjoy it for its ephemeral beauty!
FAQs
Got a few burning questions about this cool science trick? I’ve got answers!
Why don’t oil and water mix?
Great question! It all comes down to something called “polarity.” Water molecules are “polar,” meaning they have a slight positive and a slight negative end, like tiny magnets. Oil molecules, however, are “non-polar.” Polar and non-polar substances don’t attract each other, which is why they stay separate. Think of it like trying to mix oil and vinegar in salad dressing – they always separate unless you really shake them!
Why does the food coloring sink through the oil but then mix with the water?
This is the coolest part! Liquid food coloring is actually water-based. Since water and oil don’t mix, the food coloring droplets can’t dissolve into the oil. Instead, they just pass right through the oil layer, waiting until they reach the water. Once they hit the water (which they can mix with!), they dissolve and create those beautiful bursts of color. It’s like the food coloring is on a mission to find its water buddies!
Can I add more oil or water to keep the experiment going?
You can certainly experiment! If you add more water, the colors might disperse further. If you add more oil, it will simply sit on top. For the best initial “burst” effect, I find starting fresh with a new batch of colorful oil gives the most dramatic results. It’s so easy to set up again, why not create a new one?
Is this experiment safe for really young children?
Absolutely, with adult supervision! All the ingredients are non-toxic, but you always want to make sure little ones aren’t trying to taste the “magic potion.” It’s a wonderful sensory and visual activity for toddlers and preschoolers, and a great conversation starter for older kids. Looking for more simple science fun? You should definitely try our baking soda and vinegar balloon experiment next!
For more delicious recipes and fun kitchen adventures, make sure to follow us on Pinterest!
Unleash the Rainbow: Dazzling Oil and Water Experiment
Ingredients
Equipment
Method
- Step 1: Set the Stage with Water: Grab your empty jar and fill it up about three-quarters of the way with water, leaving a little room at the top.
- Step 2: Prep Your Oil: In your separate small bowl, pour in about three tablespoons of cooking oil. Exact measurements are not crucial for this fun experiment.
- Step 3: Add the Burst of Color: Add three to five drops of your desired liquid food coloring directly into the oil. For a rainbow effect, use different colors. Observe how the drops sit on top of the oil.
- Step 4: Gentle Stirring Magic: Gently stir the oil and food coloring together with your spoon. The goal is to create tiny colored droplets and swirls within the oil, not to mix them completely.
- Step 5: The Grand Finale – Pour and Observe! Carefully pour your colorful oil mixture into the jar of water. Watch closely as the oil floats on top and the vibrant colored droplets slowly sink through the oil layer. As they hit the water, they will burst into incredible, dazzling trails of color.