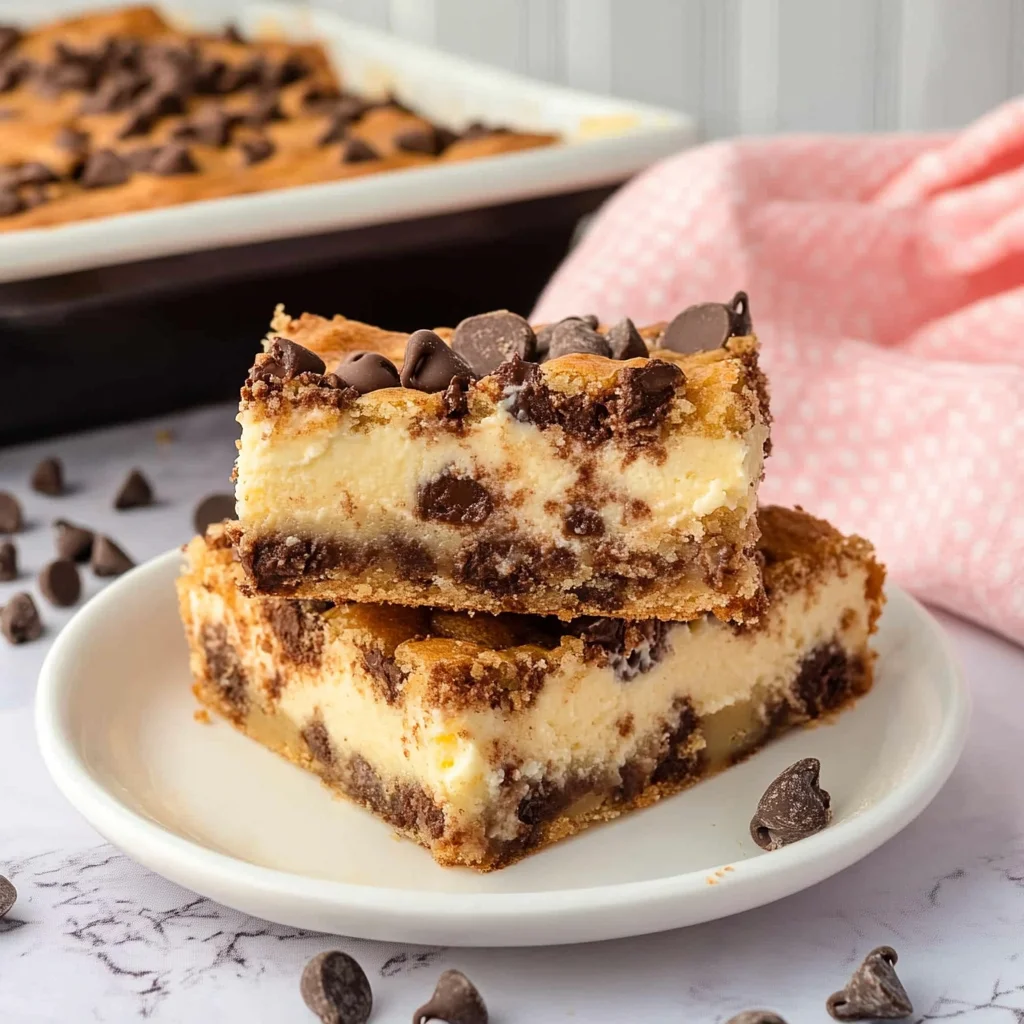
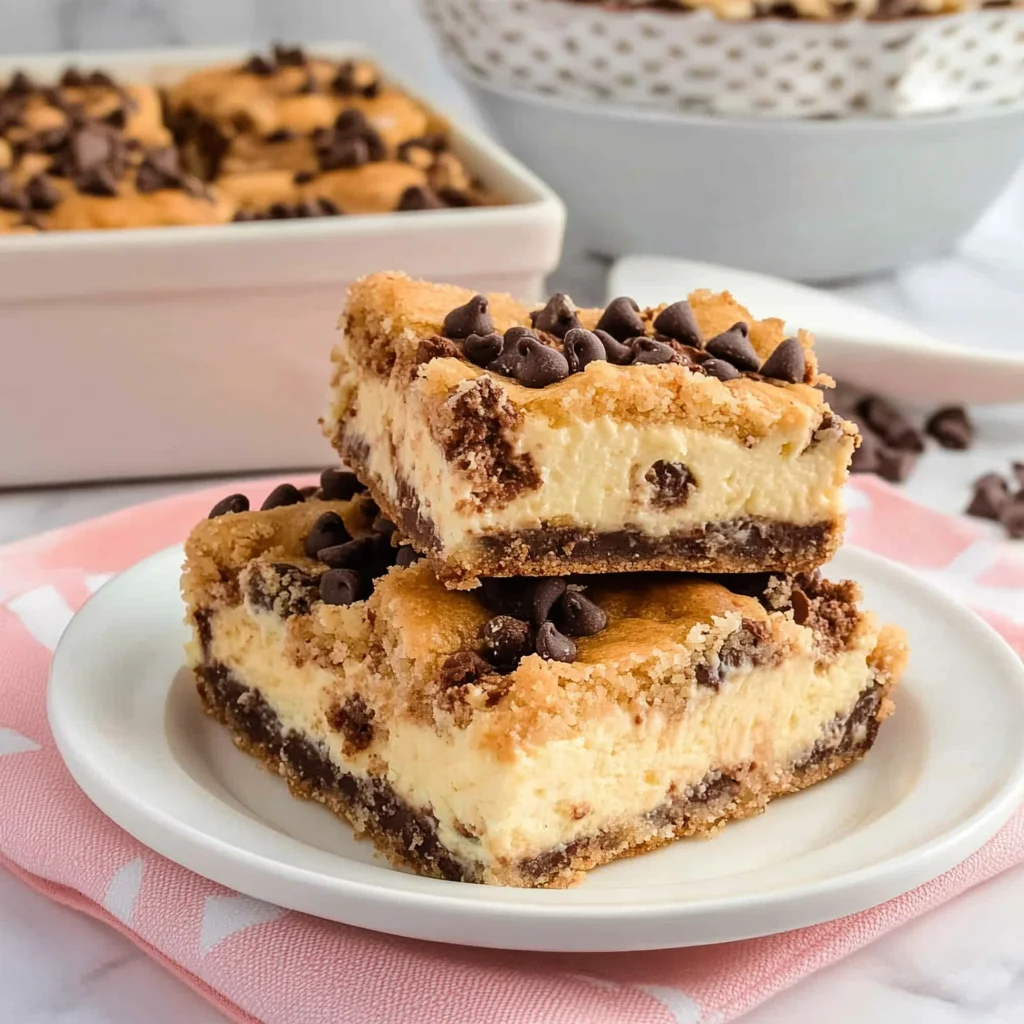
Oh my goodness, have I got a treat for you! You know those times when you just can’t decide between a warm, gooey chocolate chip cookie and a creamy, dreamy slice of cheesecake? Well, guess what? You don’t have to choose anymore! These Chocolate Chip Cheesecake Bars bring the absolute best of both worlds together in one seriously easy, totally irresistible package. They’re the kind of bake sale star, potluck hero, or simple Tuesday night pick-me-up that you’ll find yourself making again and again. Forget complicated layers and finicky steps – we’re keeping it simple, cozy, and utterly delicious. Ready to make some magic happen in your kitchen?
Why You’ll Love This Recipe
Let’s be real, we all need recipes that deliver big flavor without a big fuss. These bars totally fit the bill!
- Fast: You can have these mixed up and in the oven before you know it. Minimal prep, maximum reward!
- Easy: If you can make chocolate chip cookies, you can make these. It’s just combining a few simple mixtures and layering them up.
- Giftable: Need a sweet treat to share? These bars slice beautifully and pack up perfectly for gifting or taking to a party. Everyone will thank you!
- Crowd-pleasing: Seriously, who doesn’t love the combo of chocolate chip cookies and cheesecake? These disappear fast, guaranteed.
Ingredients
Gather ’round, friends! Here’s what you’ll need for this glorious mashup. Most of these are probably already hanging out in your pantry and fridge!
- For the Crust & Topping:
- 2 cups All-Purpose Flour: Our trusty foundation!
- ½ tsp Baking Soda: Helps our cookie part puff up just right.
- ½ tsp Salt: Essential for balancing all that sweetness.
- ⅔ cup (about 10 tablespoons) Softened Butter: Make sure it’s softened to room temp! This is key for creaming properly.
- ½ cup Granulated Sugar: For classic cookie sweetness.
- ⅔ cup Packed Brown Sugar: Adds that lovely chewiness and depth of flavor to the cookie part.
- 1 Large Egg: Binds it all together.
- 2 tsp Vanilla Extract: A warm, essential flavor for both the cookie and the filling.
- 2 cups Chocolate Chips: Because it wouldn’t be chocolate chip anything without ’em! Use your favorite kind – milk, semi-sweet, or even dark!
- For the Filling:
- 8 oz Softened Cream Cheese: Just one block! Again, softened is super important for a smooth filling.
- ½ cup Granulated Sugar: Sweetens up that tangy cream cheese.
- 1 Large Egg: Helps the cheesecake set beautifully.
- 1 tsp Vanilla Extract: More vanilla goodness!
How to Make It
Okay, deep breaths! You’ve got this. Just follow these simple steps, and you’ll be enjoying cheesecake cookie heaven in no time.
- First things first, let’s get that oven ready! Preheat it to 350°F (175°C).
- Next, grab a 9×9-inch square baking pan. Line it with parchment paper or aluminum foil, leaving some overhang on the sides – this makes lifting the cooled bars out so much easier! Give that liner a quick spray with nonstick spray. Trust me, you’ll thank yourself later!
- Let’s start on the cookie crust and topping! In a medium bowl, whisk together your flour, baking soda, and salt. Just a quick mix to get everything distributed.
- Now, in a large bowl (your mixing bowl!), cream together the softened butter, brown sugar, and granulated sugar. Beat it with an electric mixer (or good old elbow grease!) until it’s light and fluffy. This incorporates air, making your cookie layer tender.
- Add the egg and vanilla extract to your creamed butter mixture. Beat again until everything is well combined.
- Gradually add your dry flour mixture to the wet ingredients. Mix on low speed or stir by hand just until the flour is almost completely incorporated. Don’t overmix!
- Time for the best part – the chocolate chips! Fold those lovely chips into the dough. You can use a spatula or a wooden spoon for this.
- Now, take about two-thirds of your delicious cookie dough mixture. Press it firmly and evenly into the bottom of your prepared 9×9 pan. Get it into the corners!
- While your crust is waiting, let’s whip up the filling! In a separate bowl, combine the softened cream cheese, ½ cup sugar, the second egg, and 1 tsp vanilla extract.
- Beat the filling ingredients together until it’s wonderfully smooth and completely blended. Make sure there are no lumps of cream cheese!
- Carefully pour or spread the smooth cheesecake filling evenly over the cookie dough layer in the pan. Use a spatula to gently level it out.
- Remember that remaining one-third of cookie dough? Now’s its time to shine! Crumble this dough evenly over the top of the cheesecake filling. It doesn’t have to be perfect; little clumps and crumbles are great!
- Pop the pan into your preheated oven. Bake for about 40 minutes, or until the cheesecake layer looks set (it might be slightly jiggly in the very center, but not liquidy) and the cookie dough topping is golden brown and looks cooked through.
- Okay, this is the hardest part: waiting! Let the bars cool completely in the pan on a wire rack. Seriously, completely cool! Then, for the best results (and easy slicing!), cover the pan and chill it in the refrigerator for at least 2-3 hours, or ideally longer. I often make them the day before I want to serve them!
- Once chilled, use the parchment or foil overhang to lift the whole block of bars out of the pan. Place them on a cutting board and slice into squares. Wipe your knife between cuts for super clean edges if you like!
- Serve ’em up and watch them disappear!
Substitutions & Additions
One of the fun things about baking is making it your own! Here are a few ideas to switch things up:
- Different Chips: Instead of regular chocolate chips, try milk chocolate, dark chocolate, white chocolate, peanut butter chips, or even butterscotch chips! A mix is fun too.
- Add Nuts: Fold in a ½ cup of chopped pecans or walnuts with the chocolate chips in the cookie dough for some crunch.
- Extracts: Swap out a little of the vanilla for almond extract in either layer for a different flavor profile.
- Swirl it Up: Want to get fancy? Reserve a tiny bit of the cookie dough (like a tablespoon or two) and swirl it into the top of the cheesecake filling before crumbling the rest of the dough on top.
- Salted Caramel Drizzle: A little drizzle of store-bought or homemade salted caramel sauce over the top before serving is divine!
Tips for Success
Want your Chocolate Chip Cheesecake Bars to turn out perfect every single time? Keep these little pointers in mind:
- Room Temperature is Key: Make sure your butter and especially your cream cheese are truly softened to room temperature. This prevents lumps in the batter and filling and helps everything cream together smoothly. Take them out of the fridge an hour or two ahead of time.
- Don’t Overmix the Cookie Dough: Once you add the flour, mix only until just combined. Overmixing develops too much gluten and can make your cookie layer tough.
- Press the Crust Firmly: Make sure that bottom layer of cookie dough is pressed down evenly and firmly into the pan. This gives you a good, solid base.
- Chill, Chill, Chill!: I cannot stress this enough. While it’s tempting to slice right away, chilling is essential for the cheesecake layer to fully set and for the bars to hold their shape when cut. Be patient – it’s worth it!
- Cutting Tip: For super clean cuts, use a sharp knife and wipe it clean with a hot, damp cloth between each slice.
How to Store It
Assuming you have any leftovers (a big assumption, I know!), here’s how to keep them fresh and delicious:
Keep the Chocolate Chip Cheesecake Bars stored in an airtight container in the refrigerator. Because of the cream cheese filling, they need to be kept cold. They should stay fresh in the fridge for 4-5 days.
You can also freeze these! Once cooled and sliced, place the bars in a single layer on a baking sheet and freeze until firm. Then, transfer them to a freezer-safe container or bag, separating layers with parchment paper. Thaw overnight in the refrigerator before serving. They should keep well in the freezer for up to 2 months.
FAQs
Got questions? I’ve got answers!
Q: Can I make these in a different size pan?
A: This recipe is written for a 9×9-inch square pan. A different size would change the thickness of the layers and the baking time. A 9×13 pan would make thinner bars, and you’d need to increase the ingredient amounts by about 1.5 times and adjust the baking time (likely shorter). It’s best to stick to the 9×9 for the intended result!
Q: Do I really have to chill them for so long?
A: Yes, you really, really should! Chilling allows the cheesecake filling to firm up properly and makes the bars much easier to slice neatly. Trying to cut them warm will result in a gooey mess. Patience, my friend!
Q: Can I use cold cream cheese if I’m in a hurry?
A: I strongly advise against it! Cold cream cheese won’t beat smoothly and you’ll end up with frustrating lumps in your filling. Take the time to let it soften – it makes a huge difference in texture.
Q: How can I tell when they are done baking?
A: The cookie topping should be golden brown, and the cheesecake layer beneath should look set. If you gently jiggle the pan, the very center might have a slight wobble, but the edges should be firm. They will continue to set as they cool.
Seriously, these Chocolate Chip Cheesecake Bars are a dream come true. They’re simple enough for a beginner but impressive enough for any occasion. Give them a try, and let me know what you think! Happy baking!

Seriously Easy & Absolutely Delicious Chocolate Chip Cheesecake Bars
Ingredients
Equipment
Method
- Step 1: Preheat oven to 350°F (175°C). Line a 9x9-inch square baking pan with parchment paper or aluminum foil, leaving overhang, and spray with nonstick spray.
- Step 2: In a medium bowl, whisk together flour, baking soda, and salt.
- Step 3: In a large bowl, cream together softened butter, brown sugar, and granulated sugar until light and fluffy.
- Step 4: Add the egg and 2 tsp vanilla extract to the creamed butter mixture and beat until well combined.
- Step 5: Gradually add the dry flour mixture to the wet ingredients. Mix on low speed or stir by hand just until flour is almost completely incorporated. Don't overmix.
- Step 6: Fold the chocolate chips into the dough.
- Step 7: Take about two-thirds of the cookie dough mixture and press it firmly and evenly into the bottom of the prepared pan.
- Step 8: In a separate bowl, combine softened cream cheese, ½ cup sugar, the second egg, and 1 tsp vanilla extract. Beat until smooth and completely blended.
- Step 9: Carefully pour or spread the cheesecake filling evenly over the cookie dough layer in the pan.
- Step 10: Crumble the remaining one-third of cookie dough evenly over the top of the cheesecake filling.
- Step 11: Bake for about 40 minutes, or until the cheesecake layer looks set (slightly jiggly in the center) and the cookie topping is golden brown.
- Step 12: Let the bars cool completely in the pan on a wire rack. Cover the pan and chill in the refrigerator for at least 2-3 hours, or ideally longer, before slicing.
- Step 13: Once chilled, use the overhang to lift the bars out. Slice into squares using a sharp knife (wipe knife clean between cuts for neat edges).
- Step 14: Serve and enjoy!