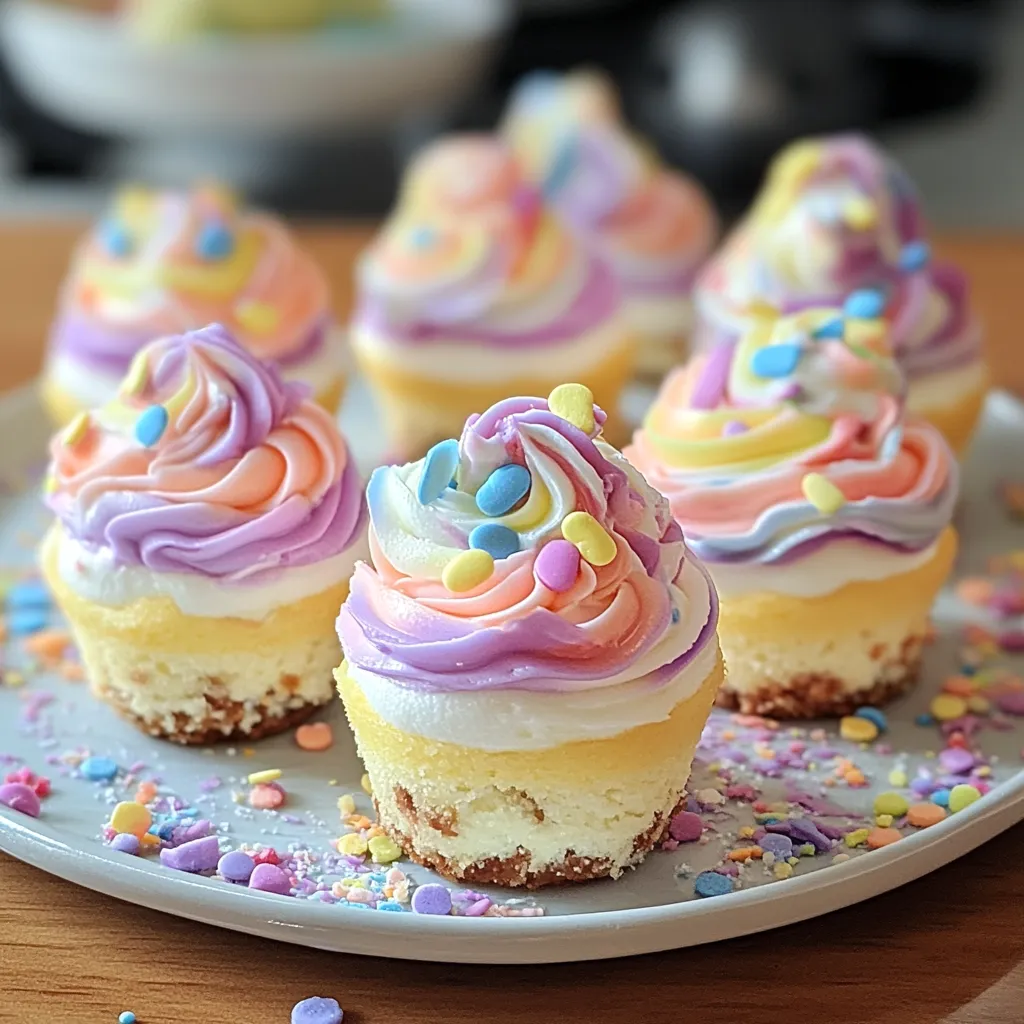
There’s something about Easter desserts that instantly brings me back to childhood—the pastel colors, the excitement of decorating treats, and that sweet moment when everything comes together on the table. These Easter No-Bake Mini Swirl Cheesecakes capture all of that magic in one simple, no-fuss recipe. You don’t need to turn on the oven, you don’t need complicated techniques, and yet you end up with something that looks like it came straight out of a bakery window.
If you’re anything like me, you love desserts that feel special but don’t require hours in the kitchen. That’s exactly what makes these mini cheesecakes so memorable. They’re creamy, light, beautifully swirled with soft spring colors, and topped with those irresistible speckled chocolate eggs. Whether you’re making them for a family gathering, gifting them to friends, or just treating yourself, this recipe is easy, quick, and guaranteed to bring smiles.
Why You’ll Love Easter No-Bake Mini Swirl Cheesecakes
- Fast – No baking required, just mix, chill, and enjoy
- Easy – Simple ingredients and beginner-friendly steps
- Giftable – Perfect for Easter baskets or spring celebrations
- Crowd-pleasing – Beautiful, creamy, and loved by kids and adults
One of my favorite things about this recipe is how approachable it is. You don’t need to worry about cracks, water baths, or baking times like with traditional cheesecakes. Everything comes together in a few bowls, and the fridge does the rest of the work. Plus, the swirl effect means every single cheesecake looks unique—no two are ever the same, which makes them feel extra special.
Ingredients
Let’s walk through what you’ll need, because every ingredient plays an important role in creating that perfect creamy texture and buttery base.
- 1 1/2 cups graham cracker crumbs – This forms the base of your cheesecake. It adds that classic crunch and slightly sweet flavor that pairs perfectly with the creamy filling.
- 1/4 cup granulated sugar – Just enough sweetness to enhance the crust without overpowering it.
- 6 tablespoons unsalted butter, melted – This binds the crust together and gives it that rich, buttery flavor.
- 16 oz cream cheese, softened – The heart of the cheesecake. Make sure it’s softened so you get a smooth, lump-free filling.
- 1/2 cup granulated sugar – Adds sweetness and balances the tanginess of the cream cheese.
- 1 teaspoon vanilla extract – A subtle flavor boost that makes everything taste more indulgent.
- 1 cup heavy whipping cream – This is what gives the cheesecake its light, fluffy texture without baking.
- 1 tablespoon lemon juice – Brightens the flavor and adds a slight tang that keeps the dessert from feeling too heavy.
- 1/4 cup sour cream – Adds creaminess and depth, making the filling extra smooth.
- Pink, purple, and yellow gel food coloring – These create that beautiful Easter swirl effect. Gel coloring works best because it’s vibrant without thinning the mixture.
- Mini speckled chocolate eggs – The perfect festive topping that adds both texture and charm.
- Sprinkles – Because no Easter dessert is complete without a little extra fun.
I always recommend using high-quality cream cheese and real vanilla extract here. Since this is a no-bake recipe, the flavor of each ingredient really shines through, and small upgrades can make a big difference.
How to Make Easter No-Bake Mini Swirl Cheesecakes
This is where the magic happens. Don’t worry—I’ll walk you through each step like we’re baking together in the kitchen.
Step 1: Prepare the Crust
Start by lining your muffin tin with cupcake liners. This makes it easy to remove the cheesecakes later and gives them a neat, professional look. In a bowl, combine the graham cracker crumbs, sugar, and melted butter. Mix until everything looks like wet sand. Then press about a tablespoon of the mixture firmly into each liner. I like to use the bottom of a glass or spoon to really pack it down. Place the tray in the fridge to chill while you prepare the filling.
Step 2: Make the Cheesecake Filling
In a large bowl, beat the softened cream cheese and sugar until smooth and creamy. Take your time here—this step is key for avoiding lumps. Add the vanilla extract, lemon juice, and sour cream, then mix again until everything is fully combined. The mixture should look silky and thick.
Step 3: Whip and Fold
In a separate bowl, whip the heavy cream until stiff peaks form. This is what gives your cheesecake that airy, mousse-like texture. Gently fold the whipped cream into the cream cheese mixture using a spatula. Be patient and fold slowly so you don’t deflate the mixture. You’ll end up with a light, fluffy filling that’s absolutely irresistible.
Step 4: Add Color
Divide the filling evenly into three bowls. Add a small amount of gel food coloring to each—pink, purple, and yellow. Mix gently until you get soft pastel shades. I like to keep the colors light and spring-like, but you can make them as bold or subtle as you prefer.
Step 5: Create the Swirl
Spoon small amounts of each colored mixture into the crusts, alternating colors as you go. Once filled, use a toothpick or skewer to gently swirl the colors together. Don’t overmix—you want to see distinct swirls rather than a blended color.
Step 6: Chill
Place the cheesecakes in the refrigerator for at least 4 hours, or until they’re fully set. This is the hardest part because you’ll want to dig in right away, but trust me—the wait is worth it.
Step 7: Decorate and Serve
Right before serving, top each cheesecake with mini speckled eggs and a sprinkle of colorful decorations. This final touch really brings the Easter theme to life and makes them look absolutely adorable.
Substitutions & Additions

One of the things I love most about this recipe is how flexible it is. You can easily adjust it to fit your taste or what you have on hand.
- Crust alternatives: Try crushed digestive biscuits, vanilla wafers, or even chocolate cookies for a different flavor base.
- Flavor twist: Add a little almond extract or citrus zest to the filling for extra depth.
- Fruit addition: Swirl in a bit of strawberry or raspberry puree along with the colors for a fruity touch.
- Dairy swaps: Use mascarpone instead of cream cheese for a slightly richer texture.
I’ve even tried adding a thin layer of lemon curd on top before decorating, and it adds a bright, tangy contrast that works beautifully with the creamy filling.
Tips for Success
Even though this recipe is simple, a few tips can make all the difference between good and absolutely perfect mini cheesecakes.
- Use softened cream cheese: Cold cream cheese can lead to lumps, so let it sit at room temperature before mixing.
- Don’t overmix the swirl: Less is more when creating that marbled effect.
- Chill long enough: Give the cheesecakes enough time to fully set, or they’ll be too soft when serving.
- Fold gently: When combining the whipped cream, use a light hand to keep the mixture airy.
If you’re making these ahead of time (which I highly recommend), you can prepare them the night before and decorate them just before serving. It takes all the pressure off and lets you enjoy the moment.
How to Store Easter No-Bake Mini Swirl Cheesecakes
These cheesecakes store beautifully, which makes them perfect for planning ahead or saving leftovers.
Keep them in an airtight container in the refrigerator for up to 4 days. If you’ve already added the decorations, just make sure they’re covered well so they don’t dry out. For best results, add toppings right before serving.
You can also freeze them (without toppings) for up to one month. Just wrap them individually and thaw in the fridge overnight before serving. The texture stays surprisingly creamy even after freezing.
FAQs
Can I make these without food coloring?
Absolutely! They’ll still taste amazing. You can leave them plain or use natural colorings like fruit purees for a softer, more subtle look.
Do I have to use a muffin tin?
A muffin tin works best for uniform mini cheesecakes, but you can also use small jars or ramekins for a different presentation.
How do I know when they’re set?
The centers should feel firm to the touch and hold their shape when gently pressed. If they’re still soft, give them more time in the fridge.
Can I double the recipe?
Yes, and it’s a great idea if you’re serving a crowd. Just make sure you have enough space in your fridge for chilling.
If you’re looking for a dessert that’s equal parts easy, beautiful, and delicious, these Easter No-Bake Mini Swirl Cheesecakes are truly hard to beat. They bring color, joy, and that creamy cheesecake goodness to your table without any of the stress. Once you make them, I promise they’ll become a spring tradition in your kitchen just like they have in mine.
For more delicious inspiration and creative dessert ideas, don’t forget to follow us on Pinterest!
Easter No-Bake Mini Swirl Cheesecakes
Ingredients
Equipment
Method
- Step 1: Line a muffin tin with cupcake liners.
- Step 2: Mix graham cracker crumbs, sugar, and melted butter until combined.
- Step 3: Press the mixture into the liners and refrigerate to set.
- Step 4: Beat cream cheese and sugar until smooth and creamy.
- Step 5: Add vanilla extract, lemon juice, and sour cream, then mix well.
- Step 6: Whip heavy cream to stiff peaks and gently fold into the cheesecake mixture.
- Step 7: Divide the filling into three bowls and color each portion with gel food coloring.
- Step 8: Spoon colored mixtures into the crusts and swirl gently with a toothpick.
- Step 9: Refrigerate for at least 4 hours until fully set.
- Step 10: Decorate with mini chocolate eggs and sprinkles before serving.