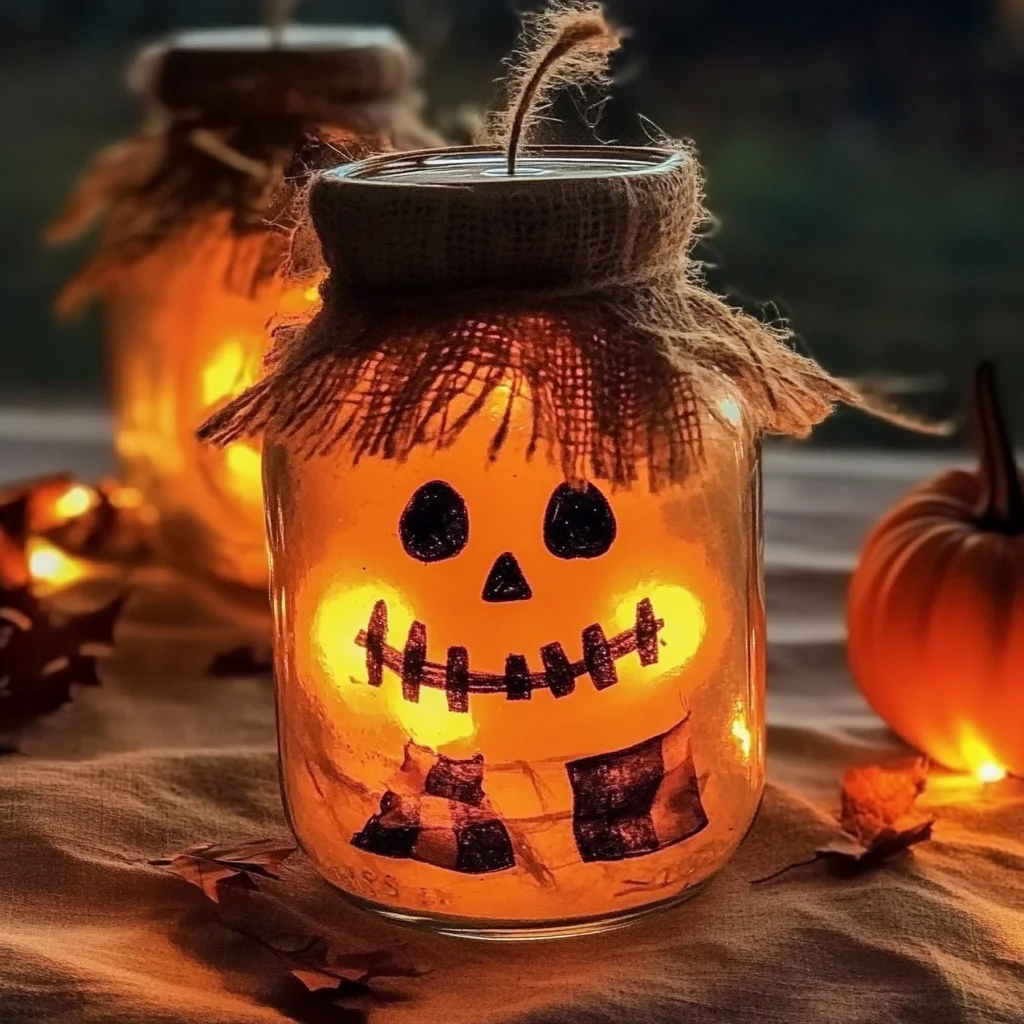
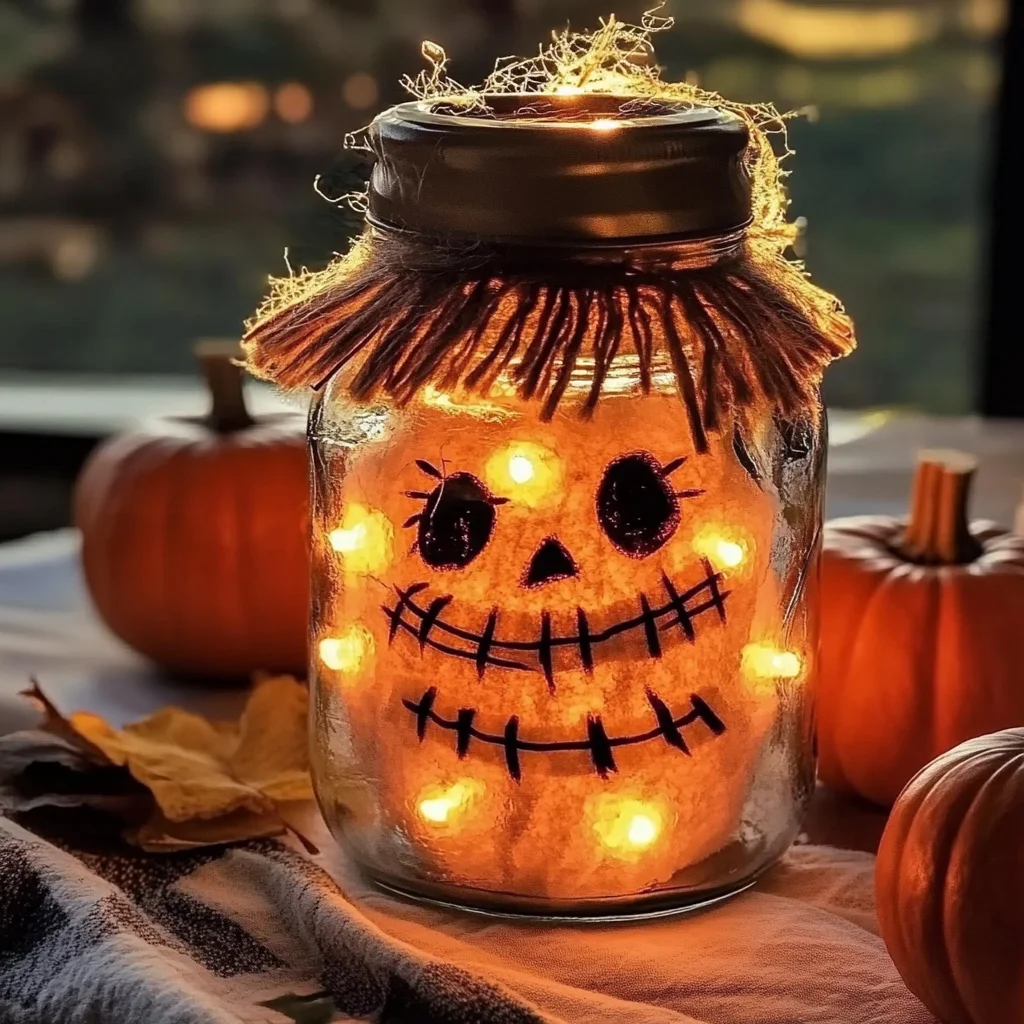
Oh, autumn! There’s just something magical about those crisp evenings, the leaves changing colors, and the scent of pumpkin spice in the air. As the days get shorter and the nights draw in, I love to bring that cozy, welcoming feeling right into my home. And what better way to do that than with a touch of handmade charm? Today, I’m so excited to share one of my absolute favorite fall crafts: these adorable Light-Up Scarecrow Mason Jars! They’re super easy, surprisingly quick, and add such a warm, friendly glow to any corner of your house. Trust me, you’ll be making these for every mantel, bookshelf, and kitchen counter!
Why You’ll Love Light-Up Scarecrow Mason Jars
- Fast: You can whip one up in less than an hour, not including drying time!
- Easy: No fancy crafting skills required – just a little tearing, gluing, and imagination.
- Giftable: These make the sweetest, most thoughtful gifts for teachers, neighbors, or anyone who loves a touch of fall charm. Why not pair it with a batch of easy no-bake caramel pretzel bars for a truly delightful treat?
- Crowd-pleasing: Everyone, from little ones to grown-ups, adores these charming little scarecrows.
Ingredients
Gathering your supplies for these charming scarecrows is almost as fun as making them! Most of these you might already have lying around, especially if you’re a fellow craft enthusiast.
- 1 clean mason jar (any size): Quart-sized jars work wonderfully, but pint jars are also adorable for smaller spaces. Just make sure it’s sparkling clean and dry!
- Orange or amber tissue paper (or paint): This is what gives your scarecrow its warm, pumpkin-like glow. If you don’t have tissue paper, a coat of orange or amber glass paint works just as well.
- Mod Podge or clear-drying glue: The magical adhesive that makes everything stick and gives a lovely, smooth finish.
- Black construction paper or vinyl: For crafting those expressive scarecrow faces. Vinyl stickers are super easy if you have a cutting machine!
- Burlap scraps or raffia: This is for our scarecrow’s rustic “hair” and a cute little scarf. You can find small bundles at craft stores.
- Twine or ribbon: To tie around the neck for that classic scarecrow look.
- Battery-operated tea light or fairy lights: The heart of your light-up jar! Make sure they’re battery-operated for safety and portability.
- Hot glue gun: Your best friend for quick and secure attachments.
- Optional: cinnamon sticks, dried star anise, or buttons for décor: These little extras really elevate your scarecrow from cute to absolutely captivating!
How to Make Light-Up Scarecrow Mason Jars
Alright, friend, let’s get crafty! Follow these simple steps, and you’ll have a delightful scarecrow glowing in no time.
Step 1: Give Your Jar an Autumnal Glow
First things first, let’s transform that clear jar into a warm, inviting canvas. Grab your orange or amber tissue paper and tear it into small, irregular pieces. Don’t worry about perfection here; the uneven edges add to the charm! Now, brush a layer of Mod Podge or clear-drying glue onto a section of your clean mason jar. Start layering those tissue paper pieces onto the glue, overlapping them slightly. Continue brushing on glue over the tissue paper as you go, ensuring each piece is fully adhered and smooth. Cover the entire outer surface of the jar, leaving the rim and bottom clear. Once you’re done, let your jar dry completely. This might take an hour or two, or you can speed it up with a hairdryer on a low setting. This vibrant base will set the perfect mood for your pumpkin banana loaf baking sessions!
Step 2: Craft Your Scarecrow’s Friendly Face
Now for the fun part – giving your scarecrow some personality! Take your black construction paper or vinyl. Cut out two round or almond shapes for the eyes, a small triangle for the nose, and a long, slightly curved line for a stitched smile. Feel free to get creative here! Maybe your scarecrow has big, friendly eyes or a mischievous grin. Once your pieces are cut, arrange them on the dry tissue paper-covered jar until you love the look. Then, use a dab of glue for each piece to securely attach them to the jar. Press down gently to ensure they stick well.
Step 3: Hat and Hay Hair
Every good scarecrow needs a hat and some straw for hair! Take a strip of burlap – about 1-2 inches wide – and wrap it around the metal band of the mason jar lid. Secure it with a little hot glue. This gives the illusion of a rustic hat brim. Next, grab a small tuft of raffia or a few strands of straw. Using your hot glue gun, carefully attach this “hair” to the top of the lid, just underneath your burlap brim. You can let it stick out whimsically, just like a real scarecrow’s hay!
Step 4: Accessorize with a Cozy Scarf
Let’s add a finishing touch! Take your twine or a small strip of burlap ribbon and tie it around the neck of the jar, just below the lid. You can tie it in a simple knot or a small bow to resemble a scarf. This is also the perfect spot to add any optional fall embellishments you have. Hot glue a miniature cinnamon stick, a dried star anise, or even a cute button or two to the “scarf” area. These little details really make your scarecrow unique and are wonderful for embracing those cozy autumn evenings.
Step 5: Light It Up and Enjoy!
The grand finale! Carefully place your battery-operated tea light or string of fairy lights inside the mason jar. Turn them on, and watch as your adorable scarecrow comes to life with a warm, gentle glow. Find the perfect spot for your new fall friend – on your windowsill, as a centerpiece, or adding a magical touch to a quiet corner. Enjoy the beautiful, cozy atmosphere your handmade creation brings!
Substitutions & Additions
Part of the fun of crafting is making it your own! Don’t be afraid to experiment with these ideas:
- For the Jar Color: Instead of tissue paper, you could use orange or amber transparent glass paint for a smoother finish. Or, for a different look, try a light coat of matte white paint and then distress it for an aged, farmhouse feel.
- For the Face: Get creative with your scarecrow’s expression! Use googly eyes, draw the face with a black permanent marker, or even cut out felt shapes for a softer look. Buttons or small twigs could make charming noses or mouths.
- For the Hair/Scarf: Yarn, shredded brown paper bags, or even natural dried grasses can substitute for raffia. For the scarf, colorful fall-themed fabric scraps or patterned ribbon would be lovely.
- Extra Embellishments: Small artificial fall leaves, miniature pumpkins, acorns, or even tiny pinecones can be hot-glued around the base or the lid for extra festive flair. A dab of glitter glue could add a subtle sparkle to the face.
Tips for Success
- Cleanliness is Key: Make sure your mason jar is super clean and dry before applying Mod Podge. Any grease or dust can prevent the tissue paper from sticking properly.
- Thin Layers of Mod Podge: When applying the tissue paper, use thin, even coats of Mod Podge. Too much can make the paper soggy and tear. Work in small sections.
- Patience with Drying: Allow ample drying time between steps, especially after applying the tissue paper. This prevents smudging and ensures everything adheres well.
- Hot Glue Gun Safety: If little hands are helping, supervise closely with the hot glue gun. Low-temp glue guns are a great alternative for kids.
- Prep Ahead: Cut out all your face shapes and burlap strips before you start gluing. This makes the assembly process much smoother and more enjoyable.
How to Store Light-Up Scarecrow Mason Jars
These little guys are pretty sturdy, so storing them is a breeze! When autumn passes and you’re ready to pack away your fall decor, gently wipe any dust off your scarecrow jar. You can wrap it loosely in tissue paper or bubble wrap to protect the delicate tissue paper and any glued-on embellishments. Store it in a box with your other seasonal decorations in a cool, dry place. They’ll be ready to bring cheer again next fall, year after year!
FAQs
- Can I use real candles instead of battery-operated lights?
I highly recommend sticking to battery-operated tea lights or fairy lights. They are much safer, especially with paper and burlap, and eliminate any fire hazards.
- What if I don’t have Mod Podge?
A mix of white school glue (like Elmer’s) and a little water (about 3 parts glue to 1 part water) can work as a substitute, though Mod Podge often dries clearer and provides a bit more durability.
- Can my kids help make these?
Absolutely! This is a fantastic craft for kids. They can help tear tissue paper, cut out faces (with safety scissors), and arrange the pieces. Just handle the hot glue gun parts yourself or supervise closely if they’re using a low-temp one.
- How do I clean my scarecrow jar?
Since it’s made with tissue paper and glue, avoid submerging it in water. A gentle dusting with a soft, dry cloth is usually all it needs.
For more delicious recipes and crafty inspirations, follow us on Pinterest!

Light-Up Scarecrow Mason Jars
Ingredients
Equipment
Method
- Step 1: Give Your Jar an Autumnal GlowTear orange or amber tissue paper into small, irregular pieces. Brush a layer of Mod Podge or clear-drying glue onto a section of your clean mason jar. Layer tissue paper pieces, overlapping slightly, and brush more glue over them, ensuring each piece is fully adhered and smooth. Cover the entire outer surface of the jar, leaving the rim and bottom clear. Let your jar dry completely (this might take an hour or two, or use a hairdryer on low).
- Step 2: Craft Your Scarecrow's Friendly FaceFrom black construction paper or vinyl, cut out two round or almond shapes for eyes, a small triangle for the nose, and a long, slightly curved line for a stitched smile. Arrange the pieces on the dry tissue paper-covered jar until you like the look, then use a dab of glue for each piece to securely attach them to the jar.
- Step 3: Hat and Hay HairTake a strip of burlap (about 1-2 inches wide) and wrap it around the metal band of the mason jar lid, securing it with hot glue to create a rustic hat brim. Next, grab a small tuft of raffia or a few strands of straw and use your hot glue gun to attach this 'hair' to the top of the lid, just underneath your burlap brim, letting it stick out whimsically.
- Step 4: Accessorize with a Cozy ScarfTake your twine or a small strip of burlap ribbon and tie it around the neck of the jar, just below the lid, in a simple knot or small bow to resemble a scarf. This is also the perfect spot to hot glue any optional fall embellishments like a miniature cinnamon stick, dried star anise, or buttons.
- Step 5: Light It Up and Enjoy!Carefully place your battery-operated tea light or string of fairy lights inside the mason jar. Turn them on to see your scarecrow come to life with a warm, gentle glow. Find the perfect spot for your new fall friend to display.