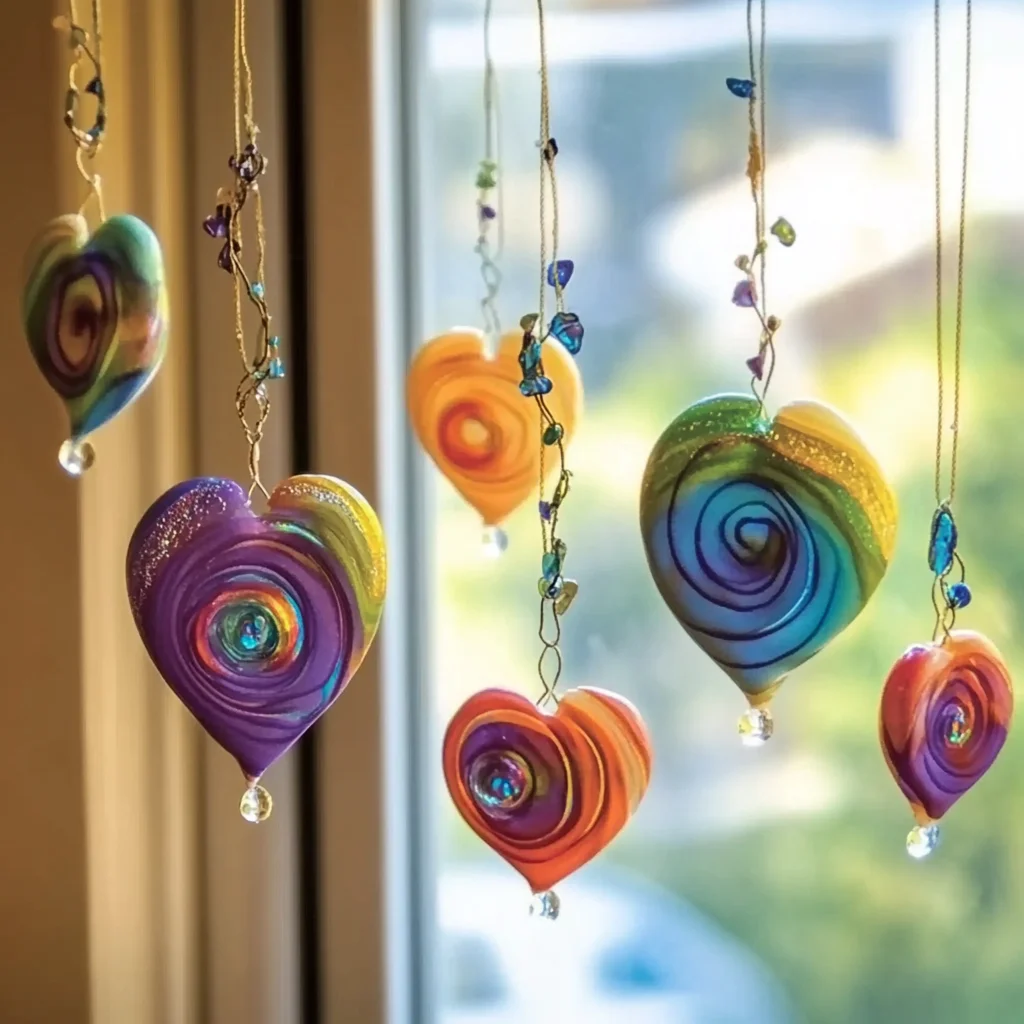
Do you remember those childhood days, when a simple craft could feel like pure magic? The way light would dance through a colored piece of paper taped to a window, or how a handmade ornament could catch the morning sun? There’s something truly special about bringing a little extra shimmer into your home, and that’s exactly what we’re going to do today with these incredibly easy DIY Glue Suncatchers! Forget complicated steps or fancy tools – this is a project that’s as quick as it is memorable, perfect for a cozy afternoon with loved ones, or a peaceful moment of solo creativity.
Why You’ll Love DIY Glue Suncatchers
- Fast
- Easy
- Giftable
- Crowd-pleasing
Ingredients
- White school glue: The classic choice, like Elmer’s! It dries surprisingly clear with a beautiful frosted look, making it perfect for our project.
- Clear glue (optional): If you want a perfectly see-through finish for your colors, this is your go-to. It gives your suncatchers a more glass-like appearance.
- Wax paper or plastic sheeting: This is your non-stick canvas for creating your masterpieces. Don’t skip this important step; it makes peeling a breeze!
- Food coloring: A rainbow of possibilities! Liquid or gel food colors work wonderfully to infuse your suncatchers with vibrant hues.
- Scissors: For a little trim and shaping after your suncatchers are dry, allowing you to perfect your design.
- String or ribbon: To hang your beautiful, light-catching creations in your favorite sunny spot.
- Glitter (optional): For that extra sparkle, because who doesn’t love a little more shine?
- Cookie cutters (optional): Perfect for getting those crisp, defined shapes without the fuss, especially if you’re aiming for specific designs.
How to Make DIY Glue Suncatchers
Ready to bring some shimmer into your life? Let’s get crafting!
Step 1: Create Your Base
First things first, you’ll want to get your workspace ready. Lay down a sheet of wax paper or plastic sheeting on a flat, protected surface. This is super important because glue sticks to just about everything! Now, grab your glue. Pour a thick layer onto the non-stick surface in your desired shape. If you’re aiming for perfect stars, hearts, or fun animal shapes, now is the time to place your favorite cookie cutters firmly on the wax paper and fill them with glue. Don’t be shy with the glue; a thicker layer will make for a sturdier suncatcher that’s less prone to tearing.
Step 2: Add Color (Optional)
This is where the magic truly begins! If you’re using food coloring, gently drop small amounts onto the wet glue. You can swirl the colors with a toothpick for a marbled effect, create stripes, or design intricate patterns. I love watching the colors bleed into each other just slightly – it gives such a dreamy, watercolor look! If you’re a glitter enthusiast (like me!), now’s the time to sprinkle a little onto the wet glue for an added touch of sparkle. Remember, a little goes a long way to keep them beautifully translucent!
Step 3: Dry Completely
Now for the hardest part: patience! You need to allow your glue masterpieces to dry fully until they are completely hard and translucent. This typically takes overnight, but if you’ve made some extra thick designs, they might need a bit more time. I usually let mine sit for at least 24 hours, especially on humid days. You’ll know they’re ready when they’re firm to the touch and peel away easily. And while you’re waiting for everything to dry, why not whip up a batch of easy no-bake peanut butter bars to snack on? Crafting always makes me hungry!
Step 4: Peel & Shape
This is arguably the most satisfying step! Gently peel the dried glue from the wax paper or plastic sheeting. Take your time here – a slow, steady hand prevents tearing. If you didn’t use cookie cutters, or if you want to refine the edges of your shapes, now is the perfect opportunity to use your scissors for a little trim. You can even cut out new designs freehand!
Step 5: Hang & Display
Your gorgeous suncatcher is almost ready for its debut! Use a small hole punch or the tip of your scissors to carefully create a small hole at the top of your suncatcher. Thread a piece of string or ribbon through the hole, tie a knot, and find that perfect sunny window. Watch as your handmade creation catches the light and casts beautiful, colorful shadows around your room. It’s truly a delight!
Substitutions & Additions
One of the best things about DIY crafts is how flexible they are! Here are some ideas to make these glue suncatchers truly your own:
- Beyond Food Coloring: Don’t have food coloring on hand? You can try diluting a bit of acrylic paint with water (just a tiny drop of paint for a lot of glue!) for vibrant, opaque colors. Or, for a different texture, try pressing small pieces of tissue paper into the wet glue.
- Shape Shifters: No cookie cutters? No problem! Freehand shapes work beautifully for a more organic look. You can also use stencils or even draw shapes directly onto the wax paper with a permanent marker as a guide before filling them with glue.
- Extra Sparkle & Charm: Want to amp up the dazzle? Tiny beads, sequins, or even small, pressed dried flowers can be gently embedded into the wet glue for a truly unique look. Imagine creating a nature-themed suncatcher with tiny leaves and petals! For more nature-inspired DIY fun, you might love making our DIY Rain Cloud Jar.
- Glow-in-the-Dark Fun: Add a sprinkle of glow-in-the-dark glitter or a few drops of glow-in-the-dark paint for a magical nighttime effect!
Tips for Success
To ensure your suncatchers turn out absolutely perfect, keep these handy tips in mind:
- Don’t Skimp on Thickness: A common mistake is pouring the glue too thin. This makes the suncatchers fragile and prone to tearing when peeling. Aim for a thickness similar to a dime or slightly thicker.
- Patience is Key for Drying: Resist the urge to peel them too early! An incompletely dried suncatcher will be sticky, lose its shape, and might tear. If you live in a humid climate, give them extra time.
- Less is More with Color: While you want vibrant colors, too much food coloring can make your suncatcher opaque instead of beautifully translucent. Start with a few drops and add more if needed.
- Gentle Peel: When it’s time to peel, start from an edge and go slowly. If it feels stuck, it might need a little more drying time.
- Make Extras: Especially if you’re crafting with kids (or are just a little prone to craft mishaps like I am!), making a few extra ensures you’ll have plenty of beautiful suncatchers to hang. Sometimes the “mistakes” turn out to be the most beautiful anyway!
How to Store DIY Glue Suncatchers
Once your DIY Glue Suncatchers are dry and hanging, they’ll bring joy for a long, long time! They’re quite durable once hardened, but if you need to store them (perhaps to switch them out for seasonal decor or if you’re saving them as gifts), lay them flat between sheets of wax paper in a box. This will prevent them from sticking to each other or bending. Keep them in a cool, dry place away from direct heat to maintain their shape and color. They don’t have a “shelf life” like food, but proper care will ensure they continue to sparkle for years!
FAQs
Q: How long do DIY glue suncatchers typically take to dry?
A: Most glue suncatchers will be dry to the touch in about 12-24 hours. However, thicker designs or those made in humid environments might need up to 48 hours to fully harden and become completely translucent. It’s always best to let them sit longer than you think!
Q: Can I use different types of glue for this craft?
A: White school glue (like Elmer’s) is definitely the best for this project as it dries clear and flexible. Clear glue also works beautifully for a glass-like finish. Other craft glues might dry opaque or be too brittle, so stick to the school glue if you can!
Q: Are these suncatchers waterproof?
A: While they can withstand a little moisture, they aren’t truly waterproof. They’re best suited for indoor display in windows. If they get very wet, they might become tacky or warp.
Q: What if my suncatcher rips when I peel it?
A: Don’t fret! If it’s a small tear, you can often “mend” it by applying a tiny dab of fresh glue over the tear and letting it dry completely. If it’s a big rip, consider it an opportunity to start a new, exciting design! Sometimes accidents lead to the most unique results, much like how a little unexpected ingredient can make a homemade pizza roll even more delicious.
I hope you have the most wonderful time making these sparkling DIY Glue Suncatchers! They’re such a simple way to add a pop of color and joy to any space.
For more creative ideas and delicious recipes, be sure to follow us on Pinterest!

Sparkle and Shine: Easy DIY Glue Suncatchers
Ingredients
Equipment
Method
- Step 1: Create Your Base. Lay down wax paper or plastic sheeting on a flat, protected surface. Pour a thick layer of glue in your desired shape. For crisp shapes, place cookie cutters firmly on the wax paper and fill them with glue. Ensure the glue layer is thick for sturdier suncatchers.
- Step 2: Add Color (Optional). If using food coloring, gently drop small amounts onto the wet glue. Swirl colors with a toothpick for a marbled effect or create patterns. If desired, sprinkle a little glitter onto the wet glue for added sparkle, being mindful not to use too much to maintain translucency.
- Step 3: Dry Completely. Allow your glue designs to dry fully until they are completely hard and translucent. This typically takes overnight (at least 24 hours), but thicker designs or humid conditions may require up to 48 hours. They are ready when firm to the touch and peel away easily.
- Step 4: Peel & Shape. Gently peel the dried glue from the wax paper or plastic sheeting, taking your time to prevent tearing. If you didn't use cookie cutters or want to refine edges, use scissors to trim and shape your suncatchers as desired.
- Step 5: Hang & Display. Carefully create a small hole at the top of your suncatcher using a small hole punch or the tip of your scissors. Thread a piece of string or ribbon through the hole, tie a knot, and hang your creation in a sunny window to catch the light and cast colorful shadows.