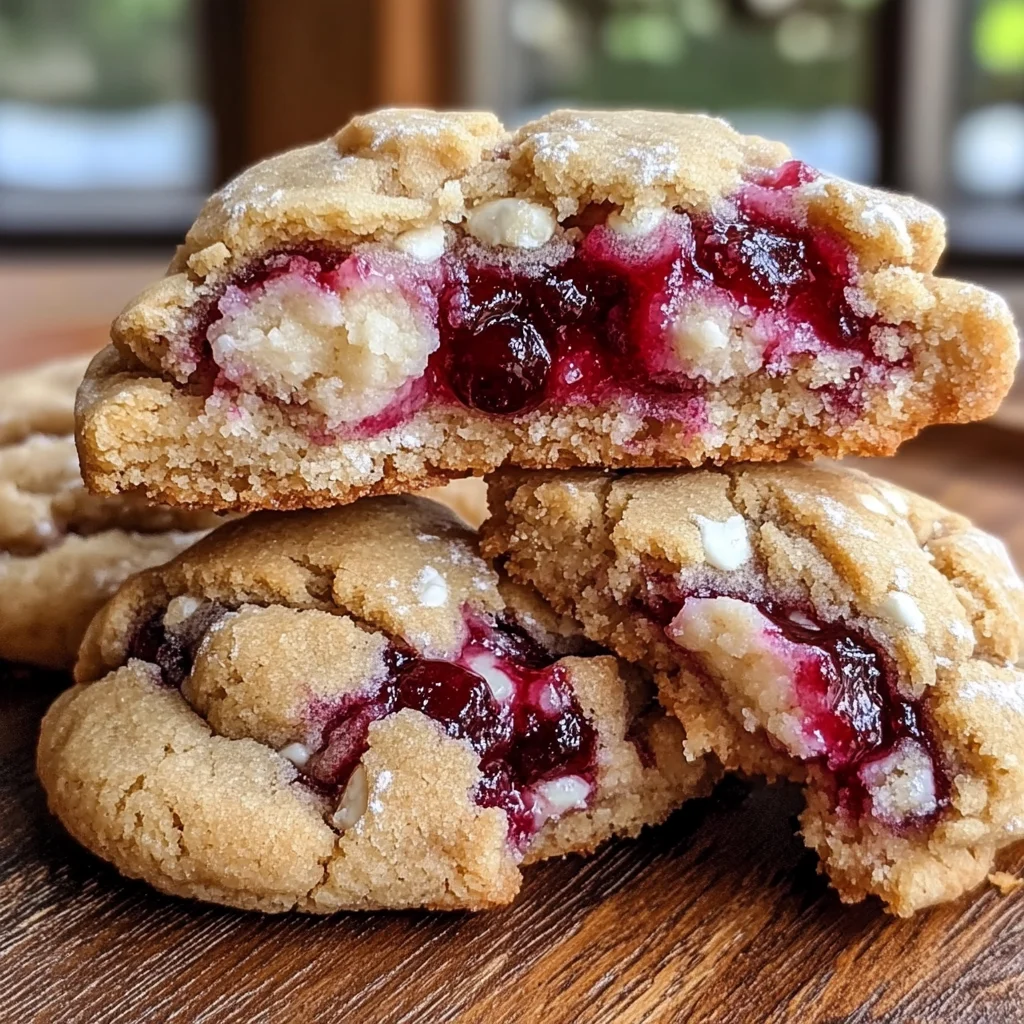
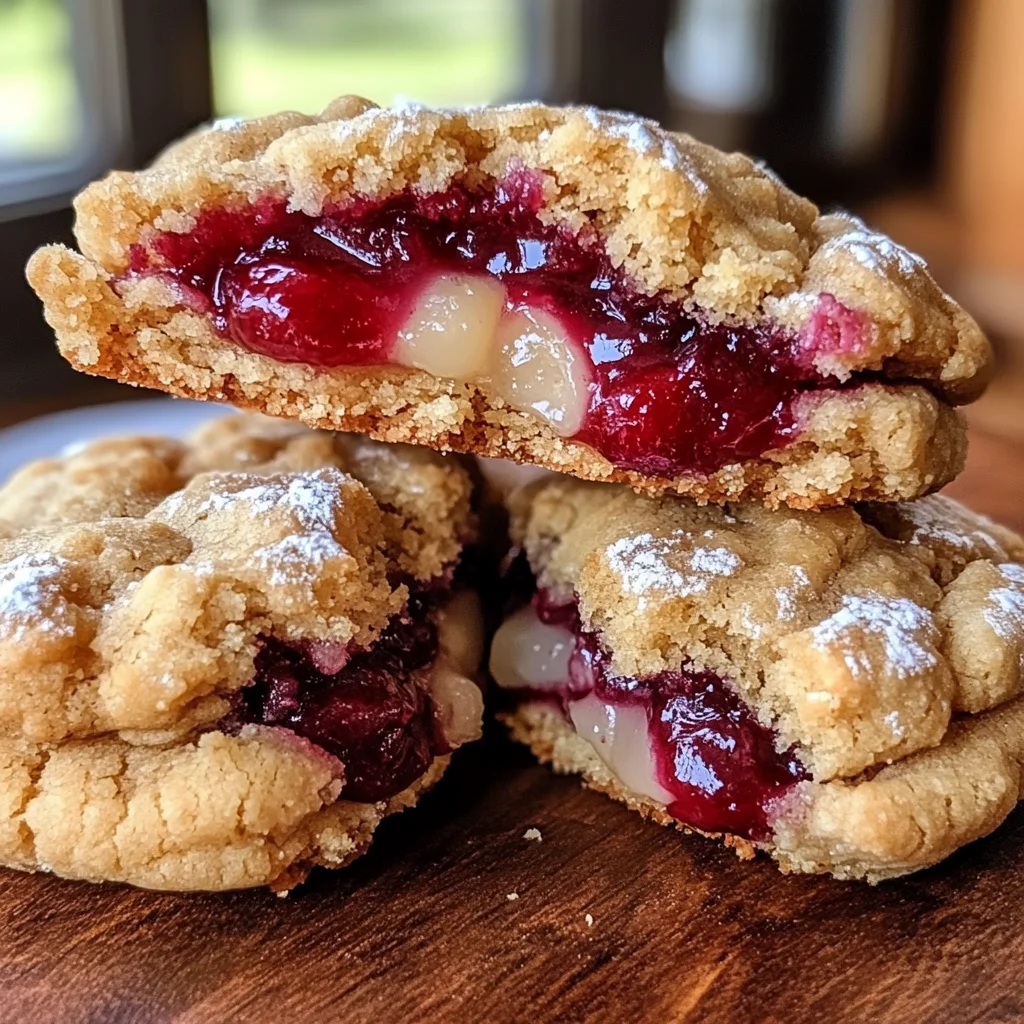
Oh, hello there, friend! Pull up a chair. I want to tell you about a cookie. Not just any cookie, but a cookie that holds a little secret inside. A cookie that tastes like your favorite cozy slice of cherry pie decided to dress up as the most perfect, chewy, slightly-crisp cookie you’ve ever had. Seriously, these Cherry Pie Stuffed Cookies are pure magic. They’re the kind of treat that makes people gasp a little when they bite in and discover that sweet, fruity surprise waiting for them. And guess what? They are SO much easier to make than you might think! They’re quick enough for a weeknight treat, impressive enough for a party, and totally unforgettable.
Why You’ll Love This Recipe
- Fast: No complicated steps here! The dough comes together quickly.
- Easy: Even if you’ve never stuffed a cookie before, you’ll nail this. It’s straightforward and fun!
- Giftable: Wrap these up in a cute box, and you’ve got a homemade gift that will make anyone smile (and maybe beg for the recipe!).
- Crowd-pleasing: Who doesn’t love the combo of classic cookie and sweet cherry pie?
Ingredients
Alright, let’s gather our goodies. You probably have most of these pantry staples on hand already!
- Cookie Dough:
- 1 cup unsalted butter, softened: Make sure it’s truly softened, not melted. This is key for that perfect cookie texture!
- ¾ cup granulated sugar: For sweetness and a little crispness.
- ¾ cup packed brown sugar: This gives us that lovely chewiness and depth of flavor. Make sure it’s packed!
- 2 large eggs: Our binders!
- 1 teaspoon vanilla extract: A must-have in almost every cookie recipe.
- 2 ½ cups all-purpose flour: The base of our cookie.
- 1 teaspoon baking soda: Helps them rise just right.
- ½ teaspoon salt: Balances out all that sweetness.
- 1 cup white chocolate chips (optional): I love the little extra sweetness these bring, but feel free to skip if you’re a purist!
- Cherry Filling:
- 1 cup cherry pie filling (store-bought or homemade): Your favorite kind works perfectly!
- 1 tablespoon cornstarch (optional, for thickening): If your pie filling seems a little watery, a tiny bit of cornstarch helps keep it from gushing out during baking. Totally optional, though!
How to Make It
Okay, deep breath! You’ve got this. Let’s bake some magic.
- Get the Cookie Dough Ready: In your biggest mixing bowl, cream together that softened butter with the granulated sugar and brown sugar. Beat it until it’s light and fluffy – think whipped cloud texture. Now, crack in those eggs one at a time, beating well after each addition. Stir in the vanilla extract. In a separate, smaller bowl, whisk together your flour, baking soda, and salt. Gradually add these dry ingredients to your wet ingredients, mixing just until they’re combined. Don’t overmix! If you’re using white chocolate chips (yay!), fold them in now. Pop this dough into the fridge for at least 30 minutes. Chilling makes it way easier to handle and stuff!
- Prep the Cherry Filling: While the dough is chilling, grab a small bowl. If you’re using cornstarch to thicken your filling, stir it into the cherry pie filling now. Otherwise, just have your delicious filling ready to go.
- Assemble Those Beauties: Preheat your oven to 350°F (175°C). Line a baking sheet with parchment paper – this is your best friend for easy cleanup and preventing sticking. Now for the fun part! Take about 2 tablespoons of your chilled cookie dough (a small cookie scoop works great for consistency!) and flatten it right in the palm of your hand. It should be like a little disc. Spoon a bit of that prepared cherry filling into the center of the disc. Be careful not to overfill! Now, gently fold the edges of the dough up and over the filling, pinching and sealing it completely so the filling is fully enclosed. Roll it gently in your hands to make a nice ball. Place it on your prepared baking sheet, giving each cookie about 2 inches of space to spread. Repeat until you’ve used up all your dough and filling.
- Bake the Cookies: Slide that baking sheet into your preheated oven. Bake for 12-15 minutes. You’re looking for the edges to be lightly golden brown. Don’t worry if the centers look a little soft – they will firm up as they cool, and that slight softness keeps them wonderfully chewy inside.
- Cool Down: Once they’re out of the oven, let those amazing cookies sit on the hot baking sheet for just a few minutes. This helps them set up without breaking. Then, carefully transfer them to a wire rack to cool completely. Patience is key here!
- Serve It Up: Once they’re cooled, give them a little dusting of powdered sugar if you like that pretty finish! Now, bite in and prepare for pure happiness.
Substitutions & Additions
Want to play around a bit? Here are some ideas:
- Different Fillings: Try apple pie filling, blueberry, or even a dollop of Nutella or peanut butter for a totally different twist!
- Chocolate Swaps: Not a white chocolate fan? Use milk chocolate, dark chocolate, or even mini chocolate chips.
- Add Spices: A pinch of cinnamon or a tiny splash of almond extract in the cookie dough could be delicious with the cherry!
- Use Pre-Made Dough: In a pinch, you could try using store-bought refrigerated cookie dough, but you’ll need to work quickly with it and ensure it’s well-chilled for stuffing.
Tips for Success
A few little pointers to make sure your stuffed cookies turn out perfectly every time:
- Chill is Your Friend: Don’t skip the dough chilling step! It makes the dough much easier to work with and helps prevent too much spreading during baking.
- Don’t Overfill: A generous spoonful of filling is great, but too much and you risk blowouts (where the filling escapes during baking). A tablespoon is usually plenty for a 2-tablespoon dough ball.
- Seal ‘Em Up Tight: Make sure there are no gaps when you enclose the filling. Pinch and roll gently to create a smooth ball.
- Watch the Edges: Cookies can go from perfectly baked to over-baked quickly. Look for those lightly golden edges as your cue.
- Prep Ahead: You can make the cookie dough ahead of time and keep it in the fridge for up to 3 days, or even freeze it for longer storage. You could also assemble the cookies and freeze them on the baking sheet, then transfer to a bag. Bake from frozen, adding a few minutes to the bake time.
How to Store It
These cookies are best enjoyed fresh, but they store well too! Once completely cooled, keep them in an airtight container at room temperature for up to 3-4 days. They tend to disappear much faster than that in my house, though!
FAQs
Got questions? I’ve got answers!
Can I use homemade cherry pie filling?
Absolutely! If you have a favorite homemade recipe, go for it. Just make sure it’s cooled completely before using.
Why do I need to chill the dough?
Chilling the dough solidifies the fat, which helps the cookies spread less in the oven, resulting in a thicker, chewier cookie. It also makes the dough less sticky and easier to handle when you’re stuffing them.
Can I freeze these cookies?
Yes! You can freeze the baked cookies in an airtight container or freezer bag for up to 3 months. You can also freeze the assembled, unbaked cookies. Place them on a baking sheet until firm, then transfer to a freezer bag. Bake from frozen, adding a few minutes to the bake time.
How do I know when they are done baking?
Look for the edges to be lightly golden brown. The centers might look soft, but they will set up as they cool. Overbaking will result in a drier cookie.

Cherry Pie Stuffed Cookies
Ingredients
Equipment
Method
- Step 1: Get the Cookie Dough Ready: In your biggest mixing bowl, cream together that softened butter with the granulated sugar and brown sugar. Beat it until it's light and fluffy. Crack in those eggs one at a time, beating well after each addition. Stir in the vanilla extract. In a separate, smaller bowl, whisk together your flour, baking soda, and salt. Gradually add these dry ingredients to your wet ingredients, mixing just until they're combined. Don't overmix! If you're using white chocolate chips, fold them in now. Pop this dough into the fridge for at least 30 minutes.
- Step 2: Prep the Cherry Filling: While the dough is chilling, grab a small bowl. If you're using cornstarch to thicken your filling, stir it into the cherry pie filling now. Otherwise, just have your delicious filling ready to go.
- Step 3: Assemble Those Beauties: Preheat your oven to 350°F (175°C). Line a baking sheet with parchment paper. Take about 2 tablespoons of your chilled cookie dough and flatten it in the palm of your hand. Spoon a bit of that prepared cherry filling into the center. Gently fold the edges of the dough up and over the filling, pinching and sealing it completely so the filling is fully enclosed. Roll it gently in your hands to make a nice ball. Place it on your prepared baking sheet, giving each cookie about 2 inches of space to spread. Repeat until you've used up all your dough and filling.
- Step 4: Bake the Cookies: Slide that baking sheet into your preheated oven. Bake for 12-15 minutes. You're looking for the edges to be lightly golden brown. Don't worry if the centers look a little soft – they will firm up as they cool.
- Step 5: Cool Down: Once they're out of the oven, let those amazing cookies sit on the hot baking sheet for just a few minutes. Then, carefully transfer them to a wire rack to cool completely.
- Step 6: Serve It Up: Once they're cooled, give them a little dusting of powdered sugar if you like that pretty finish! Now, bite in and prepare for pure happiness.