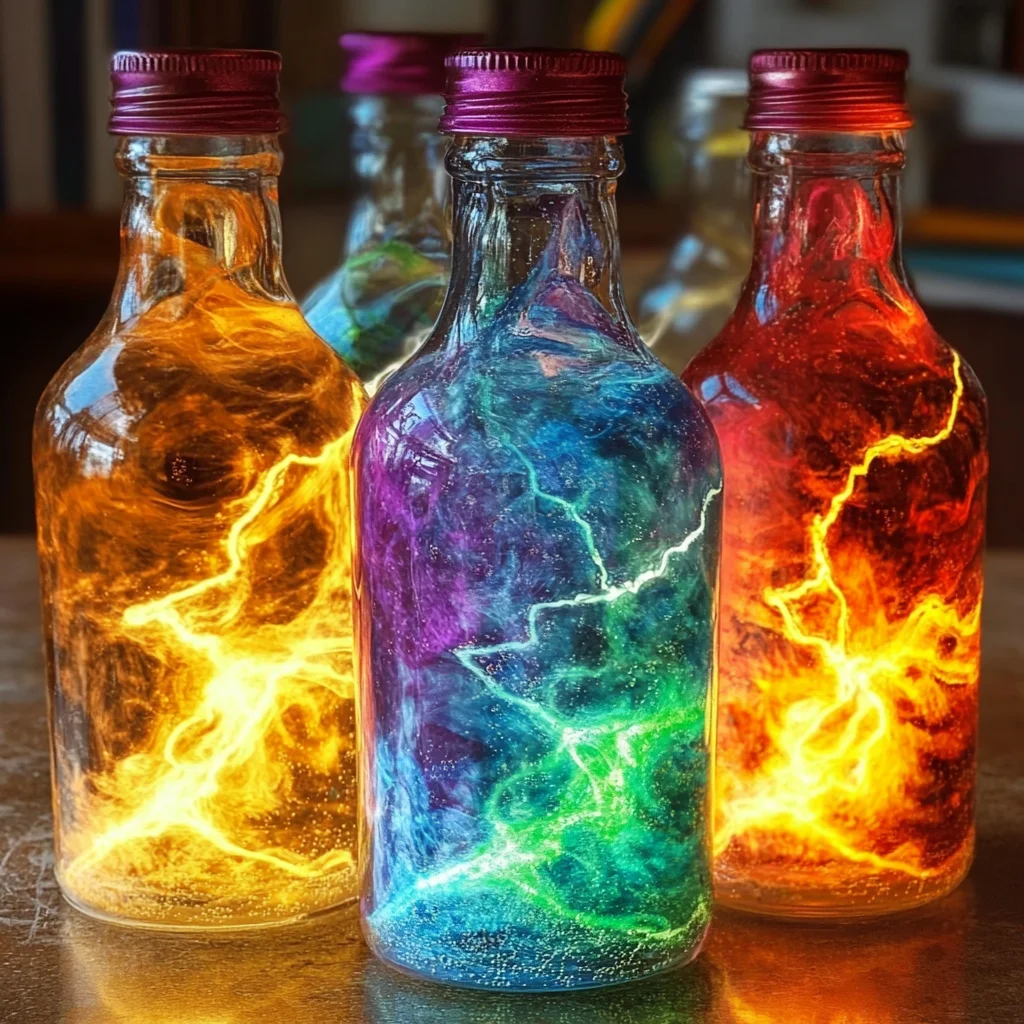
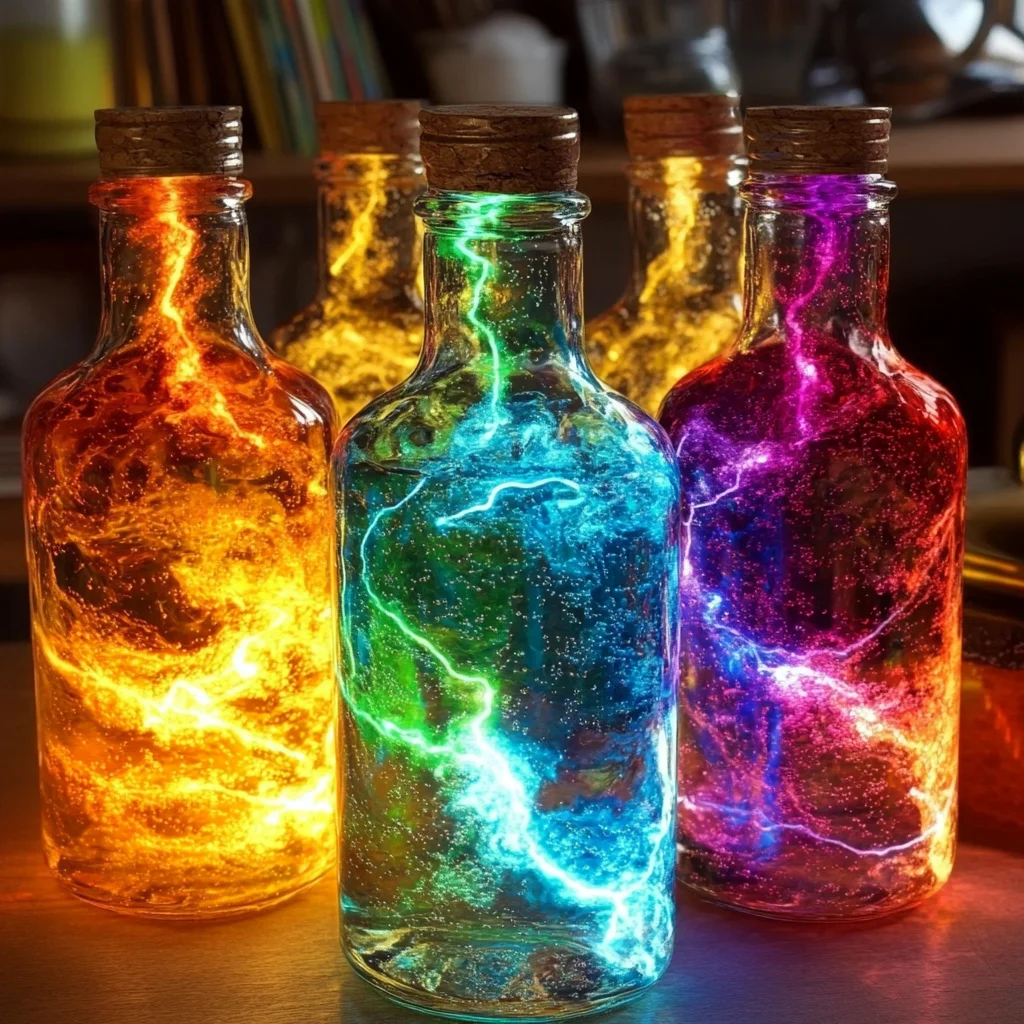
Do you remember those childhood moments of pure wonder? Maybe it was catching fireflies on a warm summer night, or watching a lava lamp bubble mesmerizingly, or even just seeing the magic happen when you mixed baking soda and vinegar for a science fair project. There’s something so enchanting about simple, visual magic, isn’t there? Well, get ready to recapture that feeling and share it with everyone you know, because today we’re diving into how to make the most incredible Bubbling Rainbow Lightning Bottles!
These aren’t just a craft; they’re a truly captivating sensory experience that’s super easy, surprisingly quick, and oh-so-memorable. Whether you’re looking for a calming activity for a rainy afternoon, a dazzling party favor, or a unique homemade gift, these bottles are a total showstopper. Trust me, you’ll be amazed at how a few simple ingredients can create such a vibrant, stormy rainbow inside a bottle!
Why You’ll Love Bubbling Rainbow Lightning Bottles
- Fast: You can whip up these magical bottles in under 15 minutes, making them perfect for spontaneous fun!
- Easy: No complicated steps or fancy equipment here! If you can stir and pour, you can make these.
- Giftable: Who wouldn’t love a bottle full of bubbling rainbows and glowing light? They make unique and personal presents.
- Crowd-pleasing: Kids and adults alike are absolutely mesmerized by the swirling colors and gentle fizz. They’re fantastic for parties or just keeping little hands busy.
Ingredients
Gathering your supplies is half the fun! Most of these you probably already have lying around, or they’re easily found at your local craft or grocery store.
- 2 clear plastic bottles with lids: Think empty soda bottles, water bottles, or even clear plastic jars. Just make sure they’re clean and have tight-fitting lids!
- 1/2 cup warm water: This helps everything dissolve beautifully.
- 1/4 cup vinegar: Our first secret ingredient for that wonderful fizz! White vinegar works best.
- 1 tablespoon baking soda: The dynamic duo with vinegar, ready to create some bubbly magic.
- 1 teaspoon citric acid: My personal secret for an extra-long and super vigorous fizz. It really takes the bubbles to the next level!
- 1 tablespoon rainbow glitter mix: Because everything’s better with a little sparkle! Grab a mix for extra dazzling effect.
- 1 teaspoon glow-in-the-dark powder or paint: This is what gives your lightning its eerie, magical glow.
- Red, yellow, blue, and green food coloring (a few drops of each): Your palette for a vibrant, swirling rainbow. Feel free to use your favorite colors!
- 1 teaspoon dish soap: This creates those beautiful, lasting bubbles that truly make it look like a stormy rainbow.
- 2 small glow sticks or waterproof LED lights: The “lightning” in our bottles! Glow sticks offer a temporary burst, while small LED lights can be reused.
- 1 spoon: For easy stirring and measuring.
How to Make Bubbling Rainbow Lightning Bottles
Ready to bring some bubbly magic to life? Let’s get these rainbow lightning bottles glowing!
- Set the Scene: First things first, carefully place one small glow stick or a waterproof LED light into the bottom of each of your clear plastic bottles. This is your “lightning” base!
- Whip Up the Wonder Liquid: In a separate measuring cup or bowl, combine your 1/2 cup of warm water, 1/4 cup of vinegar, and 1 teaspoon of dish soap. Now, here’s where the magic really begins to brew: add your 1 teaspoon of glow-in-the-dark powder (or a squeeze of glow paint if that’s what you have) and a few drops of each food coloring – red, yellow, blue, and green. Give it a really good stir with your spoon until everything is thoroughly mixed and the colors start to swirl together.
- Divide and Conquer: Once your colored, glowing liquid is ready, divide it evenly and carefully pour it into both of your prepared plastic bottles.
- Sprinkle the Sparkle: Now for the fun part! Sprinkle about half of your rainbow glitter mix into each bottle. Watch it settle and shimmer – it’s already looking pretty cool, right?
- Unleash the Fizz: This is the grand finale! Quickly add 1 tablespoon of baking soda to each bottle, and then immediately follow it with 1 teaspoon of citric acid. The combination of these two is what creates that incredible, bubbling reaction!
- Seal and Swirl: As soon as you add the baking soda and citric acid, securely close the lids on your bottles. Give them a gentle but firm shake. You’ll see the ingredients combine, creating a mesmerizing stormy rainbow effect with bubbles, color, and glitter swirling around. It truly looks like a little lightning storm caught inside a bottle!
Substitutions & Additions
Part of the joy of DIY projects is making them your own! Here are some ideas for how you can customize your Bubbling Rainbow Lightning Bottles:
- For the Glow: If you don’t have glow-in-the-dark powder, you can often find glow paints at craft stores. Just make sure it’s non-toxic! If you’re out of glow sticks or LED lights, the colorful bubbling effect is still super impressive on its own, especially in natural light.
- Fizz Power: If you don’t have citric acid, you can still get a good fizz with just baking soda and vinegar. The citric acid just gives it an extra boost and longer-lasting bubbles, which I always recommend for the best effect!
- Color Palette: Mix and match your food coloring! Want a mystical purple storm? Use blue and red. A fiery sunset? Go for red and yellow. The possibilities are endless.
- Extra Sparkle: Experiment with different types of glitter – chunky, fine, iridescent, holographic. You can also add small sequins or even tiny plastic beads for extra visual interest.
- Scent-sational Twist: For an added sensory dimension, you could add a few drops of a kid-safe essential oil like lavender for a calming effect, or peppermint for a refreshing scent.
Tips for Success
To ensure your rainbow lightning bottles are a dazzling success every time, keep these little pointers in mind:
- Tight Lids are Key: Seriously, double-check those lids! A loose lid will lead to a bubbly, glittery mess, and nobody wants that. I like to twist them on as tightly as possible.
- Act Fast with Fizz: Once you add the baking soda and citric acid, don’t dally! Close the lid and shake quickly to get the best, most dramatic bubbling reaction.
- Warm Water Helps: Using warm water (not hot!) helps the baking soda and citric acid dissolve more efficiently, leading to a more vigorous and complete reaction.
- Supervise Little Scientists: While the ingredients are generally safe, always supervise younger children, especially during the mixing and sealing steps, to prevent accidental spills or ingestion. This can also be a wonderful Baking Soda Vinegar Balloon Experiment to do with them!
- Pre-Mix for Parties: If you’re making a batch for a party or as homemade gifts, you can pre-mix the water, vinegar, dish soap, glow powder, and food coloring. Store this liquid in a separate container, and then just add the glitter, baking soda, and citric acid right before the fun begins!
How to Store Bubbling Rainbow Lightning Bottles
Once your Bubbling Rainbow Lightning Bottles are complete, they can last for quite a while, offering ongoing joy! The liquid contents themselves don’t really expire, especially with the vinegar acting as a preservative.
- Indefinite Shelf Life (Sealed!): As long as the lids are securely sealed, your bottles can technically last indefinitely as a fascinating display. The bubbling reaction, of course, will subside over time (usually within a few minutes per “shake”), but you can reactivate it by adding new baking soda and citric acid if you wish to open them up.
- Preserving the Glow: If you used glow-in-the-dark powder or paint, storing the bottles in a cool, dark place when not in use can help prolong their ability to glow after being “charged” by light. For glow sticks, they’re typically a one-time use item, lasting a few hours. Waterproof LED lights will last as long as their batteries do.
- Display with Pride: These bottles make fantastic decor! Place them on a shelf, by a window (out of direct, intense sunlight which can fade colors over time), or even on a bedside table for a soothing nightlight effect.
FAQs
Q: Are these bottles safe for young children?
A: Yes, the ingredients are generally safe and non-toxic. However, adult supervision is always recommended, especially when mixing and ensuring the lids are tightly sealed to prevent accidental spills or ingestion. It’s an excellent DIY Rain Cloud Jar alternative for a calming sensory experience.
Q: How long does the bubbling effect last?
A: The initial vigorous bubbling effect typically lasts a few minutes after the baking soda and citric acid are added and shaken. You can reactivate it by opening the bottle (carefully, as there might be a bit of pressure!), adding more baking soda and citric acid, and re-sealing quickly.
Q: Can I use different types of bottles?
A: Absolutely! Any clear, clean plastic bottle with a tight-fitting lid will work. Varying sizes and shapes can create different visual effects. Glass bottles are not recommended, especially for children, due to breakage risk.
Q: My glow-in-the-dark powder isn’t glowing much. What’s wrong?
A: Glow-in-the-dark powders need to be “charged” by light! Hold your bottles under a bright lamp or in sunlight for a few minutes before taking them into a dark room to see the best glowing effect.
Follow us on Pinterest for more fun ideas!

Bubbling Rainbow Lightning Bottles
Ingredients
Equipment
Method
- Step 1: Set the Scene. Carefully place one small glow stick or a waterproof LED light into the bottom of each of your clear plastic bottles. This is your 'lightning' base!
- Step 2: Whip Up the Wonder Liquid. In a separate measuring cup or bowl, combine 1/2 cup of warm water, 1/4 cup of vinegar, and 1 teaspoon of dish soap. Add 1 teaspoon of glow-in-the-dark powder (or glow paint) and a few drops of each food coloring (red, yellow, blue, and green). Give it a really good stir with your spoon until everything is thoroughly mixed and the colors start to swirl together.
- Step 3: Divide and Conquer. Once your colored, glowing liquid is ready, divide it evenly and carefully pour it into both of your prepared plastic bottles.
- Step 4: Sprinkle the Sparkle. Sprinkle about half of your rainbow glitter mix into each bottle. Watch it settle and shimmer.
- Step 5: Unleash the Fizz. Quickly add 1 tablespoon of baking soda to each bottle, and then immediately follow it with 1 teaspoon of citric acid. The combination of these two creates the incredible, bubbling reaction!
- Step 6: Seal and Swirl. As soon as you add the baking soda and citric acid, securely close the lids on your bottles. Give them a gentle but firm shake. You’ll see the ingredients combine, creating a mesmerizing stormy rainbow effect with bubbles, color, and glitter swirling around, looking like a little lightning storm caught inside a bottle!