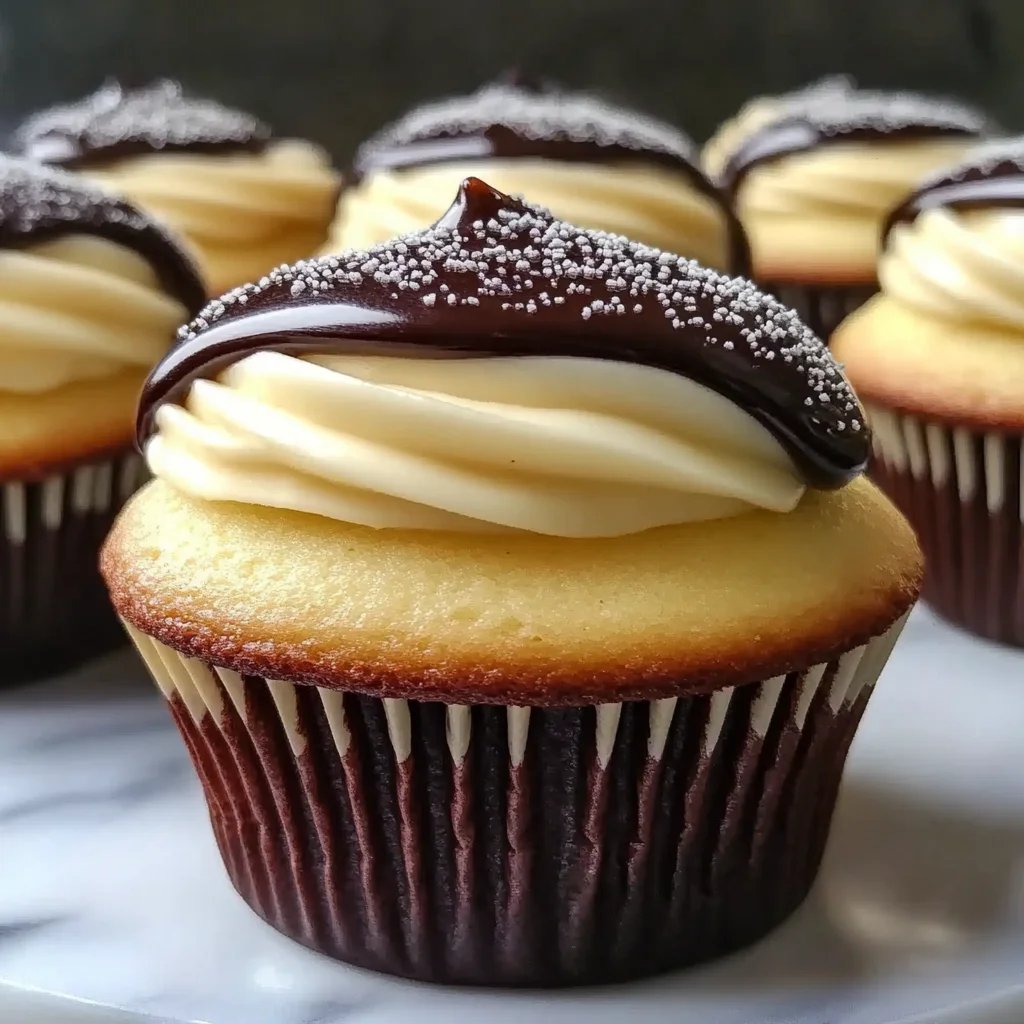
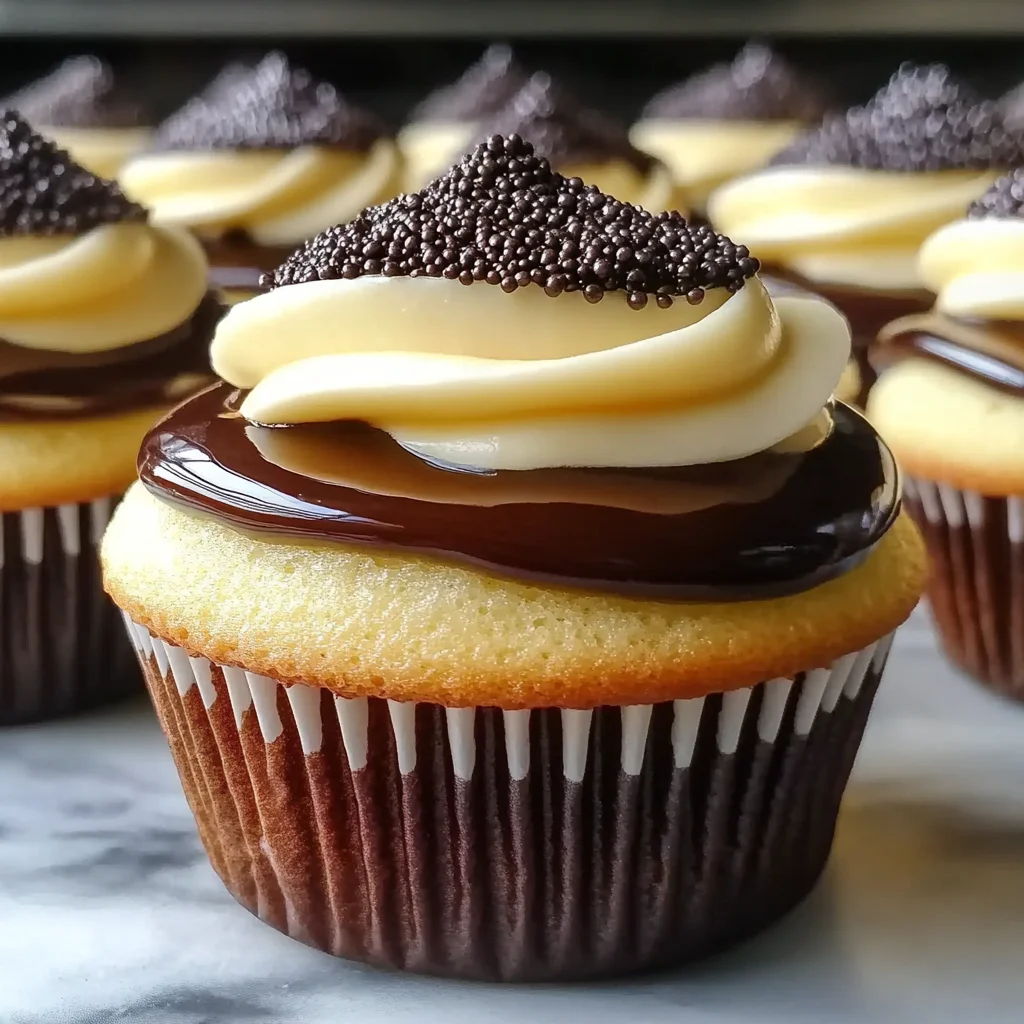
Oh, Boston Cream Pie. Just saying the name brings back happy memories, right? That perfect combination of tender vanilla cake, creamy custard filling, and rich chocolate ganache… it’s pure comfort. While a traditional Boston Cream Pie is a showstopper, sometimes you want all that deliciousness in a cute, individual package. Enter these Boston Cream Pie Cupcakes! They capture everything you love about the classic dessert but are perfectly portioned and surprisingly simple to whip up.
Seriously, these are a game-changer. Whether you’re baking for a party, a potluck, or just because you deserve a treat, these cupcakes deliver big flavor with minimal fuss. Let’s get baking!
Why You’ll Love This Recipe
- Fast(ish): While there are a few components, none are overly complicated, making the process manageable.
- Easy: Simple techniques mean even beginner bakers can tackle these with confidence.
- Giftable: Box these beauties up for a thoughtful homemade gift!
- Crowd-pleasing: Who doesn’t love Boston Cream Pie? These disappear fast!
Ingredients
Here’s what you’ll need to gather for these delightful treats. Using good quality ingredients really makes a difference!
For the Cake:
- 12 tablespoons unsalted butter, softened: Make sure it’s properly softened – not melted! It creams better this way.
- 1 cup sugar: Just granulated sugar is perfect.
- 2 teaspoons vanilla: Pure vanilla extract gives the best flavor.
- 3 eggs: Room temperature eggs incorporate better into the batter.
- 1 ½ cups flour: All-purpose flour is your go-to here.
- 2 teaspoons baking powder: This helps the cupcakes rise beautifully.
- ½ teaspoon salt: Just a pinch to balance the sweetness.
- ⅔ cup buttermilk: Buttermilk is key for tender, moist cupcakes!
For the Filling:
- 3 egg yolks: Save those whites for something else! Yolks give richness.
- 3 cups milk: Whole milk works best for a rich custard, but 2% is fine too.
- ½ cup sugar: Sweetens our lovely pastry cream.
- ⅓ cup cornstarch: This is our thickener – no lumps allowed!
- ¼ teaspoon salt: Enhances the other flavors.
- 1 teaspoon vanilla: Adds that classic custard flavor.
For the Ganache:
- 8 ounces semi-sweet baking chocolate, finely chopped: Good quality chocolate melts smoothly for a glossy finish.
- 1 cup heavy cream: This creates that perfectly pourable (and eventually set) ganache.
How to Make It
Ready to make some magic? Follow these steps!
Make the Cake:
- First things first, preheat your oven to 350°F (175°C) and line a lightly greased muffin pan with cupcake liners.
- In your largest mixing bowl (or the bowl of a stand mixer), cream together that softened butter and sugar until it’s light and fluffy. You’ll see it lighten in color.
- Pour in the vanilla extract and give it another quick beat.
- Add the eggs one at a time, beating well after you add each one. Make sure each egg is fully incorporated before adding the next. Scrape down the sides of the bowl if needed.
- In a separate medium bowl, whisk together your dry ingredients: flour, baking powder, and salt.
- Now, we’re going to alternate adding the dry mixture and the buttermilk to the creamed mixture. Start with a third of the flour mixture, beat until just combined. Then add half of the buttermilk, beat again. Repeat with the second third of the flour, the rest of the buttermilk, and finally the last third of the flour. Make sure you begin and end with the dry ingredients! Beat just until no dry streaks remain. Don’t overmix!
- Scoop the batter into your prepared cupcake liners, filling each one about ¾ of the way full.
- Bake for 18 to 25 minutes. Start checking around 18 minutes with a toothpick inserted into the center of a cupcake – it should come out clean when they’re done.
- Let those beautiful cupcakes cool completely on a wire rack. This is important before filling and frosting!
Make the Filling (Pastry Cream):
- While the cupcakes bake or cool, let’s make the creamy filling. In a medium bowl, beat your egg yolks well.
- Gradually whisk in the milk until everything is smooth and well blended.
- In a heavy-bottomed saucepan (this helps prevent scorching!) over medium-low heat, mix together the sugar, cornstarch, and salt.
- Slowly pour the milk and egg yolk mixture into the saucepan with the dry ingredients, stirring constantly as you pour to prevent any lumps from forming.
- Keep cooking over medium-low heat, and this is where the constant stirring comes in! You need to stir continuously to prevent it from sticking and lumping. It will take about 20 minutes to reach a low boil and thicken nicely. You’ll see it get thick like pudding.
- Once thickened, remove the saucepan from the heat. To cool it down quickly and prevent a skin from forming (and continue thickening), set the bottom of the pot in a large bowl filled with ice water, stirring constantly for a few minutes.
- Stir in the vanilla extract.
- For extra insurance against a skin, press a piece of plastic wrap directly onto the surface of the filling in the pot or transfer it to a bowl and cover tightly with plastic wrap touching the surface. Pop it in the refrigerator until it’s completely chilled and ready to use.
Prepare the Ganache:
- While the filling chills and the cupcakes cool, make your gorgeous ganache. If your chocolate isn’t already finely chopped, give it a whirl in a food processor or chop it by hand until it’s in small pieces. Put the chopped chocolate in a mixing bowl.
- Heat your heavy cream in a small saucepan over medium heat, stirring often, just until it starts to steam around the edges. Don’t let it boil rapidly.
- Pour the hot cream over the chopped chocolate in the bowl. Let it sit for about 5 minutes to let the heat melt the chocolate.
- After 5 minutes, gently whisk the mixture starting from the center and working your way out, until it’s completely smooth and glossy.
- Let the ganache sit at room temperature until it’s cool enough to handle and dip the cupcakes but not so cool that it has hardened. It should be like a thick paint consistency. If it gets too hard, gently warm it slightly. If too thin, let it sit longer or chill for a few minutes, stirring often.
Assemble the Cupcakes:
- Once the cupcakes are totally cool and the pastry cream is nicely chilled and firm, it’s assembly time! Scoop the pastry cream into a piping bag fitted with a filling tip (a long, narrow tip works best).
- Carefully insert the tip into the center of each cupcake and gently squeeze the bag, filling the cupcake until you feel it swell slightly or see a little filling peek out the top.
- Now for the best part – the chocolate dip! Hold the top of each filled cupcake and dip it into the bowl of slightly cooled ganache, twisting gently to get a nice, even coating.
- Place the dipped cupcakes back on the wire rack (place parchment paper underneath to catch drips!) and let the ganache set. This usually takes 30 minutes to an hour at room temperature.
Substitutions & Additions
- Milk for Buttermilk: If you don’t have buttermilk, you can make a quick substitute by putting 2 teaspoons of white vinegar or lemon juice in a liquid measuring cup and adding enough milk to make ⅔ cup. Let it sit for 5-10 minutes before using. The texture might be slightly different, but it works in a pinch!
- Different Chocolate: You could use dark chocolate for a richer ganache, or even milk chocolate if you prefer it sweeter. Adjust the cream slightly if needed to get the right consistency.
- Add a Garnish: A simple swirl of whipped cream or a fresh raspberry on top of the set ganache would be lovely!
- Citrus Zest: Whisk a little lemon or orange zest into the pastry cream while it’s still warm for a subtle bright note.
Tips for Success
- Room Temperature Ingredients: For the cake, make sure your butter, eggs, and buttermilk are at room temperature. This helps everything emulsify properly, resulting in a smoother batter and better cake texture.
- Don’t Overmix the Cake: Mix the dry and wet ingredients just until combined. Overmixing develops the gluten too much, leading to tough cupcakes.
- Stir the Pastry Cream Constantly: Seriously, don’t walk away! Constant stirring is key to a smooth, lump-free pastry cream.
- Cooling is Crucial: Make sure the cupcakes are fully cooled before filling and dipping, and the filling is fully chilled. Warm cupcakes or filling will create a soggy mess.
- Ganache Consistency: If your ganache is too thick for dipping, warm it gently over a double boiler or in short bursts in the microwave, stirring often, until it’s dippable. If it’s too thin, let it cool longer or pop it in the fridge for a few minutes, stirring every few minutes.
How to Store It
Because of the creamy filling, these Boston Cream Pie Cupcakes need to be stored in the refrigerator. Keep them in an airtight container. They are best enjoyed within 2-3 days. The cake can dry out a little over time, but the filling keeps them moist for a bit.
FAQs
Got questions? I’ve got answers!
- Can I make the filling or ganache ahead of time? Absolutely! The pastry cream can be made a day or two in advance and stored in the fridge. The ganache can also be made ahead, stored at room temp (or fridge if hot) and gently re-warmed if needed before dipping.
- What if I don’t have a filling tip? You can still fill them! Use a small knife or apple corer to carefully scoop out a small cavity from the center of the top of each cupcake, then spoon the filling into the hole. Replace the cake piece if you like, or just fill flush with the top.
- My ganache is too hard to dip! What do I do? Just warm it gently! Place the bowl over a pot of simmering water (a double boiler) and stir until it softens to a dippable consistency. Or microwave in 15-second bursts, stirring well after each, until ready.
- Can I use a box cake mix? While this recipe is for homemade cake, yes, you could use a yellow or vanilla box cake mix according to package directions. Just bake them in cupcake liners. Then proceed with making the homemade filling and ganache. The results will be different, but still tasty!
I hope you love these Boston Cream Pie Cupcakes as much as I do! They’re truly a little bite of happiness. Happy baking!

Easy & Classic Boston Cream Pie Cupcakes
Ingredients
Equipment
Method
- Make the Cake:
- Step 1: Preheat your oven to 350°F (175°C) and line a lightly greased muffin pan with cupcake liners.
- Step 2: In your largest mixing bowl, cream together the softened butter and sugar until it's light and fluffy.
- Step 3: Pour in the vanilla extract and give it another quick beat.
- Step 4: Add the eggs one at a time, beating well after you add each one. Scrape down the sides of the bowl if needed.
- Step 5: In a separate medium bowl, whisk together your dry ingredients: flour, baking powder, and salt.
- Step 6: Alternate adding the dry mixture and the buttermilk to the creamed mixture. Start with a third of the flour mixture, beat until just combined. Then add half of the buttermilk, beat again. Repeat with the second third of the flour, the rest of the buttermilk, and finally the last third of the flour. Begin and end with the dry ingredients. Beat just until no dry streaks remain. Do not overmix.
- Step 7: Scoop the batter into your prepared cupcake liners, filling each one about ¾ of the way full.
- Step 8: Bake for 18 to 25 minutes. Check around 18 minutes with a toothpick inserted into the center of a cupcake – it should come out clean when they're done.
- Step 9: Let the cupcakes cool completely on a wire rack.
- Make the Filling (Pastry Cream):
- Step 1: In a medium bowl, beat your egg yolks well.
- Step 2: Gradually whisk in the milk until everything is smooth and well blended.
- Step 3: In a heavy-bottomed saucepan over medium-low heat, mix together the sugar, cornstarch, and salt.
- Step 4: Slowly pour the milk and egg yolk mixture into the saucepan with the dry ingredients, stirring constantly as you pour to prevent any lumps from forming.
- Step 5: Keep cooking over medium-low heat, stirring continuously, for about 20 minutes until it reaches a low boil and thickens nicely, like pudding.
- Step 6: Once thickened, remove from heat. To cool quickly and prevent a skin, set the bottom of the pot in a large bowl filled with ice water, stirring constantly for a few minutes.
- Step 7: Stir in the vanilla extract.
- Step 8: Press plastic wrap directly onto the surface of the filling to prevent a skin. Refrigerate until completely chilled and ready to use.
- Prepare the Ganache:
- Step 1: Put the finely chopped chocolate in a mixing bowl.
- Step 2: Heat heavy cream in a small saucepan over medium heat, stirring often, just until it starts to steam around the edges (do not boil rapidly).
- Step 3: Pour the hot cream over the chopped chocolate. Let it sit for about 5 minutes to melt the chocolate.
- Step 4: Gently whisk the mixture starting from the center and working your way out, until it's completely smooth and glossy.
- Step 5: Let the ganache sit at room temperature until it's cool enough to handle and dip the cupcakes but not hardened (thick paint consistency). Gently warm if too hard, chill if too thin.
- Assemble the Cupcakes:
- Step 1: Once the cupcakes are totally cool and the pastry cream is chilled, scoop the pastry cream into a piping bag fitted with a filling tip (or use a small knife to create a cavity).
- Step 2: Carefully insert the tip into the center of each cupcake and gently squeeze the bag, filling until you feel it swell slightly or see filling peek out the top (or spoon into the cavity).
- Step 3: Hold the top of each filled cupcake and dip it into the bowl of slightly cooled ganache, twisting gently to get a nice, even coating.
- Step 4: Place the dipped cupcakes back on the wire rack (with parchment paper underneath to catch drips) and let the ganache set. This takes 30 minutes to an hour at room temperature.