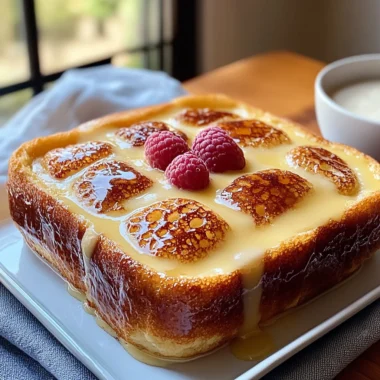
Hey there, my lovely baking friends! Today, we’re diving into a dessert that’s pure magic. You know that feeling when you bite into a classic Boston Cream Pie? That tender cake, smooth pastry cream, and rich chocolate ganache? Well, imagine all that dreamy goodness layered with a creamy, luscious cheesecake. Yep, we’re making a Boston Cream Cheesecake, and let me tell you, it’s a showstopper!
This recipe takes a little time because we’re building layers of deliciousness, but each step is totally manageable, and the result is so unbelievably worth it. It’s the kind of dessert that makes people gasp when you bring it out, and then sigh happily with every single bite. Perfect for birthdays, holidays, or just because you deserve something truly special!
Why You’ll Love This Recipe
- Impressively Delicious: Seriously, the flavor combination is out of this world.
- Layers of Flavor: Vanilla cake base, creamy cheesecake, silky pastry cream, and rich ganache.
- Perfect for Special Occasions: It looks and tastes incredibly fancy.
- Crowd-Pleasing Showstopper: Get ready for compliments!
Ingredients
Gather up your ingredients. Using room temperature ingredients for the cheesecake layer is KEY to getting that super smooth texture, so plan ahead!
For the Vanilla Cake Base:
- 56g (¼ cup) unsalted butter, softened: Make sure it’s truly soft so it creams beautifully.
- 100g (½ cup) granulated sugar: Sweetness for our cake base.
- 60g (¼ cup) sour cream, at room temperature: Adds moisture and tenderness.
- 2 tsp pure vanilla extract: The good stuff for classic flavor.
- 1 large egg, at room temperature: Helps bind everything together.
- 100g (¾ cup) all-purpose flour: Our dry base.
- 1 tsp baking powder: For a little lift.
- 60ml (¼ cup) whole milk, at room temperature: Adds richness and moisture.
For the Creamy Cheesecake Layer:
- 680g (24 oz) full-fat cream cheese, softened: Let this sit out for a few hours until it’s really soft – no cold lumps allowed!
- 3 tbsp all-purpose flour: Helps prevent cracks.
- 150g (¾ cup) granulated sugar: Sweetens the cheesecake.
- 2 tsp pure vanilla extract: Essential cheesecake flavor.
- 1 tsp fine sea salt: Balances the sweetness.
- 120g (½ cup) sour cream, at room temperature: Adds that signature tang and creaminess.
- 300ml (1¼ cups) heavy whipping cream, chilled: Contributes to the rich, creamy texture.
- 4 large eggs, at room temperature: Make sure these aren’t cold!
For the Luxurious Boston Cream Filling:
- 3 egg yolks: Gives richness to the pastry cream.
- 70g (⅓ cup) granulated sugar: Sweetens the cream.
- 30g (2½ tbsp) cornstarch: The thickening agent.
- 360ml (1½ cups) whole milk: The liquid base.
- 21g (1½ tbsp) unsalted butter: Adds richness and gloss at the end.
- 1½ tsp pure vanilla extract: For that classic Boston cream flavor.
For the Decadent Chocolate Ganache Topping:
- 170g (1 cup) semi-sweet chocolate chips or chopped chocolate: Use good quality chocolate for the best ganache.
- 120ml (½ cup) heavy whipping cream: Melts the chocolate into a smooth glaze.
How to Make It
Okay, deep breath! We’re going to take this step by step, and you’ve got this. It’s really just building block by block.
Step 1: Prepare the Cake Base
- Preheat your oven to 175°C (350°F). Get your 8-inch springform pan ready by lining the bottom with parchment paper (just trace the bottom, cut it out, and clamp it in!) and greasing the sides well. This makes it easy to release later.
- In a medium mixing bowl, cream together that softened butter and sugar until it’s light and fluffy. This takes about 4 minutes with an electric mixer.
- Beat in the room temperature sour cream, milk, and vanilla extract until everything is smooth.
- Add the egg and mix just until it’s combined. Don’t overmix!
- Gently fold in the flour and baking powder. Mix only until you no longer see dry streaks of flour. Stop there! Overmixing develops gluten and can make the cake tough.
- Pour this yummy batter into your prepared springform pan. Spread it out evenly.
- Bake for about 25 minutes. You’ll know it’s done when a toothpick inserted into the center comes out clean.
- Let the cake base cool completely in the pan. This is important before we add the cheesecake layer.
Step 2: Create the Cheesecake Layer
- Reduce your oven temperature to 150°C (300°F). Low and slow is the secret to creamy, crack-free cheesecake!
- In a large bowl, using an electric mixer on low speed, beat together the softened cream cheese, sugar, flour, salt, and vanilla until it’s smooth and there are no lumps. Scrape down the sides of the bowl often!
- Add the room temperature sour cream and the chilled heavy cream. Mix on low speed just until they are fully incorporated.
- Now, add the eggs, one at a time. Mix on low speed just until each egg is just combined before adding the next. Again, don’t overmix! Incorporating too much air can cause cracks later.
- Carefully pour the smooth cheesecake batter directly over your cooled vanilla cake layer in the springform pan.
- Time for the water bath! Place your springform pan inside a larger roasting pan. Carefully pour hot water into the roasting pan so it comes halfway up the sides of the cheesecake pan. The water bath helps regulate the temperature, ensures even baking, and prevents the cheesecake from cracking.
- Bake for approximately 90 minutes. The center should look almost set, but still a little jiggly. The edges will look more firm.
- Turn off the oven but leave the cheesecake inside with the door propped open a crack for about 10 minutes. This slow cooling helps prevent sudden temperature changes that can lead to cracks.
- Carefully remove the cheesecake from the water bath. Be cautious, the water is hot!
- Run a thin knife around the edges of the cheesecake to loosen it from the pan sides. This also helps prevent cracking as it cools and shrinks slightly.
- Let the cheesecake cool at room temperature for 1-2 hours. Then, cover it loosely with plastic wrap and refrigerate overnight. Chilling is essential for the cheesecake to fully set.
Step 3: Make the Boston Cream Filling
- While the cheesecake is chilling (or even the day before!), let’s make the luscious pastry cream. In a medium saucepan, whisk together the egg yolks, sugar, and cornstarch until it’s smooth and pale yellow.
- Gradually whisk in the whole milk until you have a smooth liquid.
- Place the saucepan over medium heat and cook, stirring constantly with a whisk or rubber spatula. Make sure to get into the corners of the pan so nothing sticks or burns.
- Keep stirring until the mixture comes to a boil and thickens considerably, about 5-7 minutes.
- Once it’s boiling, continue to cook and stir vigorously for another 2-3 minutes. This ensures the cornstarch is fully cooked and won’t give you a starchy taste. It will be very thick.
- For the smoothest cream possible, strain the hot mixture through a fine-mesh sieve into a clean bowl. This catches any tiny bits of cooked egg or lumps.
- Stir in the butter and vanilla extract until the butter is completely melted and incorporated.
- Cover the surface of the pastry cream directly with plastic wrap. Press the wrap down so it touches the entire surface – this prevents a skin from forming as it cools. Chill the filling completely in the refrigerator until it’s firm enough to spread, at least 2-3 hours, or overnight.
Step 4: Prepare the Chocolate Ganache
- When you’re ready to assemble, make the ganache. Place your chocolate chips or chopped chocolate in a heatproof bowl.
- Heat the heavy cream in a small saucepan or microwave just until it starts to simmer. You should see tiny bubbles around the edge, but not a rolling boil.
- Pour the hot cream over the chocolate and let it sit undisturbed for 2-3 minutes. This allows the heat from the cream to start melting the chocolate.
- Starting in the center of the bowl, gently stir with a whisk or rubber spatula, working your way outwards, until the ganache is completely smooth and glossy.
- Let the ganache cool slightly at room temperature until it’s thickened but still pourable. It should coat the back of a spoon nicely.
Step 5: Assemble the Cheesecake
- Carefully remove the chilled cheesecake from the springform pan. You might need to gently loosen the edges again if it stuck while chilling.
- Transfer the cheesecake to your serving plate or stand.
- Spread the chilled Boston cream filling evenly over the top of the cheesecake layer.
- Pop the cheesecake back in the refrigerator for about 10 minutes. This helps the pastry cream set up a bit more before you add the ganache.
- Pour the slightly cooled ganache over the top of the pastry cream layer. Let it naturally drizzle down the sides – it looks beautiful!
- Return the finished cheesecake to the refrigerator and chill for at least 2 more hours. This allows the ganache to set and makes for clean slicing.

Substitutions & Additions
Want to mix things up or need a swap? Here are a few ideas:
- Chocolate: Use dark chocolate for a less sweet ganache, or even white chocolate for a different look (though not classic Boston Cream!).
- Extracts: Swap some vanilla for almond extract in the cake or pastry cream for a different nuance.
- Gluten-Free? I haven’t tested it myself, but you could try a good quality all-purpose gluten-free flour blend for the cake base and cheesecake layers. Make sure the blend contains a binder like xanthan gum.
- Additions: Top the finished cheesecake with fresh berries (strawberries or raspberries are lovely), chocolate shavings, or even some whipped cream just before serving.
Tips for Success
Cheesecake can feel intimidating, but these tips will help you nail it:
- Room Temperature Ingredients are Non-Negotiable: Especially for the cream cheese and eggs in the cheesecake layer. Cold ingredients won’t mix smoothly, leaving you with lumps.
- Don’t Overmix: Overmixing incorporates too much air into the cheesecake batter, which expands in the oven and then collapses, causing cracks. Mix on low speed just until combined.
- The Water Bath is Your Friend: Yes, it’s an extra step, but it creates a gentle, humid environment in the oven that helps the cheesecake bake evenly and prevents the top from drying out and cracking.
- Cooling is Key: Don’t rush the cooling process! Leaving the cheesecake in the turned-off oven and then cooling it completely at room temperature before chilling helps prevent temperature shock and cracks.
- Chill Overnight: This is essential for the cheesecake to set properly. Trying to slice it too early will result in a gooey mess.
- Prep Ahead: You can make the cake base, pastry cream, and even the ganache a day in advance. Store the cake base wrapped at room temp, and the pastry cream and ganache (covered well) in the fridge. Reheat the ganache gently if needed before pouring.
How to Store It
This cheesecake needs to be stored in the refrigerator. Keep it covered loosely with plastic wrap or in an airtight container. It will last for 4-5 days in the fridge. I don’t recommend freezing a cheesecake with a pastry cream layer, as the texture of the cream can change upon thawing.
FAQs
Got questions? Let’s see if I can help!
Q: Why do I need a water bath for the cheesecake?
A: A water bath creates a moist, even cooking environment. This helps the cheesecake bake gently and prevents the edges from cooking too quickly while the center is still raw. The result is a creamier texture and a much lower chance of cracks on the surface.
Q: Can I make this cheesecake ahead of time?
A: Absolutely! This cheesecake is actually best when made ahead. You can bake the cake base and cheesecake layers the day before, refrigerating the cheesecake overnight as instructed. You can also make the Boston cream filling and chocolate ganache a day in advance and store them in the fridge. Assemble the cheesecake the day you plan to serve it, or a few hours before, to allow the ganache to set.
Q: My cheesecake cracked! What happened?
A: Don’t worry, it happens! Common culprits include overmixing the batter (adding too much air), using cold ingredients, overbaking, or cooling too quickly (skipping the water bath, taking it out of the oven too soon, or not letting it cool at room temp first). It will still taste amazing even with a crack, and you’re covering it with delicious pastry cream and ganache anyway!
Q: How do I get clean slices?
A: Make sure the cheesecake is well chilled (at least 2 hours after assembly, preferably longer). Use a sharp knife dipped in hot water and wiped dry between each slice.
I hope you give this stunning Boston Cream Cheesecake a try! It’s truly a labor of love, but one that pays off in the most delicious way imaginable. Happy baking!
Ultimate Decadent Boston Cream Cheesecake
Ingredients
Equipment
Method
- Step 1: Prepare the Cake BasePreheat your oven to 175°C (350°F). Get your 8-inch springform pan ready by lining the bottom with parchment paper and greasing the sides well.In a medium mixing bowl, cream together the softened butter and sugar until it's light and fluffy (about 4 minutes with an electric mixer).Beat in the room temperature sour cream, milk, and vanilla extract until everything is smooth.Add the egg and mix just until it's combined. Don't overmix!Gently fold in the flour and baking powder. Mix only until you no longer see dry streaks of flour. Stop there!Pour this batter into your prepared springform pan and spread it out evenly.Bake for about 25 minutes, or until a toothpick inserted into the center comes out clean.Let the cake base cool completely in the pan before adding the cheesecake layer.
- Step 2: Create the Cheesecake LayerReduce your oven temperature to 150°C (300°F). Low and slow is key!In a large bowl, using an electric mixer on low speed, beat together the softened cream cheese, sugar, flour, salt, and vanilla until it's smooth with no lumps. Scrape down the sides of the bowl often!Add the room temperature sour cream and the chilled heavy cream. Mix on low speed just until they are fully incorporated.Now, add the eggs, one at a time. Mix on low speed just until each egg is just combined before adding the next. Don't overmix!Carefully pour the smooth cheesecake batter directly over your cooled vanilla cake layer in the springform pan.Place your springform pan inside a larger roasting pan for a water bath. Carefully pour hot water into the roasting pan so it comes halfway up the sides of the cheesecake pan.Bake for approximately 90 minutes. The center should look almost set, but still a little jiggly; the edges will look more firm.Turn off the oven but leave the cheesecake inside with the door propped open a crack for about 10 minutes.Carefully remove the cheesecake from the water bath.Run a thin knife around the edges of the cheesecake to loosen it from the pan sides.Let the cheesecake cool at room temperature for 1-2 hours. Then, cover it loosely with plastic wrap and refrigerate overnight to fully set.
- Step 3: Make the Boston Cream FillingWhile the cheesecake is chilling (or even the day before!), make the pastry cream. In a medium saucepan, whisk together the egg yolks, sugar, and cornstarch until smooth and pale yellow.Gradually whisk in the whole milk until you have a smooth liquid.Place the saucepan over medium heat and cook, stirring constantly with a whisk or rubber spatula, ensuring you get into the corners of the pan.Keep stirring until the mixture comes to a boil and thickens considerably (about 5-7 minutes).Once boiling, continue to cook and stir vigorously for another 2-3 minutes to ensure the cornstarch is fully cooked. It will be very thick.For the smoothest cream, strain the hot mixture through a fine-mesh sieve into a clean bowl.Stir in the butter and vanilla extract until completely melted and incorporated.Cover the surface of the pastry cream directly with plastic wrap to prevent a skin from forming as it cools. Chill the filling completely in the refrigerator until it's firm enough to spread, at least 2-3 hours, or overnight.
- Step 4: Prepare the Chocolate GanacheWhen you're ready to assemble, make the ganache. Place your chocolate chips or chopped chocolate in a heatproof bowl.Heat the heavy cream in a small saucepan or microwave just until it starts to simmer (tiny bubbles around the edge).Pour the hot cream over the chocolate and let it sit undisturbed for 2-3 minutes.Starting in the center, gently stir with a whisk or rubber spatula, working outwards, until the ganache is completely smooth and glossy.Let the ganache cool slightly at room temperature until it's thickened but still pourable and coats the back of a spoon nicely.
- Step 5: Assemble the CheesecakeCarefully remove the chilled cheesecake from the springform pan. Gently loosen the edges again if needed.Transfer the cheesecake to your serving plate or stand.Spread the chilled Boston cream filling evenly over the top of the cheesecake layer.Pop the cheesecake back in the refrigerator for about 10 minutes to help the pastry cream set up before adding the ganache.Pour the slightly cooled ganache over the top of the pastry cream layer. Let it naturally drizzle down the sides.Return the finished cheesecake to the refrigerator and chill for at least 2 more hours to allow the ganache to set and make for clean slicing.