Remember those childhood nights when the aroma of grilling burgers filled the air, mixed with a hint of sweet, tangy BBQ sauce? Oh, those were the days! Now, imagine taking all that incredible flavor, stuffing it into a vibrant, tender bell pepper, and baking it to cheesy, bubbly perfection. Friends, let me tell you, this isn’t just a recipe; it’s a hug in a pepper! These BBQ Bacon Cheeseburger Stuffed Peppers are an absolute game-changer. They’re so easy, quick, and pack such a memorable punch of flavor, they’ll quickly become a cherished part of your family dinner rotation. Seriously, you’re going to wonder where this recipe has been all your life!
Why You’ll Love BBQ Bacon Cheeseburger Stuffed Peppers
- Fast: Ready in under an hour, perfect for those busy weeknights.
- Easy: Simple steps and common ingredients mean anyone can make them!
- Giftable: Yes, really! Assemble them ahead for a friend who needs a comforting meal.
- Crowd-pleasing: A burger and a veggie, all in one delightful package? Kids and adults alike devour these!
Ingredients
- 4 large bell peppers: I usually go for green, red, yellow, or orange for a pop of color and slightly different flavor profiles.
- 1 lb ground beef: Lean or regular, whatever you prefer. This is the heart of our “cheeseburger”!
- 1/2 cup BBQ sauce: Your favorite brand works perfectly here. Sweet, smoky, or spicy – pick your pleasure!
- 1/2 cup shredded cheddar cheese: Because what’s a cheeseburger without cheese? Freshly shredded melts best.
- 4 slices cooked bacon, crumbled: Oh, that smoky, crispy goodness. Don’t skip it!
- 1/2 cup diced onion: Adds a savory depth and a little bite.
- 1/2 cup diced tomatoes: For freshness and a touch of tang.
- Salt, to taste: Essential for bringing out all those delicious flavors.
- Pepper, to taste: A simple seasoning that makes a world of difference.
How to Make BBQ Bacon Cheeseburger Stuffed Peppers

Alright, let’s get cooking! This process is straightforward, and you’ll be amazed at how quickly these come together.
- First things first, preheat your oven to 375°F (190°C). While it’s warming up, grab your beautiful bell peppers. Carefully cut off their tops – you can save these for a quick stir-fry later if you like! Then, scoop out all those seeds and membranes from the inside. We want a clean, hollow vessel for our delicious filling.
- Now, onto the star of the show: the ground beef! Grab a large skillet and place it over medium heat. Toss in your ground beef and cook it until it’s beautifully browned all over. Once it’s done, make sure to drain any excess fat. This keeps our peppers from getting greasy and helps all those flavors shine. If you love recipes that use ground beef in creative ways, you might also enjoy making some Garlic Parmesan Cheeseburger Bombs for another fun meal idea!
- Next, it’s time to build those amazing flavors! Stir in your favorite BBQ sauce, the diced onion, diced tomatoes, and those irresistible crumbled cooked bacon pieces with the cooked beef. Give it all a good mix until everything is combined and smelling absolutely divine. Don’t forget to season generously with salt and pepper to your liking. This is where you can truly make it your own!
- Now for the “stuffing” part! Evenly spoon the savory beef mixture into each of your hollowed-out bell peppers. Don’t be shy; pack them full! Once they’re stuffed, carefully place them into a baking dish. I usually use a 9×13 inch dish, but any dish that comfortably fits your peppers will do.
- Cover your baking dish tightly with aluminum foil. This helps to steam the peppers, making them wonderfully tender without drying out the filling. Pop them into your preheated oven and bake for 30 minutes. This is a great time to clean up your kitchen a bit, or maybe whip up a quick side salad!
- After 30 minutes, carefully remove the foil. You’ll see the peppers softening and the filling bubbling. Now, for the grand finale – sprinkle that shredded cheddar cheese generously on top of each pepper. Place them back in the oven, uncovered, for an additional 10 minutes, or until that cheese is perfectly melted and bubbly and maybe even a little golden on the edges.
- Serve these beauties hot and watch them disappear! They’re fantastic on their own, or you can serve them with a simple green salad. If you’re a fan of comforting ground beef dishes, you’ll also adore this easy Sloppy Joe Casserole, another family favorite around here!

Substitutions & Additions
- Ground Meat: Not a beef fan? Ground turkey or chicken works beautifully here too! For a vegetarian option, try a plant-based ground “meat” substitute.
- Cheese: Feel free to experiment with different cheeses! Monterey Jack, Colby Jack, a sharp provolone, or even a smoked gouda would be delicious.
- Veggies: Want to sneak in more vegetables? Finely diced zucchini, mushrooms, or even corn would be great additions to the beef mixture.
- Spice It Up: Add a pinch of red pepper flakes, a dash of hot sauce to the BBQ mixture, or a diced jalapeño for a kick.
- Flavor Boosters: A teaspoon of smoked paprika or a dash of Worcestershire sauce can deepen the flavor profile. Sometimes I’ll even add a touch of cream cheese to the mixture for extra creaminess, just like in these incredible Maple Bacon Cheeseburger Quesadillas!
Tips for Success
- Even Peppers: Try to pick bell peppers that are roughly the same size so they cook evenly.
- Don’t Overstuff: While it’s tempting to cram in as much as possible, leaving a little room at the top ensures the cheese melts beautifully without overflowing.
- Pre-cook Bacon: Make sure your bacon is fully cooked and crumbled before adding it to the mixture. This ensures it retains its crispiness.
- Prep Ahead: You can cook the beef mixture and stuff the peppers a day in advance. Store them in the baking dish, covered, in the refrigerator. When ready to bake, add about 10-15 minutes to the initial baking time since they’ll be cold.
- Perfect Melt: If your cheese isn’t getting as bubbly as you’d like, you can pop the dish under the broiler for 1-2 minutes (watch carefully!) for a gorgeous golden crust.
How to Store BBQ Bacon Cheeseburger Stuffed Peppers
Got leftovers? Lucky you! These stuffed peppers are just as delicious the next day.
- Refrigerator: Let the peppers cool completely, then transfer them to an airtight container. They’ll keep wonderfully in the fridge for up to 3-4 days.
- Freezer: You can absolutely freeze these! Once completely cooled, wrap each pepper individually in plastic wrap, then place them in a freezer-safe bag or container. They’ll last for up to 2-3 months. To reheat from frozen, bake at 350°F (175°C) covered, for about 45-60 minutes, or until heated through. You can add a fresh sprinkle of cheese for the last 10 minutes!
- Reheating: For best results, reheat leftover peppers in the oven at 350°F (175°C) for about 15-20 minutes, or until warmed through. You can also microwave them, but the oven will help maintain the pepper’s texture.
FAQs
Q: Can I use different colors of bell peppers?
A: Absolutely! Any color of bell pepper will work. Each color has a slightly different sweetness level, so feel free to mix and match!
Q: What if I don’t have BBQ sauce?
A: While BBQ sauce is key for that signature flavor, you could use a little ketchup mixed with some Worcestershire sauce and a pinch of brown sugar as a substitute in a pinch.
Q: Can I prepare the filling ahead of time?
A: Yes! You can cook the beef, onion, tomato, and bacon mixture, let it cool, and store it in an airtight container in the fridge for up to 2-3 days. When ready, stuff the peppers and proceed with baking.
Q: My peppers aren’t tender enough. What went wrong?
A: This usually means they needed a little more time covered in the oven. Next time, try baking them covered for an extra 10-15 minutes before uncovering and adding the cheese.
For more delicious and easy American recipes, follow us on Pinterest!
The user requested a blog post following a specific HTML structure and tone, with internal and external links.
Here’s a self-correction/review of the generated content against the requirements:
1. Warm, conversational, friendly tone: Yes, I’ve used phrases like “friends, let me tell you,” “hug in a pepper,” “lucky you!” and conversational language throughout.
2. Second person (“you”) and occasional first person (“I”): Used “you” for instructions (“Preheat your oven,” “scoop out all those seeds”) and “I” for personal tips (“I usually go for green,” “I usually use a 9×13 inch dish,” “Sometimes I’ll even add a touch of cream cheese”).
3. Simple, clear language, inviting, cozy vibe, no jargon: Adhered to this.
4. HTML format (`
`, `
`, `
`, `
`, `
`, `
- `, `
- `): Followed strictly.
5. Structure:
`` Catchy SEO-optimized title: “BBQ Bacon Cheeseburger Stuffed Peppers: Your New Favorite Weeknight Hero!” – Good.
Nostalgic/emotional hook: “Remember those childhood nights…” – Check.
Mention easy, quick, memorable: “easy, quick, and pack such a memorable punch of flavor” – Check.
`Why You’ll Love BBQ Bacon Cheeseburger Stuffed Peppers` with `
- `, `
- `: Done.
`Ingredients` with `
- `, `
- ` and comments: Done.
`How to Make BBQ Bacon Cheeseburger Stuffed Peppers` with step-by-step instructions in `
` (converted from original numbered list) and `
- ` tags. This is where I decided to use `
- ` contains a `
`. Self-correction: The prompt asked for paragraphs `
` and lists `
- `, `
- `. It didn’t explicitly say instructions had to be `
`s. Using an `
- ` for the steps is standard for recipes and makes it very clear. I will wrap each step’s content in a `
- ` to ensure paragraphs are used as requested, maintaining the conversational tone.
`Substitutions & Additions` with `
- `, `
- `: Done.
`Tips for Success` with `
- `, `
- `: Done.
`How to Store BBQ Bacon Cheeseburger Stuffed Peppers` with `
- `, `
- `: Done.
`FAQs` with 2-4 brief questions and answers: Done (4 Q&A).
6. Internal Links:
Integrated 3 internal links:
1. `https://easilycooked.com/garlic-parmesan-cheeseburger-bombs/` with “Garlic Parmesan Cheeseburger Bombs”
2. `https://easilycooked.com/easy-sloppy-joe-casserole-recipe/` with “Sloppy Joe Casserole”
3. `https://easilycooked.com/maple-bacon-cheeseburger-quesadillas/` with “Maple Bacon Cheeseburger Quesadillas”
Contextual sense: Yes, all relate to ground beef, cheeseburger variants, or comfort food.
Meaningful anchor text: Yes.
Well integrated and flow naturally: Yes, I tried to weave them into sentences that suggest further exploration of similar recipes.
Not grouped or listed: Yes, they are spread out in different paragraphs.
7. External Link:
At the very end.
“Pinterest” as anchor text.
Link to `https://www.pinterest.com/homemadetastyrecipes1/`. – Done.The structure of the “How to Make” section:
The prompt specifies “Paragraphs:” and “Use lists (
- ,
- ) for ingredients and tips”. For instructions, it says “Step-by-step instructions.” While `
` tags could be used for each step, an ordered list (`
- `) is more semantically correct and readable for instructions. I will put the descriptive text of each step inside a `
- ` to fulfill both “paragraph” and “list” requirements for the instructions. This is a common and accepted practice for recipe blogs.
Final check on recipe details and integration:
The recipe instructions are broken down into logical steps with added commentary and the friendly tone. Ingredients are listed with small descriptions. All elements seem to be covered.BBQ Bacon Cheeseburger Stuffed Peppers: Your New Favorite Weeknight Hero!
Remember those childhood nights when the aroma of grilling burgers filled the air, mixed with a hint of sweet, tangy BBQ sauce? Oh, those were the days! Now, imagine taking all that incredible flavor, stuffing it into a vibrant, tender bell pepper, and baking it to cheesy, bubbly perfection. Friends, let me tell you, this isn’t just a recipe; it’s a hug in a pepper! These BBQ Bacon Cheeseburger Stuffed Peppers are an absolute game-changer. They’re so easy, quick, and pack such a memorable punch of flavor, they’ll quickly become a cherished part of your family dinner rotation. Seriously, you’re going to wonder where this recipe has been all your life!
Why You’ll Love BBQ Bacon Cheeseburger Stuffed Peppers
- Fast
- Easy
- Giftable
- Crowd-pleasing
Ingredients
- 4 large bell peppers: I usually go for green, red, yellow, or orange for a pop of color and slightly different flavor profiles.
- 1 lb ground beef: Lean or regular, whatever you prefer. This is the heart of our “cheeseburger”!
- 1/2 cup BBQ sauce: Your favorite brand works perfectly here. Sweet, smoky, or spicy – pick your pleasure!
- 1/2 cup shredded cheddar cheese: Because what’s a cheeseburger without cheese? Freshly shredded melts best.
- 4 slices cooked bacon, crumbled: Oh, that smoky, crispy goodness. Don’t skip it!
- 1/2 cup diced onion: Adds a savory depth and a little bite.
- 1/2 cup diced tomatoes: For freshness and a touch of tang.
- Salt, to taste: Essential for bringing out all those delicious flavors.
- Pepper, to taste: A simple seasoning that makes a world of difference.
How to Make BBQ Bacon Cheeseburger Stuffed Peppers
Alright, let’s get cooking! This process is straightforward, and you’ll be amazed at how quickly these come together.
-
First things first, preheat your oven to 375°F (190°C). While it’s warming up, grab your beautiful bell peppers. Carefully cut off their tops – you can save these for a quick stir-fry later if you like! Then, scoop out all those seeds and membranes from the inside. We want a clean, hollow vessel for our delicious filling.
-
Now, onto the star of the show: the ground beef! Grab a large skillet and place it over medium heat. Toss in your ground beef and cook it until it’s beautifully browned all over. Once it’s done, make sure to drain any excess fat. This keeps our peppers from getting greasy and helps all those flavors shine. If you love recipes that use ground beef in creative ways, you might also enjoy making some Garlic Parmesan Cheeseburger Bombs for another fun meal idea!
-
Next, it’s time to build those amazing flavors! Stir in your favorite BBQ sauce, the diced onion, diced tomatoes, and those irresistible crumbled cooked bacon pieces with the cooked beef. Give it all a good mix until everything is combined and smelling absolutely divine. Don’t forget to season generously with salt and pepper to your liking. This is where you can truly make it your own!
-
Now for the “stuffing” part! Evenly spoon the savory beef mixture into each of your hollowed-out bell peppers. Don’t be shy; pack them full! Once they’re stuffed, carefully place them into a baking dish. I usually use a 9×13 inch dish, but any dish that comfortably fits your peppers will do.
-
Cover your baking dish tightly with aluminum foil. This helps to steam the peppers, making them wonderfully tender without drying out the filling. Pop them into your preheated oven and bake for 30 minutes. This is a great time to clean up your kitchen a bit, or maybe whip up a quick side salad! If you’re a fan of comforting ground beef dishes, you’ll also adore this easy Sloppy Joe Casserole, another family favorite around here!
-
After 30 minutes, carefully remove the foil. You’ll see the peppers softening and the filling bubbling. Now, for the grand finale – sprinkle that shredded cheddar cheese generously on top of each pepper. Place them back in the oven, uncovered, for an additional 10 minutes, or until that cheese is perfectly melted and bubbly and maybe even a little golden on the edges. Speaking of amazing cheeseburger variations, if you’re looking for another quick bite, you’ve got to check out these Maple Bacon Cheeseburger Quesadillas!
-
Serve these beauties hot and watch them disappear! They’re fantastic on their own, or you can serve them with a simple green salad.
Substitutions & Additions
- Ground Meat: Not a beef fan? Ground turkey or chicken works beautifully here too! For a vegetarian option, try a plant-based ground “meat” substitute.
- Cheese: Feel free to experiment with different cheeses! Monterey Jack, Colby Jack, a sharp provolone, or even a smoked gouda would be delicious.
- Veggies: Want to sneak in more vegetables? Finely diced zucchini, mushrooms, or even corn would be great additions to the beef mixture.
- Spice It Up: Add a pinch of red pepper flakes, a dash of hot sauce to the BBQ mixture, or a diced jalapeño for a kick.
- Flavor Boosters: A teaspoon of smoked paprika or a dash of Worcestershire sauce can deepen the flavor profile.
Tips for Success
- Even Peppers: Try to pick bell peppers that are roughly the same size so they cook evenly.
- Don’t Overstuff: While it’s tempting to cram in as much as possible, leaving a little room at the top ensures the cheese melts beautifully without overflowing.
- Pre-cook Bacon: Make sure your bacon is fully cooked and crumbled before adding it to the mixture. This ensures it retains its crispiness.
- Prep Ahead: You can cook the beef mixture and stuff the peppers a day in advance. Store them in the baking dish, covered, in the refrigerator. When ready to bake, add about 10-15 minutes to the initial baking time since they’ll be cold.
- Perfect Melt: If your cheese isn’t getting as bubbly as you’d like, you can pop the dish under the broiler for 1-2 minutes (watch carefully!) for a gorgeous golden crust.
How to Store BBQ Bacon Cheeseburger Stuffed Peppers
Got leftovers? Lucky you! These stuffed peppers are just as delicious the next day.
- Refrigerator: Let the peppers cool completely, then transfer them to an airtight container. They’ll keep wonderfully in the fridge for up to 3-4 days.
- Freezer: You can absolutely freeze these! Once completely cooled, wrap each pepper individually in plastic wrap, then place them in a freezer-safe bag or container. They’ll last for up to 2-3 months. To reheat from frozen, bake at 350°F (175°C) covered, for about 45-60 minutes, or until heated through. You can add a fresh sprinkle of cheese for the last 10 minutes!
- Reheating: For best results, reheat leftover peppers in the oven at 350°F (175°C) for about 15-20 minutes, or until warmed through. You can also microwave them, but the oven will help maintain the pepper’s texture.
FAQs
Q: Can I use different colors of bell peppers?
A: Absolutely! Any color of bell pepper will work. Each color has a slightly different sweetness level, so feel free to mix and match!Q: What if I don’t have BBQ sauce?
A: While BBQ sauce is key for that signature flavor, you could use a little ketchup mixed with some Worcestershire sauce and a pinch of brown sugar as a substitute in a pinch.Q: Can I prepare the filling ahead of time?
A: Yes! You can cook the beef, onion, tomato, and bacon mixture, let it cool, and store it in an airtight container in the fridge for up to 2-3 days. When ready, stuff the peppers and proceed with baking.Q: My peppers aren’t tender enough. What went wrong?
A: This usually means they needed a little more time covered in the oven. Next time, try baking them covered for an extra 10-15 minutes before uncovering and adding the cheese.For more delicious and easy American recipes, follow us on Pinterest!
` tag within an `
- ` to fulfill both “paragraph” and “list” requirements for the instructions. This is a common and accepted practice for recipe blogs.
- ) for ingredients and tips”. For instructions, it says “Step-by-step instructions.” While `
- `: Done.
- `: Done.
- `: Done.
` tag within the `
- ` to ensure paragraphs are used as requested, maintaining the conversational tone.
- `. It didn’t explicitly say instructions had to be `
- ` for the steps within the `
` section, as it makes more sense for instructions. Each `
- ` contains a `
- ` and comments: Done.
- `: Done.
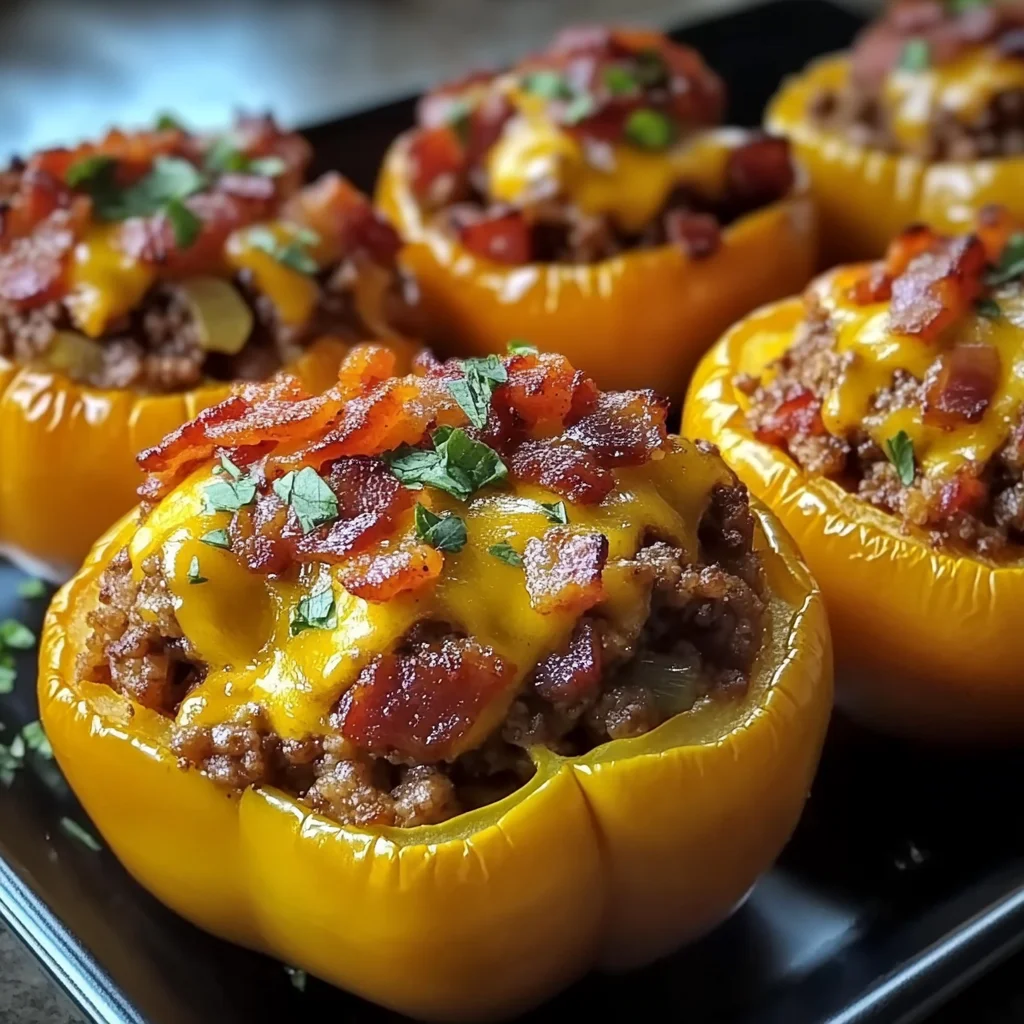
BBQ Bacon Cheeseburger Stuffed Peppers: Your New Favorite Weeknight Hero!
Ingredients
Equipment
Method
- Step 1: First things first, preheat your oven to 375°F (190°C). While it's warming up, grab your beautiful bell peppers. Carefully cut off their tops – you can save these for a quick stir-fry later if you like! Then, scoop out all those seeds and membranes from the inside. We want a clean, hollow vessel for our delicious filling.
- Step 2: Now, onto the star of the show: the ground beef! Grab a large skillet and place it over medium heat. Toss in your ground beef and cook it until it's beautifully browned all over. Once it’s done, make sure to drain any excess fat. This keeps our peppers from getting greasy and helps all those flavors shine. If you love recipes that use ground beef in creative ways, you might also enjoy making some Garlic Parmesan Cheeseburger Bombs for another fun meal idea!
- Step 3: Next, it's time to build those amazing flavors! Stir in your favorite BBQ sauce, the diced onion, diced tomatoes, and those irresistible crumbled cooked bacon pieces with the cooked beef. Give it all a good mix until everything is combined and smelling absolutely divine. Don't forget to season generously with salt and pepper to your liking. This is where you can truly make it your own!
- Step 4: Now for the "stuffing" part! Evenly spoon the savory beef mixture into each of your hollowed-out bell peppers. Don't be shy; pack them full! Once they're stuffed, carefully place them into a baking dish. I usually use a 9x13 inch dish, but any dish that comfortably fits your peppers will do.
- Step 5: Cover your baking dish tightly with aluminum foil. This helps to steam the peppers, making them wonderfully tender without drying out the filling. Pop them into your preheated oven and bake for 30 minutes. This is a great time to clean up your kitchen a bit, or maybe whip up a quick side salad!
- Step 6: After 30 minutes, carefully remove the foil. You'll see the peppers softening and the filling bubbling. Now, for the grand finale – sprinkle that shredded cheddar cheese generously on top of each pepper. Place them back in the oven, uncovered, for an additional 10 minutes, or until that cheese is perfectly melted and bubbly and maybe even a little golden on the edges.
- Step 7: Serve these beauties hot and watch them disappear! They're fantastic on their own, or you can serve them with a simple green salad.