Oh, friends! There’s just something magical about those first crisp days of fall, isn’t there? The leaves start to turn, the air gets that little nip, and suddenly all I can think about are warm, comforting treats loaded with apples and cinnamon. Remember visiting those local apple orchards or maybe hitting up the farmer’s market? Finding that perfect apple pastry was always the highlight!
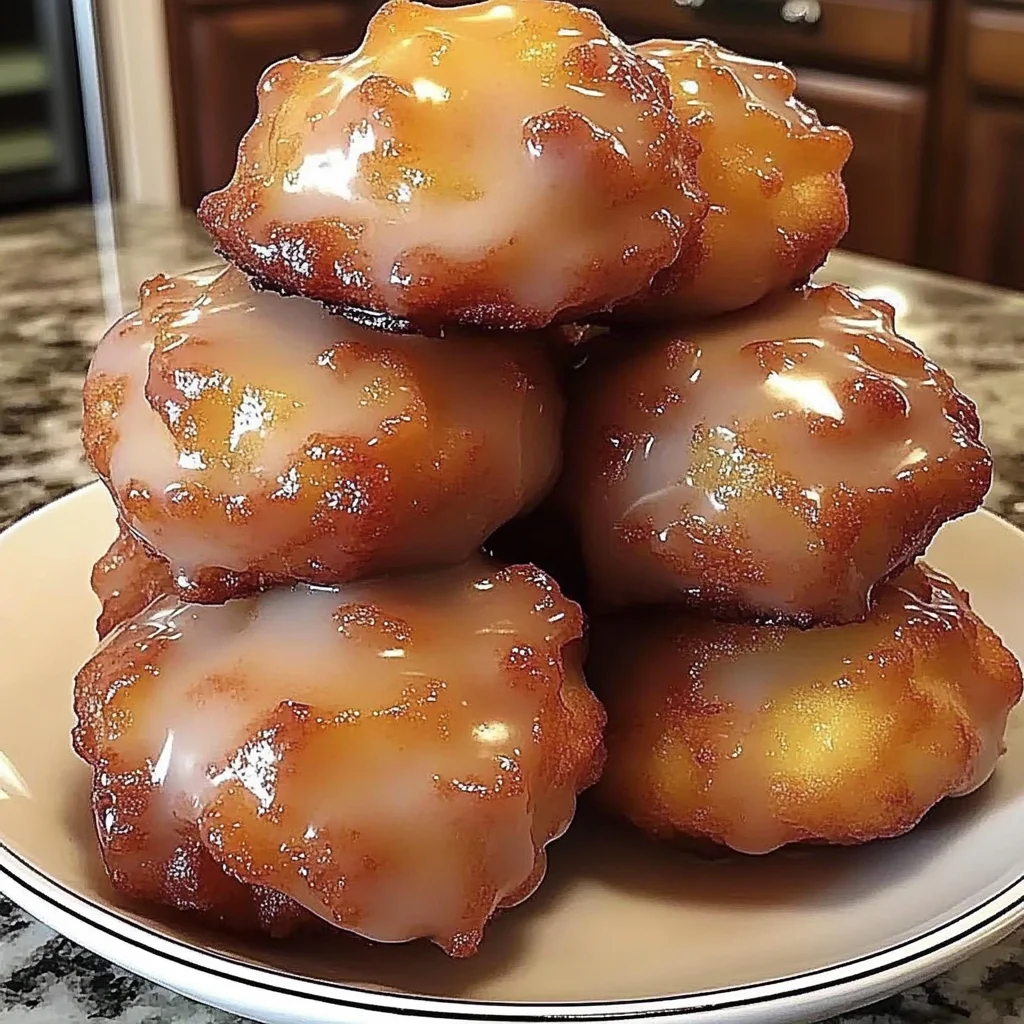
Well, what if I told you you could capture that same cozy, nostalgic feeling right in your own kitchen, without a deep fryer in sight? Yes, you heard me! These Baked Apple Fritters are everything you love about traditional fritters – soft, cakey centers bursting with tender apple pieces, and a sweet, dreamy glaze – but they’re baked to golden perfection. They’re ridiculously easy, surprisingly quick, and trust me, your kitchen is about to smell like pure heaven.
Why You’ll Love This Recipe
- Fast: From mixing bowl to warm fritter in your hand in under 30 minutes!
- Easy: No complicated techniques here – just simple mixing and baking. Perfect for bakers of all skill levels.
- Giftable: Package a few up with a ribbon, and you’ve got the sweetest homemade gift for a neighbor or friend.
- Crowd-pleasing: Who can say no to a warm, glazed apple fritter? These disappear fast!
Ingredients
Gather ’round, let’s talk about the simple stars of our show!
- 2 large apples: Pick your favorites! I love using a mix of sweet (like Honeycrisp or Gala) and tart (like Granny Smith) for the best flavor contrast. Make sure they’re peeled, cored, and chopped into nice bite-sized pieces – not too big, not too small.
- 2 cups all-purpose flour: Just your standard pantry staple! It gives our fritters their perfect cakey structure.
- 1/2 cup granulated sugar: For sweetness in the batter.
- 2 teaspoons baking powder: This is our leavening agent, helping the fritters puff up beautifully in the oven.
- 1/2 teaspoon salt: Just a touch to balance the sweetness and enhance all those delicious flavors.
- 1 teaspoon ground cinnamon: The quintessential apple spice! You can add a little more if you’re a cinnamon lover like me.
- 2 large eggs: Our binders, helping everything stay together.
- 3/4 cup milk: Adds moisture to the batter. Any milk will work here!
- 1 teaspoon vanilla extract: A little splash of vanilla just makes everything taste better.
- 2 tablespoons unsalted butter, melted: Melted butter adds richness and tenderness that oil just can’t replicate.
- 1 cup powdered sugar: The base for our simple, sweet glaze.
- 2 tablespoons milk (for glaze): Thins out the powdered sugar to make a pourable glaze.
- 1/2 teaspoon vanilla extract (for glaze): Adds another layer of flavor to that glorious glaze.
How to Make It
Alright, apron on? Let’s bake some magic!
Step 1: Get the Oven Ready. First things first, let’s preheat that oven! Crank it up to 375°F (190°C). While it’s heating, grab a sturdy baking sheet and line it with parchment paper. This makes cleanup a breeze, and prevents sticking. If you don’t have parchment, you can lightly grease the sheet.
Step 2: Whisk the Dry Stuff. In a big mixing bowl – the biggest you have! – dump in your flour, granulated sugar, baking powder, salt, and cinnamon. Give it a good whisk. We’re just getting everything evenly distributed and breaking up any little clumps.
Step 3: Mix the Wet Ingredients. In a separate bowl, crack those two eggs and give them a quick beat. Then, pour in your milk, vanilla extract, and that lovely melted butter. Stir it all together until it looks well combined. It’s okay if there are still tiny bits of butter; it will incorporate in the next step.
Step 4: Combine Wet and Dry. Now, pour the wet ingredients from the second bowl into the bowl with your dry ingredients. Grab a spatula or a wooden spoon and gently stir. Mix just until you no longer see any dry flour streaks. This is important! Don’t overmix, or your fritters can become tough. A few small lumps are totally fine!
Step 5: Fold in the Apples. This is where the magic happens! Add all those chopped apple pieces to the batter. Use your spatula to gently fold them in. You want to make sure they’re pretty evenly spread throughout the batter, so every bite has apple goodness.
Step 6: Scoop onto the Sheet. Now it’s time to shape our fritters. They won’t be perfectly round like dropped cookies, and that’s part of their charm! Use a large spoon or, even better, an ice cream scoop (I find this makes them more uniformly sized) to drop portions of the batter onto your prepared baking sheet. Leave about 2 inches between each one so they have room to spread a tiny bit and bake evenly.
Step 7: Bake! Pop that baking sheet into your preheated oven. Bake for 15 to 20 minutes. You’ll know they’re ready when they look golden brown, especially around the edges, and a toothpick inserted into the center of one comes out clean. Baking time can vary depending on your oven and how big you scooped your fritters, so keep an eye on them!
Step 8: Make the Glaze. While those beauties are baking and filling your kitchen with amazing smells, whip up the glaze. In a small bowl, whisk together the powdered sugar, the two tablespoons of milk, and the half teaspoon of vanilla extract. Keep whisking until it’s super smooth and free of lumps. If it seems too thick, add milk just a tiny drop at a time until it’s the perfect drizzling consistency. Too thin? Add a little more powdered sugar.
Step 9: Cool (a Little!). Once the fritters are done, take them out of the oven. Let them hang out on the baking sheet for about 5 minutes. They need to cool just enough to handle and to let the glaze set nicely, but you still want them warm so the glaze melts onto them slightly.
Step 10: Drizzle that Glaze! Now for the grand finale! You can use a spoon to generously drizzle the glaze over each warm fritter. For a prettier look, you could even transfer the glaze to a small ziploc bag, snip off a tiny corner, and pipe it on. Get creative!
Step 11: Let the Glaze Set & Enjoy! Give the glaze a few minutes to firm up a bit before you dive in. Then, grab a warm fritter (or two!) and enjoy the cozy deliciousness you just created!
Substitutions & Additions
Want to put your own spin on these? Go for it! Here are some ideas:
- Different Spices: Add a pinch of nutmeg, allspice, or ground ginger to the batter for extra warmth.
- Other Fruits: Try substituting some of the apple with chopped pears or even firm peaches (if in season!).
- Add-ins: Fold in a handful of chopped walnuts or pecans with the apples for some crunch. A sprinkle of mini chocolate chips? Why not!
- Gluten-Free? I haven’t personally tested it, but a good quality 1:1 gluten-free baking mix should work in place of the all-purpose flour.
- Dairy-Free? Use your favorite non-dairy milk (almond, oat, soy) and a melted plant-based butter alternative.
- Maple Glaze: Swap the milk in the glaze for a tablespoon or two of pure maple syrup for a delicious fall twist! Add milk if needed to reach desired consistency.
Tips for Success
Baking these is pretty straightforward, but here are a few pointers to make sure they turn out perfect every time:
- Don’t Overmix! I know I said it before, but it’s the most important tip. Overmixing develops the gluten in the flour and can lead to tough, dense fritters instead of light, tender ones.
- Chop Apples Evenly: Try to chop your apples into similar-sized pieces so they cook at the same rate within the fritter. About 1/4 to 1/2 inch is ideal.
- Proper Oven Temp: Make sure your oven is fully preheated. An oven thermometer can be helpful to ensure accuracy.
- Cooling is Key: Don’t glaze piping hot fritters right out of the oven – the glaze will just melt into a puddle. Giving them that 5 minutes to cool allows the glaze to sit beautifully on top.
- Uniform Scoops: Using a scoop helps the fritters bake evenly, as they are all roughly the same size.
How to Store It
If you happen to have any of these delicious treats leftover (a big IF!), here’s how to keep them fresh:
Store cooled fritters in an airtight container at room temperature for 1-2 days. The glaze might get a little sticky, but they’ll still be tasty.
For longer storage, you can keep them in the refrigerator for up to 3-4 days. Reheat gently in the microwave for a few seconds or in a toaster oven for a slightly crispy exterior.
You can also freeze baked, unglazed fritters. Let them cool completely, then wrap individually in plastic wrap and place in a freezer-safe bag or container for up to 2-3 months. Thaw at room temperature and glaze just before serving.
FAQs
Got questions? I’ve got answers!
Q: Can I fry these instead of baking?
A: This specific recipe was developed for baking and has a batter consistency best suited for that. For traditional fried apple fritters, you’ll need a different recipe designed for deep frying.
Q: What’s the best type of apple to use?
A: I love using a mix like Granny Smith and Honeycrisp or Gala. Granny Smiths offer a nice tartness that contrasts with the sweet batter and glaze, while sweeter apples become wonderfully tender. Avoid overly soft or mealy apples.
Q: Can I make the batter ahead of time?
A: It’s best to mix the batter and bake immediately, especially once the baking powder and liquids are combined. The leavening starts working right away. You can chop your apples ahead of time, though!
Q: My glaze is too thick/thin. How do I fix it?
A: If your glaze is too thick, whisk in extra milk (or water) a teaspoon at a time until it reaches your desired drizzling consistency. If it’s too thin, whisk in a tablespoon or two more powdered sugar until it thickens up.
I hope you try these Baked Apple Fritters and that they bring a little bit of cozy, apple-cinnamon joy into your home. Happy baking, friends!

Cozy Baked Apple Fritters
Ingredients
Equipment
Method
- Step 1: Get the Oven Ready. Preheat oven to 375°F (190°C). Line a sturdy baking sheet with parchment paper or lightly grease it.
- Step 2: Whisk the Dry Stuff. In a large mixing bowl, whisk together flour, granulated sugar, baking powder, salt, and cinnamon.
- Step 3: Mix the Wet Ingredients. In a separate bowl, whisk eggs. Stir in milk, vanilla extract, and melted butter until combined.
- Step 4: Combine Wet and Dry. Pour the wet ingredients into the dry ingredients. Gently stir with a spatula or wooden spoon just until no dry flour streaks remain. Do not overmix.
- Step 5: Fold in the Apples. Add chopped apples to the batter. Use the spatula to gently fold them in, ensuring they are evenly distributed.
- Step 6: Scoop onto the Sheet. Use a large spoon or ice cream scoop to drop portions of batter onto the prepared baking sheet, leaving about 2 inches between each.
- Step 7: Bake! Bake for 15 to 20 minutes, or until golden brown and a toothpick inserted into the center comes out clean.
- Step 8: Make the Glaze. While the fritters are baking, whisk together powdered sugar, 2 tablespoons milk, and 1/2 teaspoon vanilla extract in a small bowl until smooth. Adjust consistency with more milk or powdered sugar if needed.
- Step 9: Cool (a Little!). Remove fritters from oven and let them cool on the baking sheet for about 5 minutes.
- Step 10: Drizzle that Glaze! Generously drizzle or pipe the glaze over each warm fritter.
- Step 11: Let the Glaze Set & Enjoy! Allow the glaze to set for a few minutes before serving warm.
Notes
Tips for Success: Do not overmix the batter. Chop apples evenly (1/4 to 1/2 inch). Ensure oven is fully preheated. Cool fritters for 5 minutes before glazing. Use a scoop for uniform size.
Storage: Store cooled fritters in an airtight container at room temperature for 1-2 days or in the refrigerator for 3-4 days. Reheat gently. Freeze baked, unglazed fritters for up to 2-3 months, thaw, and glaze before serving.