Oh, friend, there are some smells that just instantly transport you, aren’t there? For me, it’s the aroma of warm apples mingling with cinnamon and sweet caramel. It reminds me of crisp autumn days, cozy kitchen gatherings, and the simple joy of a homemade treat. But let’s be real, sometimes those elaborate apple desserts take a little more time than we have in our busy lives.
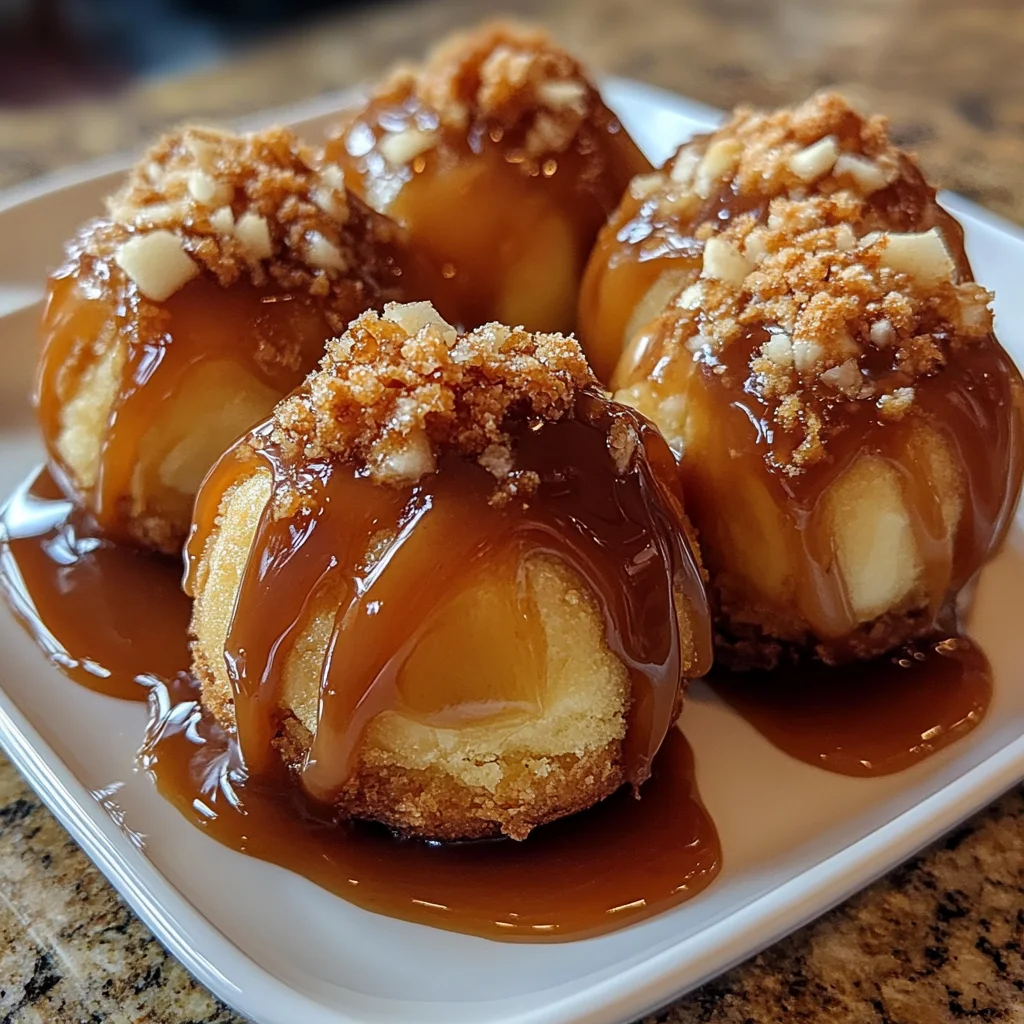
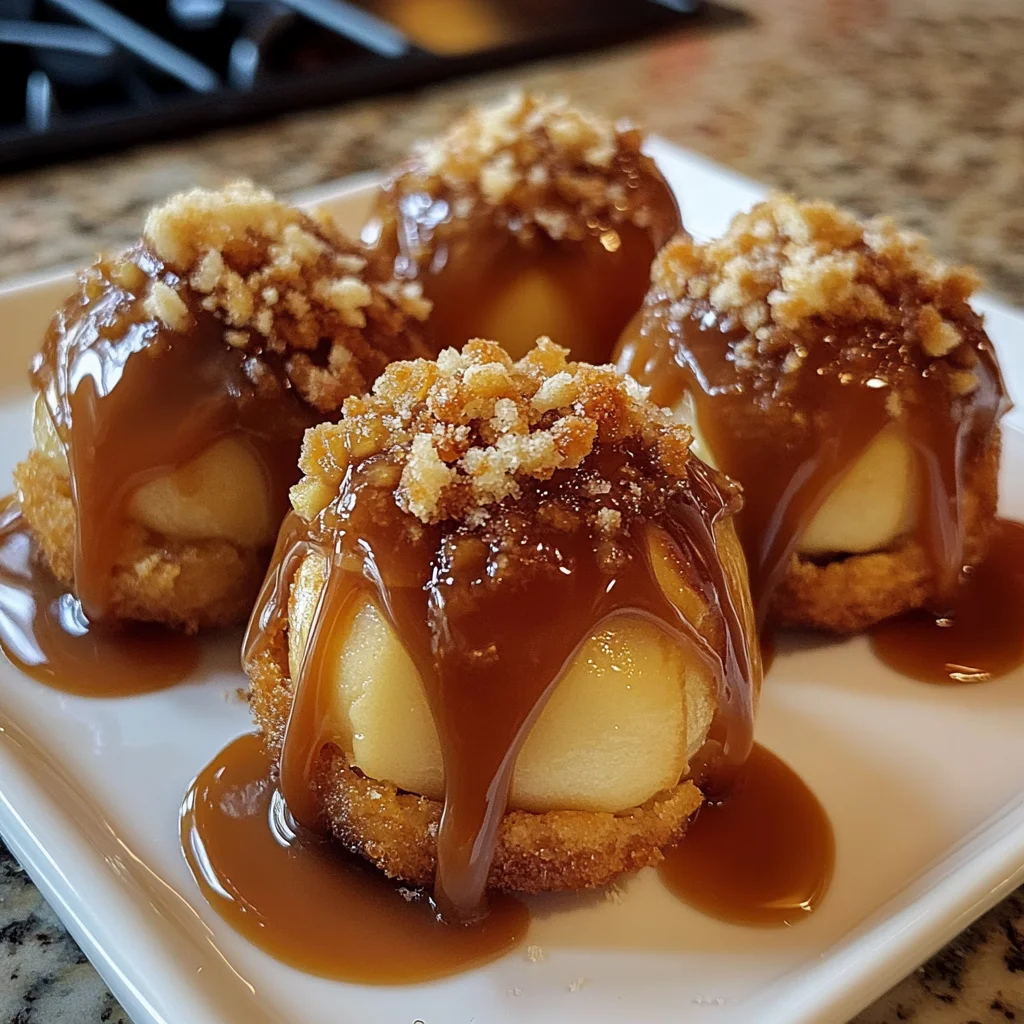
That’s where these incredible Apple Caramel Bombs swoop in to save the day! Imagine biting into a golden, tender biscuit that’s bursting with soft, spiced apples and a gooey, melted caramel center. Pure bliss, right? The best part? They are ridiculously easy, surprisingly quick, and unbelievably memorable. You’ll be amazed at how such a simple recipe can deliver so much happiness. Seriously, if you love the warm, spiced flavors of apple desserts, you might also adore our Baked Apple Fritters, which share that same cozy vibe. Get ready to fall in love!
Why You’ll Love Apple Caramel Bombs
- Fast: Seriously, these come together in a flash. Perfect for a spontaneous sweet craving!
- Easy: No fancy baking skills required. Just simple steps for delicious results.
- Giftable: Wrap a few up with a pretty ribbon and share the homemade love with friends and neighbors.
- Crowd-pleasing: Who can resist warm apples, cinnamon, and caramel? Absolutely no one!
Ingredients
Gather your simple treasures from the pantry and fridge. Here’s what you’ll need for these delightful bombs:
- 1 (16.3-oz) can refrigerated biscuit dough: This is your secret shortcut to a fluffy, golden exterior. Any brand will do!
- 8 caramel candies: These little nuggets are the gooey heart of our bombs. I like the soft, chewy kind!
- 1 tablespoon butter (for filling): Just a touch to get those apples perfectly tender.
- 2 tablespoons butter, melted (for brushing): This is what gives your bombs that beautiful golden glow and extra richness.
- 2 apples, finely chopped: Crisp and sweet apples are key! I usually go for something like Honeycrisp or Gala, but Granny Smiths add a nice tart contrast.
- 2 tablespoons brown sugar: Adds a deep, molasses-y sweetness that pairs wonderfully with apples.
- 1 teaspoon ground cinnamon: The classic spice that makes everything feel cozy and autumnal.
- Pinch of salt: Don’t skip this! It enhances all those sweet flavors and brings everything into balance.
- Caramel sauce (for topping): For that extra drizzle of pure decadence.
- Crushed peanuts (for topping): Adds a lovely crunch and a salty counterpoint. You can also use pecans or walnuts!
How to Make Apple Caramel Bombs
Let’s get cooking! You’re just a few easy steps away from warm, gooey perfection.
- First things first, you’ll want to preheat your oven to 350°F (175°C). While it’s warming up, lightly grease a medium baking dish with cooking spray. This helps prevent sticking and makes cleanup a breeze!
- Grab a medium skillet and pop it over medium-high heat. Melt that 1 tablespoon of butter in there until it’s glistening.
- Now, add your finely chopped apples, brown sugar, ground cinnamon, and that tiny pinch of salt to the skillet. Give it a good stir and cook, stirring occasionally, for about 5 minutes, or until the apples are tender and fragrant. They should be soft but still hold their shape a bit. Once done, remove them from the heat and set them aside to cool slightly. You don’t want to burn your fingers when assembling!
- Time to get creative! Separate the refrigerated biscuit dough. Gently stretch each biscuit dough disc a little, making it slightly larger and thinner. This gives you more surface area to work with for filling.
- Spoon about 1 tablespoon of your delicious, cooled apple filling onto the center of each dough disc. Then, nestle one caramel candy right on top of that filling. This little candy is going to melt into a luscious pool of caramel!
- Now for the “bomb” part! Gather the edges of the biscuit dough up and around the filling, bringing them together at the top. Pinch them firmly to seal, making sure there are no gaps for that precious caramel to escape.
- Once sealed, gently roll the dough ball in your hands to ensure a smooth, round shape. This makes them look extra pretty and helps them bake evenly.
- Arrange your perfectly formed dough balls in the prepared baking dish. They can be relatively close, but give them a little breathing room.
- Melt your remaining 2 tablespoons of butter, then brush the tops of the balls with it. This creates that gorgeous golden-brown crust you’re looking for.
- Pop the dish into your preheated oven and bake for 30 to 35 minutes, or until they’re beautifully golden brown and puffed up. Your kitchen is going to smell amazing!
- Carefully transfer the Apple Caramel Bombs to a serving platter. For the grand finale, drizzle them generously with caramel sauce and sprinkle with crushed peanuts before serving. Enjoy them warm!
Substitutions & Additions
This recipe is wonderfully adaptable! Feel free to get creative and make it your own:
- Different Fruits: Not an apple fan today? You could easily swap the apples for finely chopped peaches, pears, or even berries. If you’re feeling adventurous, you could even swap out the apples for other fruits, much like we do with our Easy Blueberry Pie Bombs.
- Spice It Up: Instead of just cinnamon, try a pinch of nutmeg, allspice, or even a tiny dash of ginger in your apple filling for a more complex flavor.
- Chocolate Lover’s Dream: Instead of caramel candies, try a square of milk or dark chocolate in the center. A chocolate-apple bomb? Yes, please!
- Nutty Crunch: Add a tablespoon of finely chopped walnuts or pecans to your apple filling for an extra layer of texture.
- Topping Variations: Beyond caramel and peanuts, consider a sprinkle of powdered sugar, a dollop of whipped cream, a scoop of vanilla ice cream, or even a drizzle of white chocolate.
Tips for Success
Even though these are super easy, a few little tricks can make them absolutely perfect every time!
- Don’t Overfill: While tempting, resist the urge to stuff too much apple filling or too many caramels into each biscuit. Too much filling makes it harder to seal and more likely to burst.
- Seal It Tight: This is crucial! Pinch the edges of the biscuit dough very firmly to ensure a good seal around the filling. This keeps all that delicious gooey caramel inside where it belongs.
- Cool the Filling: Make sure your apple filling has cooled down a bit before you add it to the biscuit dough. Hot filling can make the dough sticky and harder to work with, or even start cooking the dough prematurely.
- Serve Warm: These are truly at their best when served warm, when the caramel is perfectly melted and gooey.
- Prep Ahead: You can chop your apples and even cook the filling a day in advance. Store the cooled filling in an airtight container in the fridge. When you’re ready to bake, just assemble and go! For those who can’t get enough of that rich, buttery caramel flavor, you’ll definitely want to check out our Easy No-Bake Caramel Pretzel Bars next!
How to Store Apple Caramel Bombs
If you happen to have any leftovers (which is a big “if”!), here’s how to keep them fresh:
- Room Temperature: You can store these Apple Caramel Bombs in an airtight container at room temperature for up to 1-2 days.
- Refrigerator: For longer storage, keep them in an airtight container in the refrigerator for up to 3-4 days.
- Reheating: To enjoy that warm, gooey goodness again, simply pop them in the microwave for 15-30 seconds, or heat them in a preheated oven (around 300°F/150°C) for about 5-10 minutes until warmed through.
FAQs
Q: Can I use homemade biscuit dough?
A: Absolutely! If you have a favorite homemade biscuit recipe, feel free to use it. Just make sure the dough is rolled out to a similar thickness as the canned variety.
Q: What kind of apples are best for this recipe?
A: I prefer a slightly firmer apple that holds its shape when cooked, like Honeycrisp, Gala, Fuji, or even a slightly tart Granny Smith to balance the sweetness. A mix is also great!
Q: How do I prevent the caramel from oozing out during baking?
A: The key here is a really good seal! Make sure to pinch the dough edges together very firmly around the caramel and apple filling. Rolling the ball gently after sealing also helps to create a uniform, strong seam.
Q: Can I freeze these Apple Caramel Bombs?
A: Yes, you can! Once assembled and before baking, place them on a baking sheet and freeze until solid. Then transfer them to a freezer-safe bag or container for up to 1 month. When ready to bake, you might need to add a few extra minutes to the baking time.
For more delicious recipes and kitchen inspiration, be sure to follow us on Pinterest!

Warm & Gooey Apple Caramel Bombs
Ingredients
Equipment
Method
- Step 1: Preheat your oven to 350°F (175°C). Lightly grease a medium baking dish with cooking spray.
- Step 2: In a medium skillet, melt 1 tablespoon of butter over medium-high heat.
- Step 3: Add the finely chopped apples, brown sugar, ground cinnamon, and a pinch of salt to the skillet. Cook, stirring occasionally, for about 5 minutes, or until the apples are tender and fragrant. Remove from heat and set aside to cool slightly.
- Step 4: Separate the refrigerated biscuit dough discs. Gently stretch each disc to be slightly larger and thinner.
- Step 5: Spoon about 1 tablespoon of the cooled apple filling onto the center of each dough disc. Place one caramel candy directly on top of the apple filling.
- Step 6: Gather the edges of the biscuit dough up and around the filling, pinching them firmly together at the top to seal completely.
- Step 7: Gently roll the sealed dough ball in your hands to ensure a smooth, round shape.
- Step 8: Arrange the dough balls in the prepared baking dish, giving them a little breathing room.
- Step 9: Melt the remaining 2 tablespoons of butter and brush it over the tops of the dough balls.
- Step 10: Bake for 30 to 35 minutes, or until the bombs are beautifully golden brown and puffed up.
- Step 11: Carefully transfer the Apple Caramel Bombs to a serving platter. Drizzle generously with caramel sauce and sprinkle with crushed peanuts before serving warm.