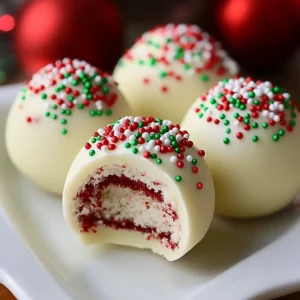
No-Bake Little Debbie Christmas Cake Balls
Transform iconic Little Debbie Christmas Tree Cakes into incredibly easy, quick, and addictive no-bake cake balls. This holiday miracle is perfect for impromptu gatherings, a delightful gift, or just a sweet escape for yourself.
Equipment
- Large mixing bowl
- Baking sheet
- Parchment paper
- Microwave or double boiler
- Fork or Dipping Tool
- Spoon or Piping Bag
Ingredients
- 2 boxes vanilla Little Debbie Christmas Tree Cakes 5-count each
- 8 oz cream cheese at room temperature
- 16 oz white candy melts
- 0.25 cup red candy melts melted, optional
- red and green colored sanding sugar
Instructions
- Step 1: Crumble the Cakes: Unwrap the Little Debbie Christmas Tree Cakes and crumble them into a large mixing bowl. Aim for nice, fine crumbs.
- Step 2: Add the Cream Cheese: Add the softened cream cheese to the bowl with the cake crumbs.
- Step 3: Mix 'til Smooth: Using your hands or a sturdy spoon, mix thoroughly until a smooth, uniform dough forms. It should be pliable and hold together when squeezed.
- Step 4: Roll into Balls: Pinch off small pieces of the dough, about 1-inch in diameter, and roll them gently between your palms to form neat balls. Arrange them onto a baking sheet lined with parchment paper.
- Step 5: Chill Out: Place the baking sheet into the refrigerator for at least 30 minutes. This helps the cake balls firm up for easier dipping.
- Step 6: Melt the White Candy: While the cake balls are chilling, melt the white candy melts according to the package instructions (typically microwave or double boiler). Stir frequently until smooth and dippable.
- Step 7: Dip Away! Once the cake balls are firm and the candy melts are smooth, use a fork or dipping tool to gently lower each cake ball into the melted white coating, ensuring it's fully covered. Tap off any excess and place the dipped ball back onto the parchment paper-lined baking sheet.
- Step 8: Optional Red Drizzle: If desired, melt the red candy melts according to package instructions. Use a spoon or a small piping bag (or a Ziploc bag with a tiny corner snipped off) to artfully drizzle the red candy over the still-wet white coating.
- Step 9: Sprinkle with Sparkle: Immediately after dipping and drizzling, sprinkle red and green sanding sugar over the cake balls while the coating is still wet so the sprinkles adhere beautifully.
- Step 10: Let Them Set: Allow the candy coating to set completely. You can place the baking sheet back in the refrigerator for about 15-20 minutes to speed this up, or leave them at room temperature until firm. Once set, they're ready to enjoy!
Notes
The beauty of a simple recipe like this is how easy it is to customize! Get creative and make these cake balls truly your own.
Substitutions & Additions:
- Different Little Debbie Cakes: Try this with Little Debbie Fudge Rounds, Zebra Cakes, or even seasonal Pumpkin Delights.
- Chocolate Lovers' Dream: Swap the white candy melts for milk or dark chocolate candy melts for a richer flavor.
- Extracts: Add a tiny drop of peppermint or almond extract (start with ¼ teaspoon!) in the cream cheese mixture or the white candy melts for a holiday twist.
- Mini Chocolate Chips: Fold some mini chocolate chips into the cake ball mixture before rolling.
- Nutty Crunch: Roll the freshly dipped balls in finely chopped pecans or walnuts for extra texture.
- More Sprinkles: Use nonpareils, edible glitter, or tiny snowflake sprinkles for extra pizzazz, or even finely crushed peppermints/candy canes.
Tips for Success:
- Room Temperature Cream Cheese is Key: Ensure your cream cheese is softened; cold cream cheese will leave lumps. Take it out of the fridge about an hour before starting.
- Don't Overmix: Once the dough comes together, stop mixing to prevent tough cake balls.
- Chill Thoroughly: The 30-minute chill time is crucial for the balls to hold their shape and dip smoothly.
- Melting Candy Melts: Go low and slow when melting to avoid seizing. If they get too thick, add a tiny bit of coconut oil or vegetable shortening (¼-½ teaspoon at a time) to thin them out.
- Work Quickly: Move relatively quickly when dipping, especially in a warm kitchen, as the coating will start to set. Gently reheat if it thickens.
- Use a Toothpick or Skewer: Insert a toothpick into each cake ball before dipping for easier handling.
How to Store Little Debbie Christmas Cake Balls:
- At Room Temperature: In an airtight container for up to 2-3 days in a cool kitchen.
- In the Refrigerator: In an airtight container for up to 1 week.
- Freezing: Arrange set cake balls in a single layer on a baking sheet and freeze until solid. Transfer to a freezer-safe bag or airtight container for up to 1-2 months. Thaw in the refrigerator before serving.